Create and manage a private offer
Easily create private offers from Salesforce opportunities using the Fours App within your Salesforce Console, then manage them — extend, cancel, notify contacts, download the EULA, or export the terms as a PDF — without leaving Salesforce.
Overview
A private offer is a custom deal you send to a specific buyer through a cloud marketplace — AWS, Azure, or GCP. It includes your negotiated pricing, contract terms, and expiration date. Think of it as sending a quote: once the buyer accepts it, the contract is live and billing starts automatically through the marketplace.
After adding the Fours App to your Salesforce Console, you can create these private offers directly from opportunities — no need to switch to the Fours Console. You can also create Agreement-Based Offers (ABO) from Salesforce. Once an offer has been created, you can manage it from the same Fours Widget on the opportunity — extend the expiry date, cancel it, notify contacts, download the EULA file, and export its terms as a PDF.
Prerequisites
- The Fours App must be installed, connected, and set up with the Fours widget on your opportunity pages.
- You need the Fours User, Fours User - Marketplace, or a cloud-specific marketplace permission set assigned to your Salesforce account. If you can’t see the New Offer button on an opportunity, your permission set is likely missing or incorrect — see Permission Sets.
- The product you want to create an offer for must already exist in Fours. If it doesn’t, create it in the Fours Console first before continuing.
Create a private offer
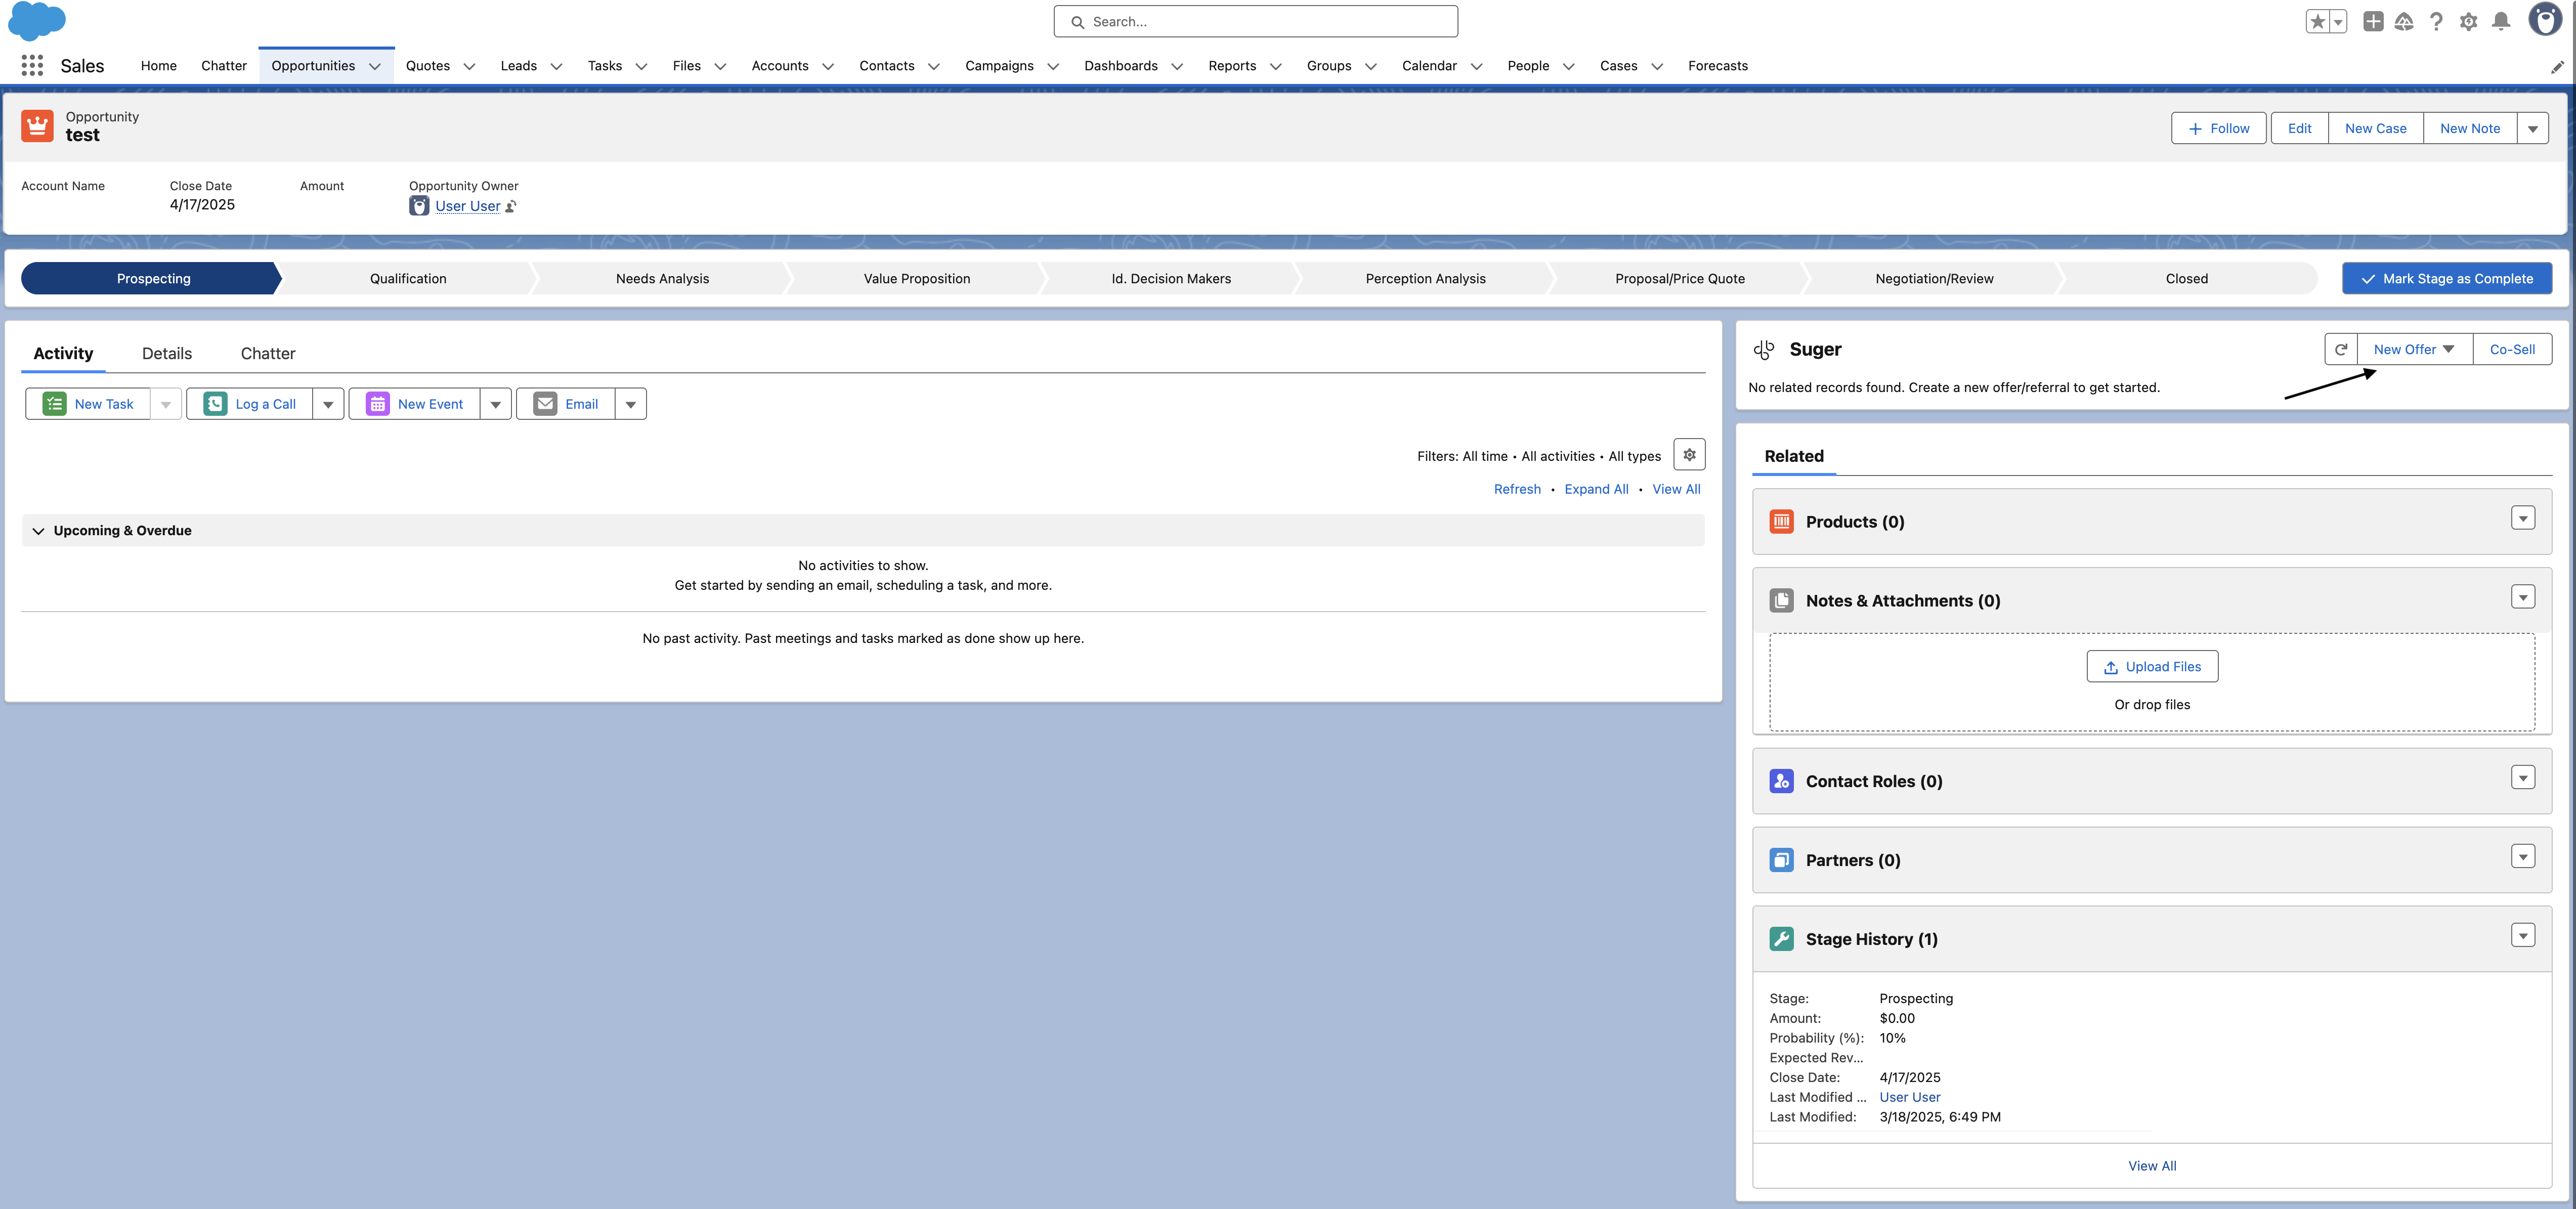
- Navigate to the opportunity’s detail page and click the New Offer dropdown button at the top of the Fours App. If you don’t see the widget, it may not be added to your page layout yet — see Add Fours widgets and buttons to Salesforce pages.
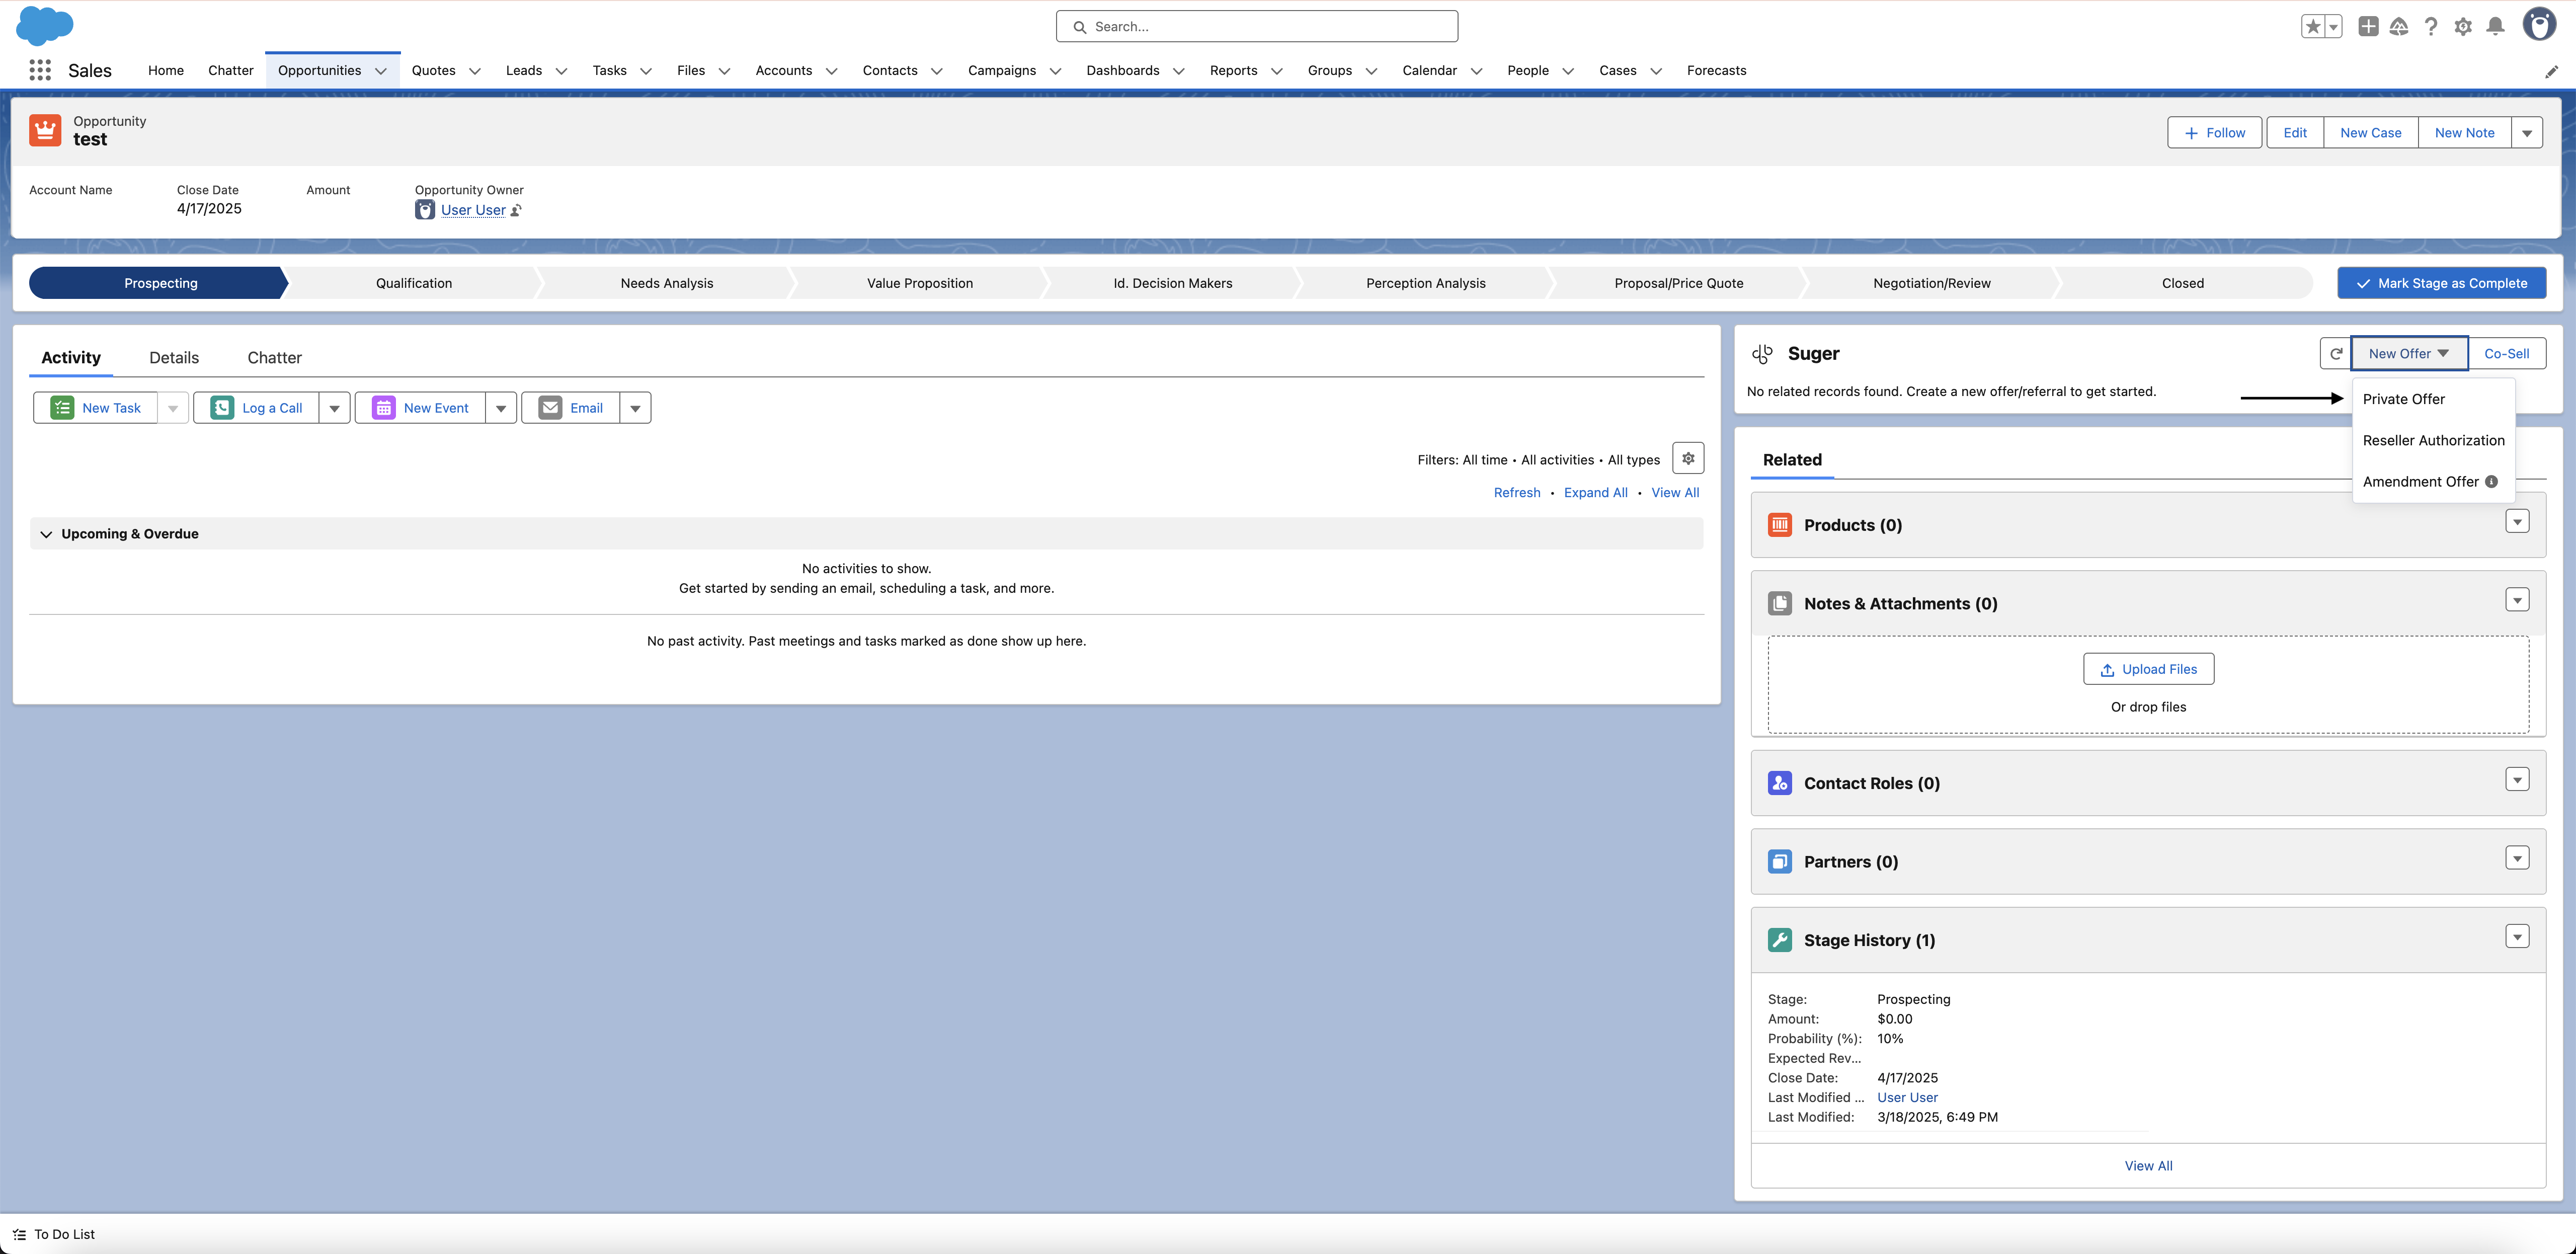
- Locate and click the “Private Offer” button.
-
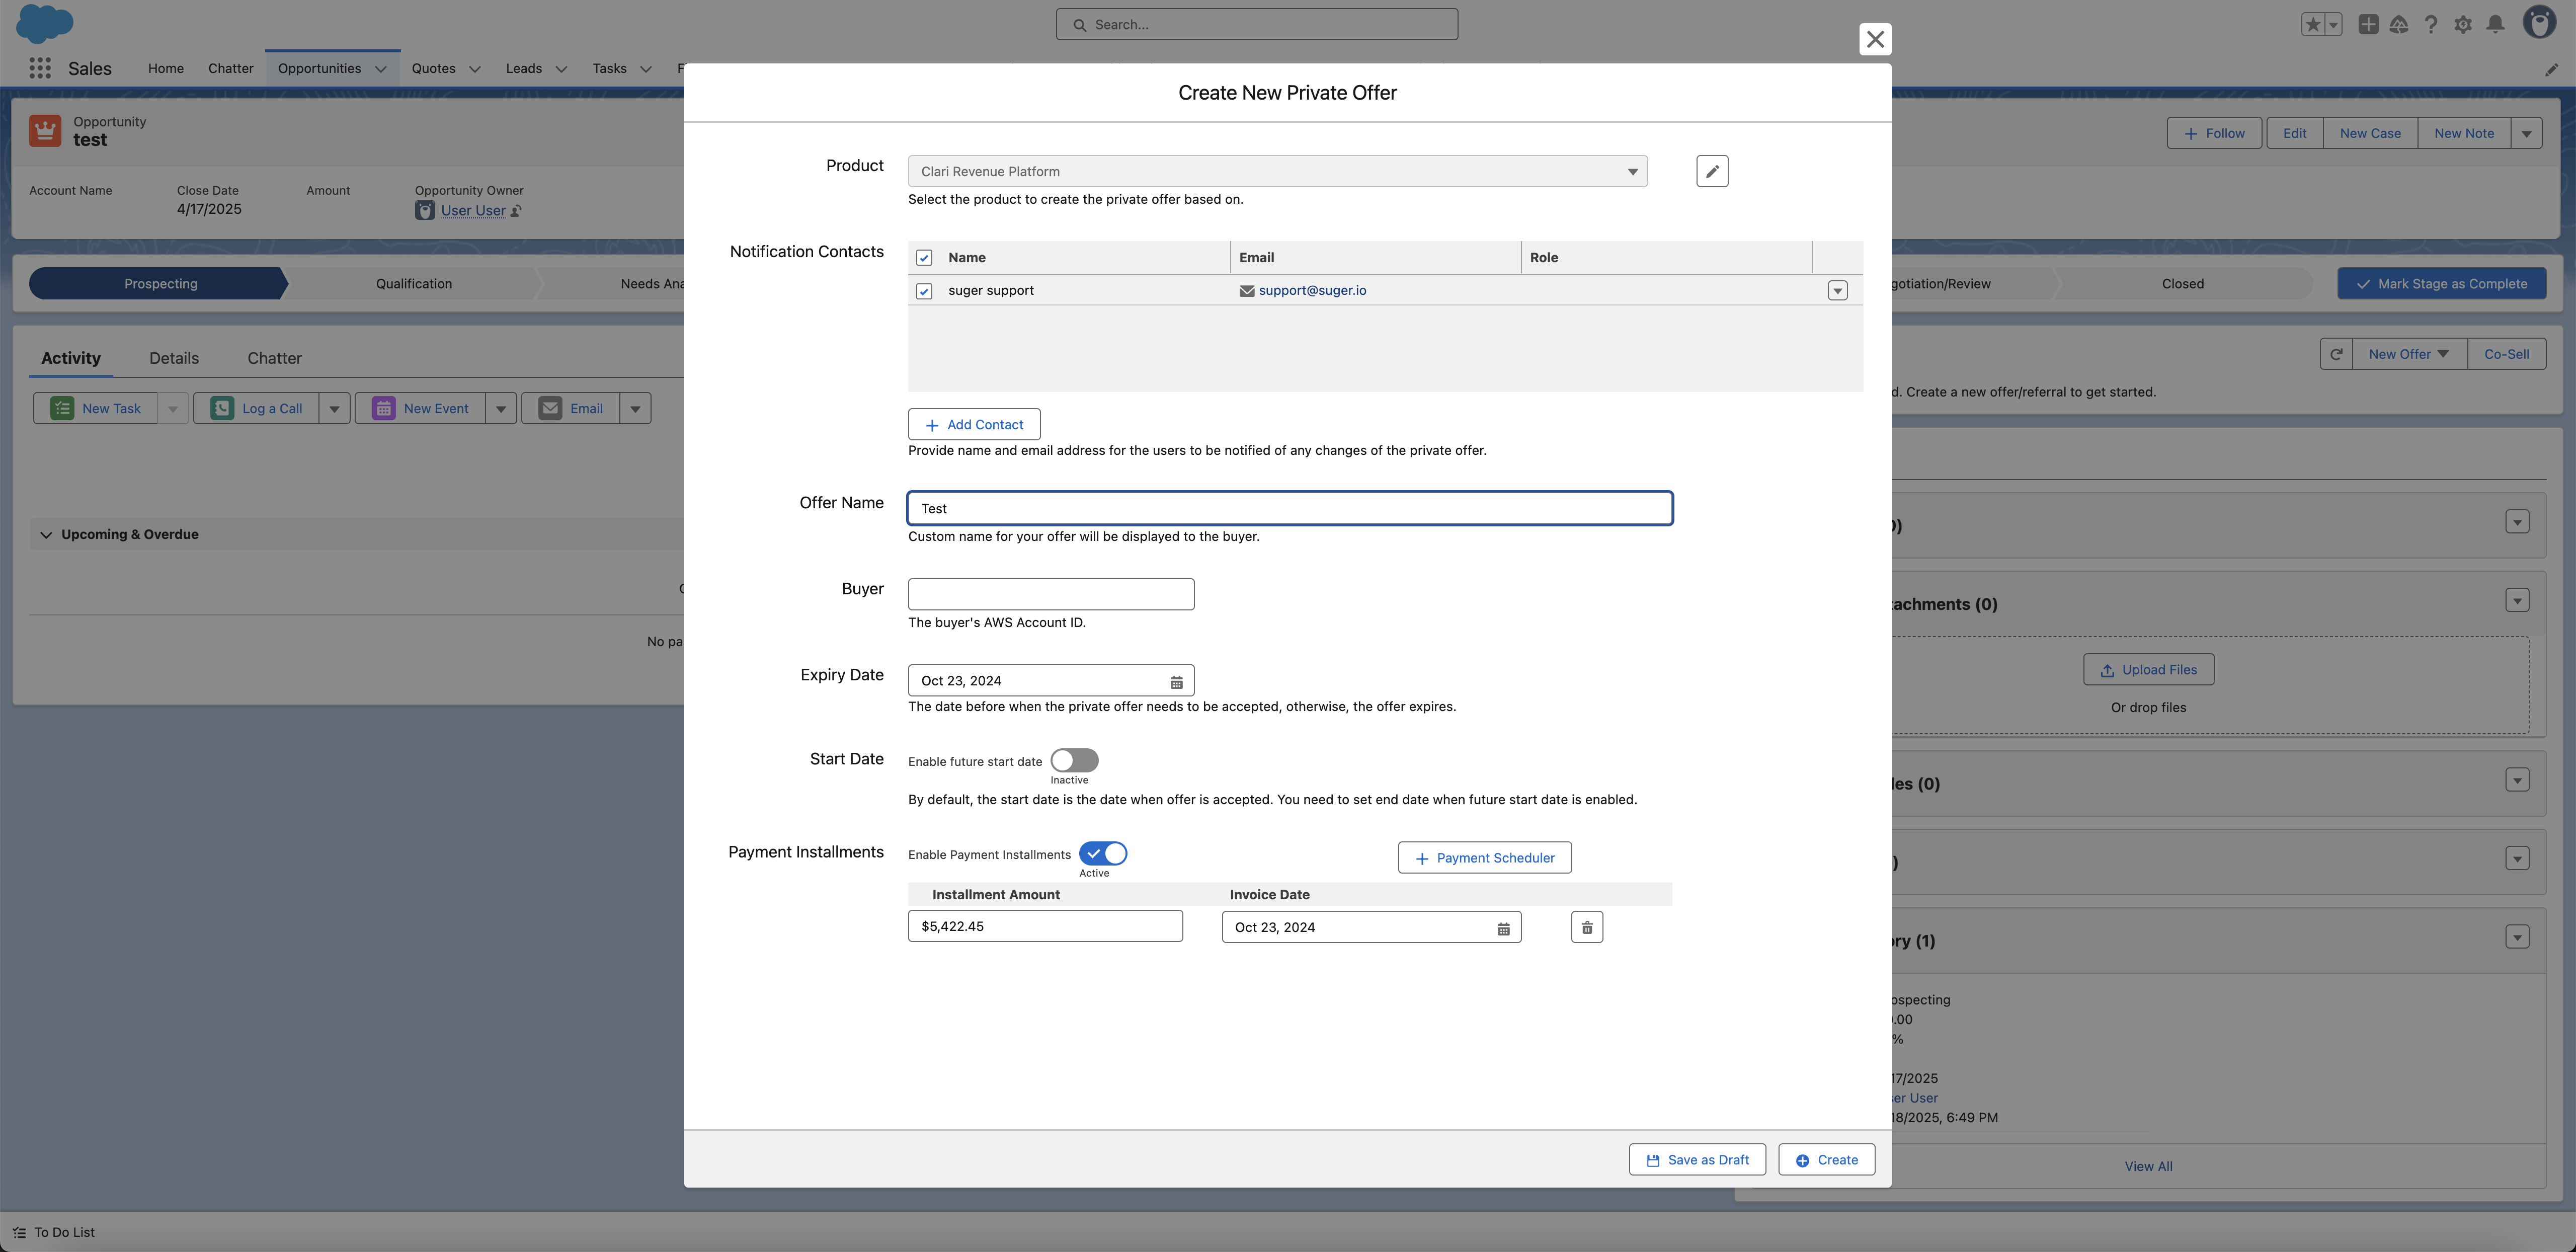
Choose the product on which the private offer will be based and complete the required fields in the form. Note that the required fields may vary depending on the cloud marketplace and the type of offer.
- The product list shows only the products available in your Fours account.
- If you are assigned a cloud-specific permission set (for example, Fours Marketplace - AWS), you will only see products for that cloud.
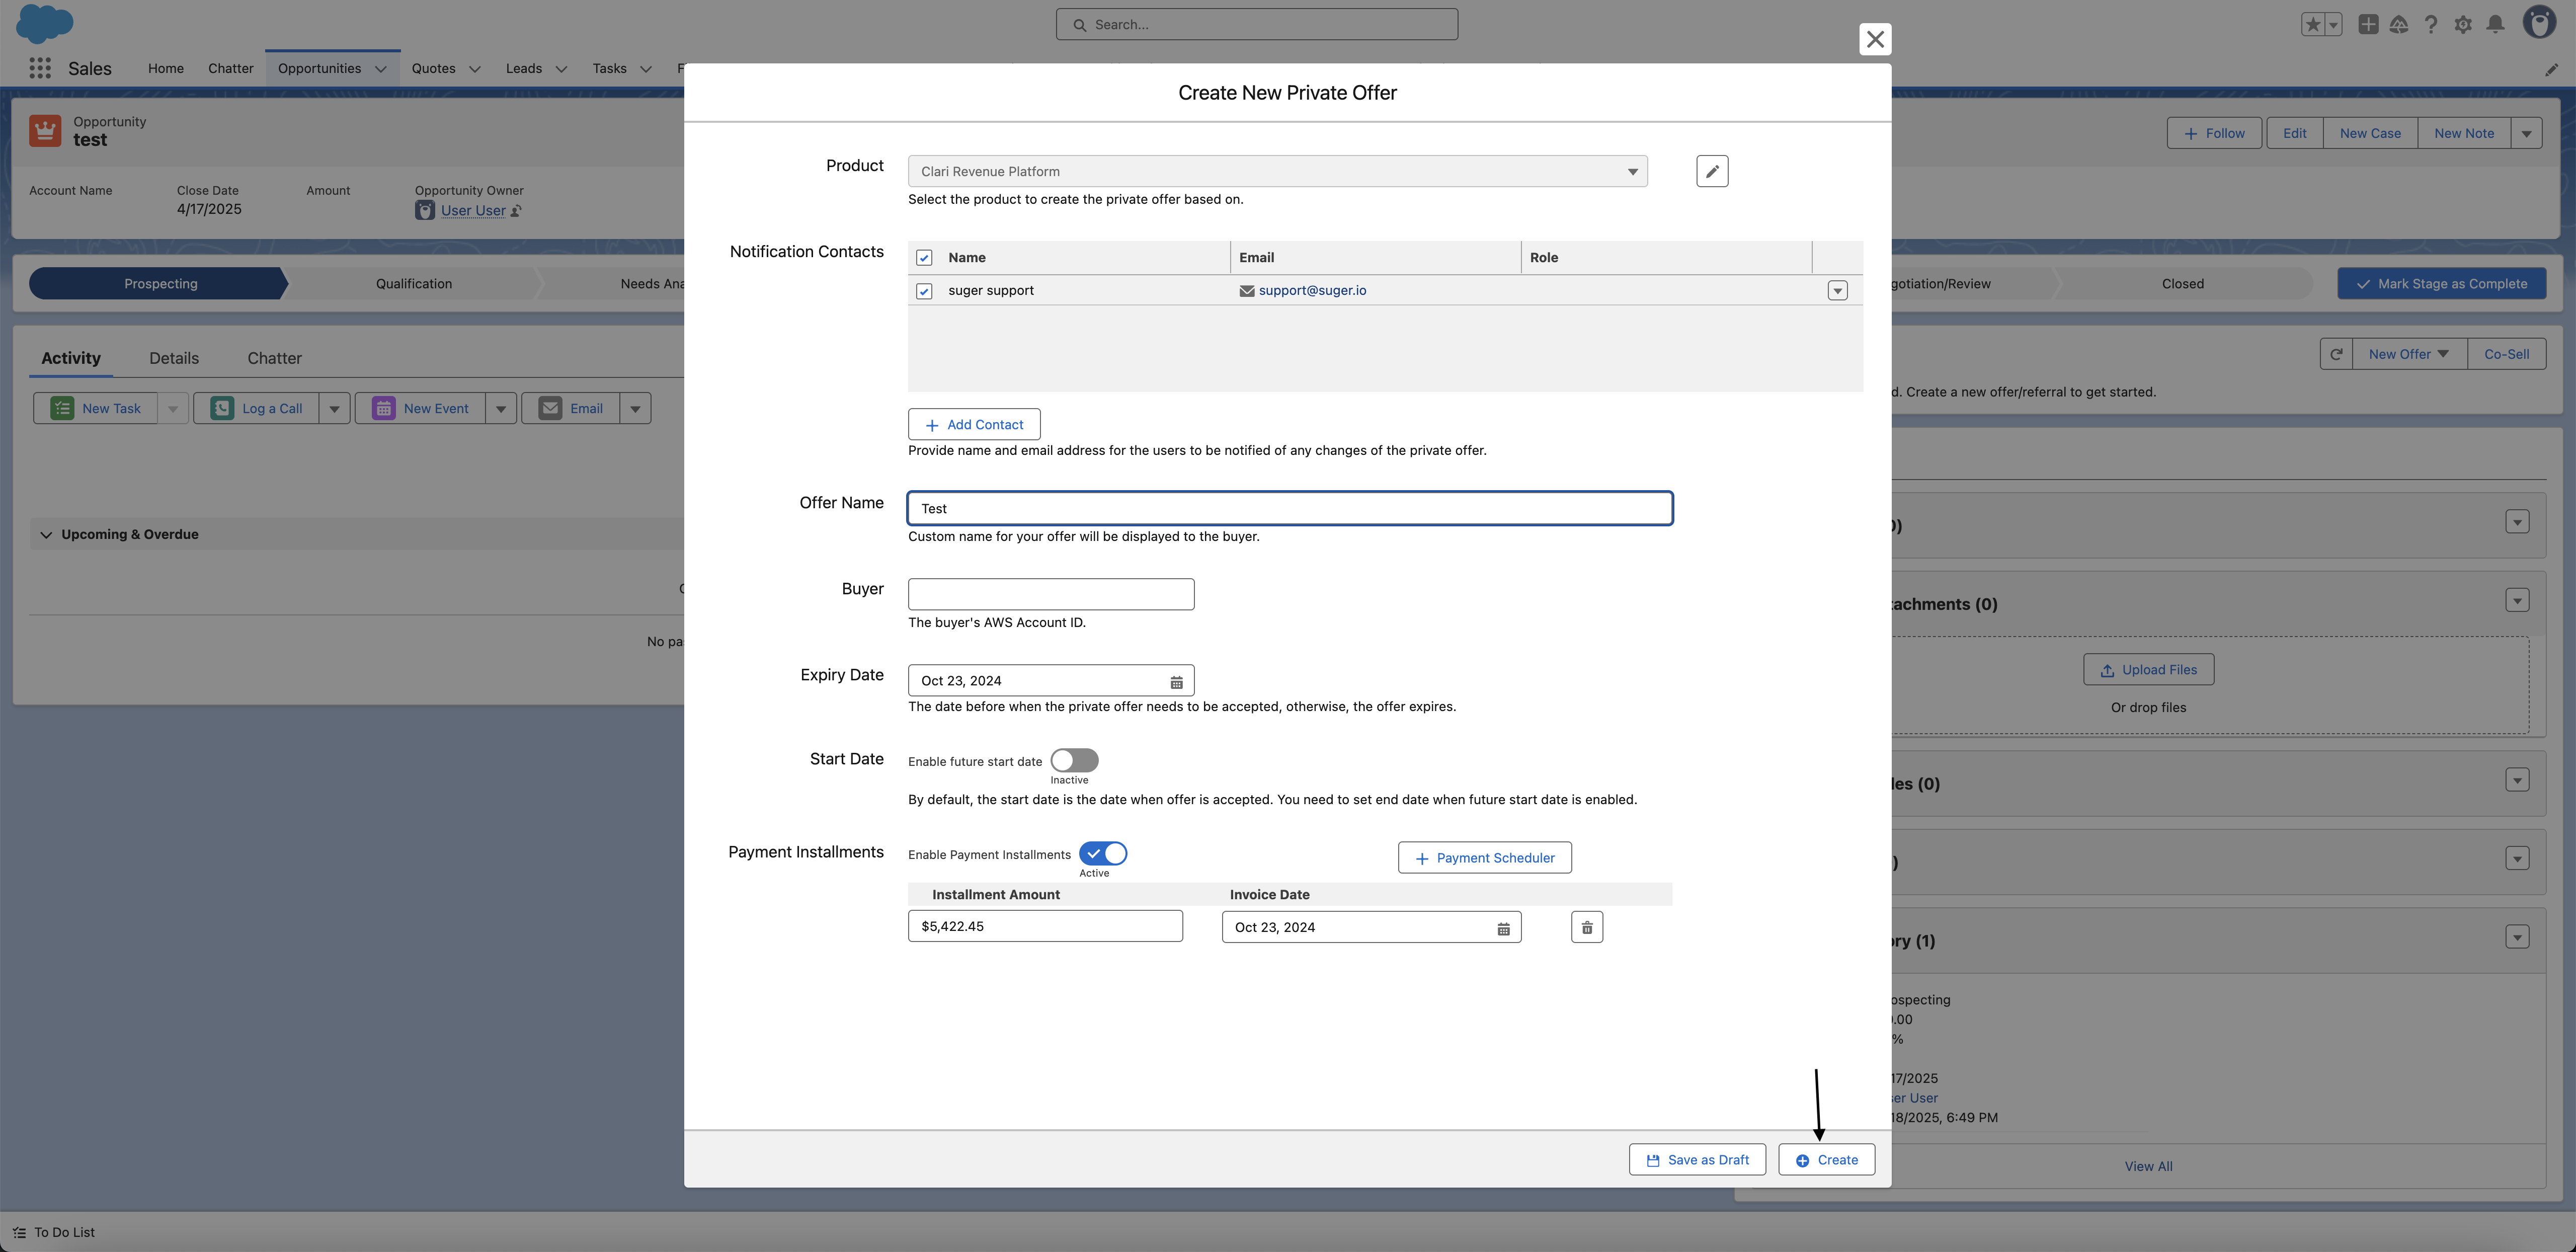
- Once all necessary information is filled in, submit the form to create the offer.
- You are all set!
AWS offer sets
An AWS offer set bundles several private offers that share the same buyer, expiry date, and customer note. New Offer → Offer Set appears in the widget once your admin turns on Enable Offer Set in Opportunity Layout in the settings of the Fours tab.
- Click New Offer → Offer Set. The Create Offer Set dialog opens.
- Fill in the shared details: Offer Set Name, Customer Note, Buyer (AWS Account ID), and Expiry Date. You can also link an Opportunity and enter a Solution Association (optional).
- Under Private Offers — Add 2-10 private offers to create an offer set — click Create Private Offer for each offer. The private offer form opens with the set’s buyer and expiry date already filled in, so enter both before you add an offer.
- Click Create Offer Set.
A set holds 2 to 10 offers. Once it has ten, Create Private Offer is disabled with the tooltip Maximum of 10 offers reached. With fewer than two, Create Offer Set is disabled with the tooltip Please add at least 2 offers.
If the product’s pricing could not be loaded
The AWS, AWS Container, and GCP create forms show a red banner at the top when Fours could not load the selected product’s specification. Submitting is refused with:
Cannot create this offer: the product info could not be loaded. {detail}
A related message appears when the product loaded but has no pricing plans to choose from:
Please select a pricing plan. If the dropdown is empty, this product’s pricing could not be loaded.
Both mean the same thing in practice: pick a different product, or fix the product’s pricing in the Fours Console, then reopen the form. There is no field on the form to correct.
GCP prepay: what happens to unused commitment
A GCP prepay offer’s create form carries an Unused commitment rule selector above the installment schedule, with three choices:
| Rule | What it does |
|---|---|
| Rollover | An installment’s unused balance carries into the next installment. |
| Expire | The unused balance is discarded at the end of the installment — the carried-over commitment and any partner-sponsored free credit. |
| Custom | Set the behaviour installment by installment. |
Once the offer exists, the installment table on the offer detail page shows the resulting rule as a read-only Unused Commitment column, worded exactly as the GCP producer portal words it, so the two can be compared side by side:
- Rollover to next commitment
- Expire all unused balance
- Expire all at offer end date — the final installment, where the term ends and nothing can roll further.
GCP usage pricing models
When the plan you select is a GCP usage plan, the form asks for a Usage Pricing Model. Each choice shows, beneath it, the hint GCP’s Producer Portal gives for it:
| Usage Pricing Model | Hint shown beneath it |
|---|---|
| Commitment discount with additional usage at list price | The customer promises to pay a discounted amount. All usage, including overages, is list price. |
| Commitment with all usage discounted | The customer promises to pay an amount. All usage, including overages, is discounted. |
| Usage-based discount only | The customer pays a discounted amount for what they use |
On a replacement offer the model is filled in from the offer being replaced — prepay offers and offers created in GCP’s Producer Portal included. Keep it: GCP refuses a replacement offer that changes the usage pricing model.
The one exception is a replacement opened from a Salesforce record whose private offer field mapping sets a model. If the mapped value is one of CUD_LIST_PRICE, CUD_ALL_USAGE_DISCOUNTED or USAGE_DISCOUNT_ONLY and differs from the replaced offer’s, the form opens with the mapped model instead — a label such as Usage-based discount only is ignored. A mapped model also resets Payment Recurrence to match, and Commitment discount with additional usage at list price clears the discounts carried over from the replaced offer, since that model prices usage at list price. Because GCP refuses a changed model, check a mapped model against the replaced offer before you submit.
Metric discounts (GCP)
On a GCP postpay offer, Metric discounts below the discount field opens the per-metric discounts; a prepay offer, and a prepay replacement offer, has the same control on each installment. Turning it off erases them and keeps only the overall discount, so turning it back on starts again from the overall discount; on a replacement, an installment that has already been charged keeps its discounts. It starts expanded only when the offer already carries a per-metric discount above 0. The rules GCP’s per-metric discounts follow are in Metric Discounts Display.
Proration (GCP, monthly billing)
A GCP private offer — on the plain private offer form or the GCP Professional Services form — whose Payment Recurrence is Monthly has a Proration switch in its pricing section:
| Setting | What GCP does |
|---|---|
| Off (the default) | Installments follow the offer’s anniversary date. |
| On | GCP prorates the first installment against the start date, so billing lines up with calendar months. |
The switch appears only for Monthly recurrence, and never when the usage pricing model is Usage-based discount only, which has no commitment installment to prorate.
Auto Renew (GCP)
On the GCP private offer, GCP Professional Services, and replacement forms, the pricing section has an Auto Renew switch. Turned On, it lets the customer decide whether the contract’s pricing and terms auto-renew, and a required Number of renewals field appears beside it, starting at 1 — the number of times the customer can renew on the current term, unless an amendment is accepted. Turning the switch Off removes the count.
- The count is a whole number of at least 1.
- GCP caps an offer’s first term plus every renewal at 84 months, so the most renewals allowed are (84 − term) ÷ term, rounded down, with the term in months. The Offer Duration is entered in the Payment Recurrence’s own unit, so a duration of 4 on a Quarterly offer is a 12-month term. A 12-month term allows 6 renewals and a 24-month term allows 2. A term longer than 42 months cannot auto-renew.
- An offer on a Custom installment schedule never renews, so it has no count.
- A clone or a replacement starts with the original offer’s count, and an auto-renew offer saved before the count existed shows 1.
The form shows the problem under the field, and refuses to create the offer until it is fixed:
| Message | What it means |
|---|---|
| Please enter the number of renewals. | The field is empty. |
| The number of renewals must be a whole number of at least 1. | The value is zero, negative, or a fraction. |
| A {n}-month offer can’t auto-renew. Shorten the duration to 42 months or less, or turn off auto-renew. | The term is longer than 42 months. |
| Maximum number of renewals allowed based on the offer duration is {max}. | The count is more than the term allows. |
AWS net payment terms
For an AWS private offer, choose Customer’s net terms with AWS to leave the custom term empty, or choose Net 15, 30, 45, 60, 90, or 120 after agreeing the term with the buyer. The buyer does not choose this value in Fours. Agreement-Based Offers are treated as new offers, so this selection starts empty.
For a CPPO resale authorization, the ISV selects the maximum buyer net payment term. For the downstream CPPO, the channel partner can inherit that maximum or select a shorter term, but cannot select a longer one. If the authorization has no maximum, a custom downstream term is unavailable. Cloning any supported AWS offer or authorization copies its current value into the new-offer form. Released values are read-only.
Offer purpose (AWS Agreement-Based Offer)
An AWS Agreement-Based Offer — the form New Offer → Amendment Offer opens for an AWS entitlement — asks for an Offer purpose directly under Offer Name: Choose whether this offer renews a pre-existing entitlement with this customer for the same product.
| Choice | What it means |
|---|---|
| Renewal of a pre-existing entitlement | This offer renews an existing entitlement with this customer for the same product. Fours declares the offer to AWS as a renewal of an existing agreement. |
| Not a renewal (preselected) | This offer does not renew a pre-existing entitlement with this customer for the same product. Nothing is declared to AWS. |
A new offer starts on Not a renewal, and a saved draft reopens on the choice it was saved with. Your private offer field mapping can preselect the renewal: when it sets metaInfo.isRenewalOffer to true, the form opens on Renewal of a pre-existing entitlement. Map the Renewal Offer Type field (see AWS private offer required fields) to AwsMarketplace alongside it — the same pair the form stores when you choose the renewal yourself.
Configure renewal terms (AWS)
AWS contract offers can carry pre-authorized renewal terms, so the agreement renews on terms the buyer already agreed to instead of requiring a new offer each cycle. When the offer qualifies, a Configure renewal terms section appears on the AWS offer form.
Whether the section appears depends on the product’s commits. It is not a setting you can turn on, and usage dimensions on the same product do not hide it:
| Offer form | The section appears when |
|---|---|
| AWS SaaS | The product carries at least one commit. |
| AWS Container | The product carries at least one commit, and the offer is priced with commits — not usage-only, and not free. |
| AWS AMI | Never. An AMI offer cannot carry renewal terms, so the section is not shown whatever the product’s pricing. |
| AWS Professional Services | The product carries at least one commit. |
If the offer stops qualifying after you set renewal terms — for example, you switch to a product with no commits — the terms are removed from the offer automatically, so they are never sent to AWS on an offer that cannot carry them.
Pick one of three renewal options:
| Option | What it does |
|---|---|
| No price uplift | Renew at the same price each cycle. |
| Price uplift | Increase pricing by a fixed percentage, or within a pre-negotiated range, each cycle. |
| No renewal | Do not include auto-renewal terms with this offer. |
Choosing Price uplift reveals a Price uplift type:
| Uplift type | Fields |
|---|---|
| Fixed percentage | Price increase percentage — 0 to 100, in steps of 0.01. |
| Percentage range | Minimum uplift percentage, Maximum uplift percentage, and Default uplift percentage, each 0 to 100 in steps of 0.01, plus an Adjustment deadline — the number of days before agreement expiration by which you must settle the uplift. The final figure inside the range is chosen later, per renewal. |
Selecting No price uplift or Price uplift opens that option’s card, and both carry the same three settings:
| Setting | What it does |
|---|---|
| Renewal decision deadline (optional) | The number of days before the agreement expires after which neither party can opt out of the renewal. Leave it blank to use the agreement expiration date itself. The deadline must fall inside the contract term; if it does not, the form names the date it lands on and the term it misses, for example Renewal decision deadline (800 days) falls on 2025-07-23, which is not inside the contract term (2026-10-01 → 2027-10-01). A percentage range’s Adjustment deadline is checked the same way. |
| Renewal count | Definite renews a set Number of renewals; Indefinite keeps renewing. |
| Renewal payment schedule | Optional. Turn on Enable renewal payment schedule to invoice each renewal cycle in installments — up to 86, totaling 100%. |
The schedule starts from your offer’s own installments. When you turn the schedule on, each of the offer’s Payment Installments becomes a row carrying its share of the total; installments on the same date merge into one row. The offer’s start date begins month 0, and each month runs from that day of the month: with an October 15 start, a November 1 installment is still in month 0, so twelve monthly installments from November 1 run months 0 to 11. When the offer has no start date, or an installment falls before it, the earliest installment is month 0 and later rows count calendar months from it. Rows are counted in months, each keeping its own day of the month (except the agreement’s last month — see below), unless two installments fall in the same month — then the whole schedule is counted in exact days. The rows follow the offer’s installments until you edit them; after that they are yours. An offer with no installments starts with a single 100% row.
To lay out a schedule yourself, click Renewal Payment Scheduler: choose a Payment frequency (Monthly, Quarterly, Semi-annually, Annually, or Custom), a Due date calculation (By month or By exact days), the Number of installments, and optionally a Day of month, check the Plan preview, and click Create. New payment installment adds a single row.
Each row has its offset — the column reads Months after agreement start or Days after agreement start — an optional Day of month, and a Percentage of TCV, and the footer shows how much is Allocated and Remaining. When the offer has priced payment installments, the schedule also states the Original contract total and Contract duration, and each row shows an Estimated first renewal cycle payment amount — its share of the contract total after one cycle of uplift. The footer then adds that first cycle’s total beside Allocated and Remaining, for example Estimated renewal total: USD 10,500.00.
The last month bills on the renewal start day. AWS does not accept a custom billing day on the installment in the agreement’s final month. When the contract term is set in months or years, that row’s Day of month is locked: it reads Start day, and its help icon explains AWS bills the last installment on the same day of the month the renewal starts. A custom day isn’t allowed for the last month. A day on that row is dropped however it got there — seeded from your installments, laid out by the scheduler, or typed in. The scheduler’s Day of month (optional) field carries the help text Optional. The last month always bills on the renewal start day., and the Plan preview labels that row, for example Month 11 of the agreement, renewal start day. A row counted in months can’t fall after that month: the form flags such a row directly under it, for example Month 12 is after the last month of this 12-month contract. Use month 11 or earlier., and won’t submit until you fix it — clicking Create shows the same text in an Invalid offer message. When the offer has an explicit end date, or a term in days or weeks, every row keeps its own editable billing day.
Once the offer exists, the terms read back as a Renewal terms card on the offer detail page. Managing a renewal after the buyer accepts — adjusting the uplift inside an agreed range, or opting out — happens on the entitlement, not here; see pre-authorized auto-renewal. In Salesforce, an AWS entitlement that carries renewal terms shows a Renewal section on its detail view: Renewal details lists the terms and the renewal payment schedule, and Renewal history lists the agreements in its renewal chain, with the current one marked Current.
Auto-Activation (Azure)
Azure SaaS offers can carry an Auto-Activation toggle — Automatically activate the subscription on purchase:
- On — Azure activates the SaaS subscription automatically once the customer purchases the private offer.
- Off — your team activates the subscription. Fours does not activate it for you on these integrations, because the integration manages subscription activation itself.
The toggle appears only when both are true: the Azure integration is set to self-managed subscription activation, and the offer uses V2 pricing (newCustomizedPlans). V1 offers cannot carry the setting at all, so it is hidden rather than shown disabled.
Notification contacts on an Azure offer
On an Azure private offer, the people you select in the form’s Notification Contacts section are saved as the offer’s Fours contacts — the same list the Notification Contacts card shows once the offer exists (see Notify contacts). They are no longer sent to Microsoft as the Azure offer’s own notification contacts; Fours emails them only through the Offer Notification Contacts rule in your email notification settings.
Start and end dates (Azure)
On the Azure private offer, Azure Application, Virtual Machine, and upgrade offer forms, the Start Date and End Date are picked as a month and a year rather than a day:
- Start Date — choose Accepted Date - when private offer is accepted by customer, or Specific Month - the first day of the month selected below and then pick a month and a year. A line beneath reads, for example, Offer starts 2027-02-01 00:00:00 UTC — always the first day of the selected month.
- End Date — The private offer will be available through the last day of the selected month. Pick a month and a year; the line beneath reads, for example, Offer ends 2027-12-31 23:59:59 UTC — always the last day of the selected month.
The year list runs from this year to five years ahead. A month you can’t use is disabled: a start month must begin after the offer’s Expiry Date and after today, and an end month must end after the expiry date and after a specific start month. On the upgrade offer form, a start month must also begin after the original offer ends. A month left empty, or one outside those bounds, is flagged under the field with Complete this field. or Must be after {date}., and the form also refuses to submit with The expiry date must be earlier than the end date., The start month must begin after the expiry date., or The start date must be earlier than the end date.
Month boundaries are Microsoft’s rule: its private offer FAQ says a private offer set to a specific month starts on the first day of the month and ends on the last day, in UTC, and that specific start and end dates can’t be selected. A multiparty private offer picks its dates the same way — see Create Reseller Authorization.
Billing frequency on a multi-market plan (Azure)
Flexible schedule is never offered under Billing Frequency when your base plan is a multi-market plan, one whose recurring price is set per market, because Fours’ flexible schedules carry USD installments only. Pick another billing frequency for such a plan. The same holds on the upgrade offer form and on a multiparty private offer.
Attach your own EULA files
When the offer uses your own EULA, the form’s EULA section lists every PDF you attach, and Fours merges them into one document in the order shown. Use the arrows beside each file — Move up in merge order and Move down in merge order — to change its position before you submit.
- If you also tick Attach Standard Contract for … Marketplace, or the checkbox that attaches your public offer’s default EULA, that document is appended last, after your own files.
- On the AWS SaaS form, changing the EULA Type clears the files you attached and unticks both of those checkboxes. The checkbox for your public offer’s default EULA is shown whenever the offer already has it ticked — from a saved draft or your field mapping — so you can always see it and untick it.
- On an Agreement-Based Offer that uses Append to Existing EULA, the base agreement’s existing EULA stays first, and the files you upload follow it in the order shown.
- The AWS Reseller and AWS Professional Services forms have no standard contract to attach, so their files merge in the order shown.
Choose PDFs from a related record
Besides uploading a file, the EULA section can pull PDFs that are already in Salesforce: Select from Opportunity Attachments, and Select from Quote Attachments when the offer is tied to a Quote. It adds at most one more button, for the record you started the offer from:
- When your admin has set a lookup for that record’s object — a record your starting record looks up to, such as an Agreement a Quote points at — the button reads Select from {lookup field} files and lists the Salesforce Files attached to that related record.
- Otherwise — no lookup set, or one set for a different object — the button reads Select from {object} files, for example Select from Agreement files, and lists the files on the record you started from.
Each record’s files are offered once: when the extra button would open the same Opportunity or Quote as Select from Opportunity Attachments or Select from Quote Attachments, it is left out. An offer started from an Opportunity therefore shows no extra button unless your admin’s lookup leads to a different record.
- When the lookup on your record is empty, or points at a record you cannot see, the button is disabled with No related record found.
- Pick one or more PDFs. The picker states the limit — 20 MB per file on the AWS forms, 3.5 MB on the Azure and GCP forms — and asks you to deselect anything larger. A related record with no files reads No files available on this record.
- The picker lists each file’s Title, Type, Size, Created Date, and Modified Date. Long titles wrap, a title opens the file in a new tab, and clicking either date’s column header sorts by it without losing your selection. Type in Search by title to narrow the list; changing the search clears what you had selected, and No files match your search. means no title contains the text.
- Fours checks your own Salesforce access to the record and the file before attaching it, so you can attach only what you could open yourself.
- The files join the EULA list like any upload and merge in the order shown.
The button is on the AWS (SaaS, Container and AMI, Machine Learning, and Professional Services), Azure, and GCP (private, Professional Services, and replacement) offer forms. The AWS Reseller form and the reseller authorization forms do not have it.
If the button cannot be used, its message says why:
| Message | What it means |
|---|---|
| No related record found. | The lookup on the record you started from is empty, or the related record is not visible to you. |
| Unable to access this document source. Contact your Salesforce administrator. | Salesforce refused access to the lookup or the record. |
| Document source configuration: … | The configured lookup no longer exists on the object, or is not a direct lookup to a single object. Ask your admin to fix the setting. |
| Select a PDF within the size limit shown on the offer. | The file you picked is not a PDF, or is over the limit. |
| The file is no longer available on this document source. | The file was removed from the related record after the picker opened. Open the picker again. |
Snowflake: attach PDFs for the buyer
A Snowflake private offer has an Attachments section for PDF files the customer can download while viewing the offer — up to 5 files, 5 MB each.
- Click Attach file to add a row, then choose a PDF for it.
- Repeat for up to five files. Attach file disappears once five rows exist, and the trash icon on a row removes it.
A file over 5 MB is refused with The file size is too large., and a file that is not a PDF with The file type is not supported. Once the offer exists, the offer page lists the attached file names under Attachments.
Oracle: when billing starts
An Oracle private offer sets when billing starts in its Billing Start section:
| Option | What happens |
|---|---|
| On acceptance (the default) | Billing starts when the buyer accepts the offer. |
| Specify date | A date field appears, and billing starts on the date you pick. |
Offer Expiration Date — the buyer’s deadline to accept — defaults to 30 days after creation, or to the day before the billing start date if that is sooner. When you specify a start date, the expiration date must fall before it. The form refuses to submit with:
- Billing start date is required when billing starts on a specific date.
- Offer expiration (accept-by) date must be before the billing start date.
Oracle: buyer and contract duration
An Oracle private offer’s Buyer Information section requires a Buyer Company Name of 1 to 100 characters; a name of only spaces counts as empty. The form refuses to submit with Buyer company name is required. or Buyer company name must be 100 characters or fewer., which also catches a longer name that was pasted in or pre-filled.
Contract Duration — how long billing runs, measured from the start date — takes a whole number and a unit: Days, Months, or Years, one year by default. A zero, a fraction, or an empty value stops the form with Contract duration must be a whole number greater than 0. The section’s description notes Oracle allows at most 375 days, but the form itself does not check that limit.
What happens next
After you submit the offer:
- Fours creates the offer record in your Salesforce org, linked to the opportunity.
- The offer is sent to the cloud marketplace (AWS, Azure, or GCP) for processing.
- Once the marketplace confirms the offer, the offer status updates and the offer URL becomes available.
- You can then copy the offer URL from the offer record and send it to the buyer — they use it to review and accept the offer in their cloud marketplace account.
Track private offer status
After creating a private offer, you can track its progress directly from the Opportunity page via the embedded Fours widget. All offer and entitlement data synced from the marketplace is displayed in real time within the widget — no need to switch platforms.
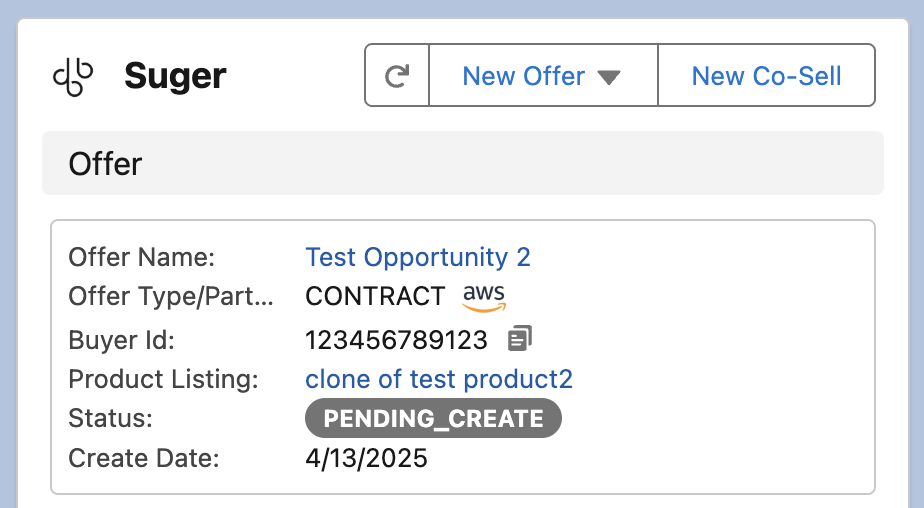
- Once you click Create, you’re returned to the Opportunity detail page. The Fours widget immediately displays the new offer with the status
PENDING_CREATE.
-
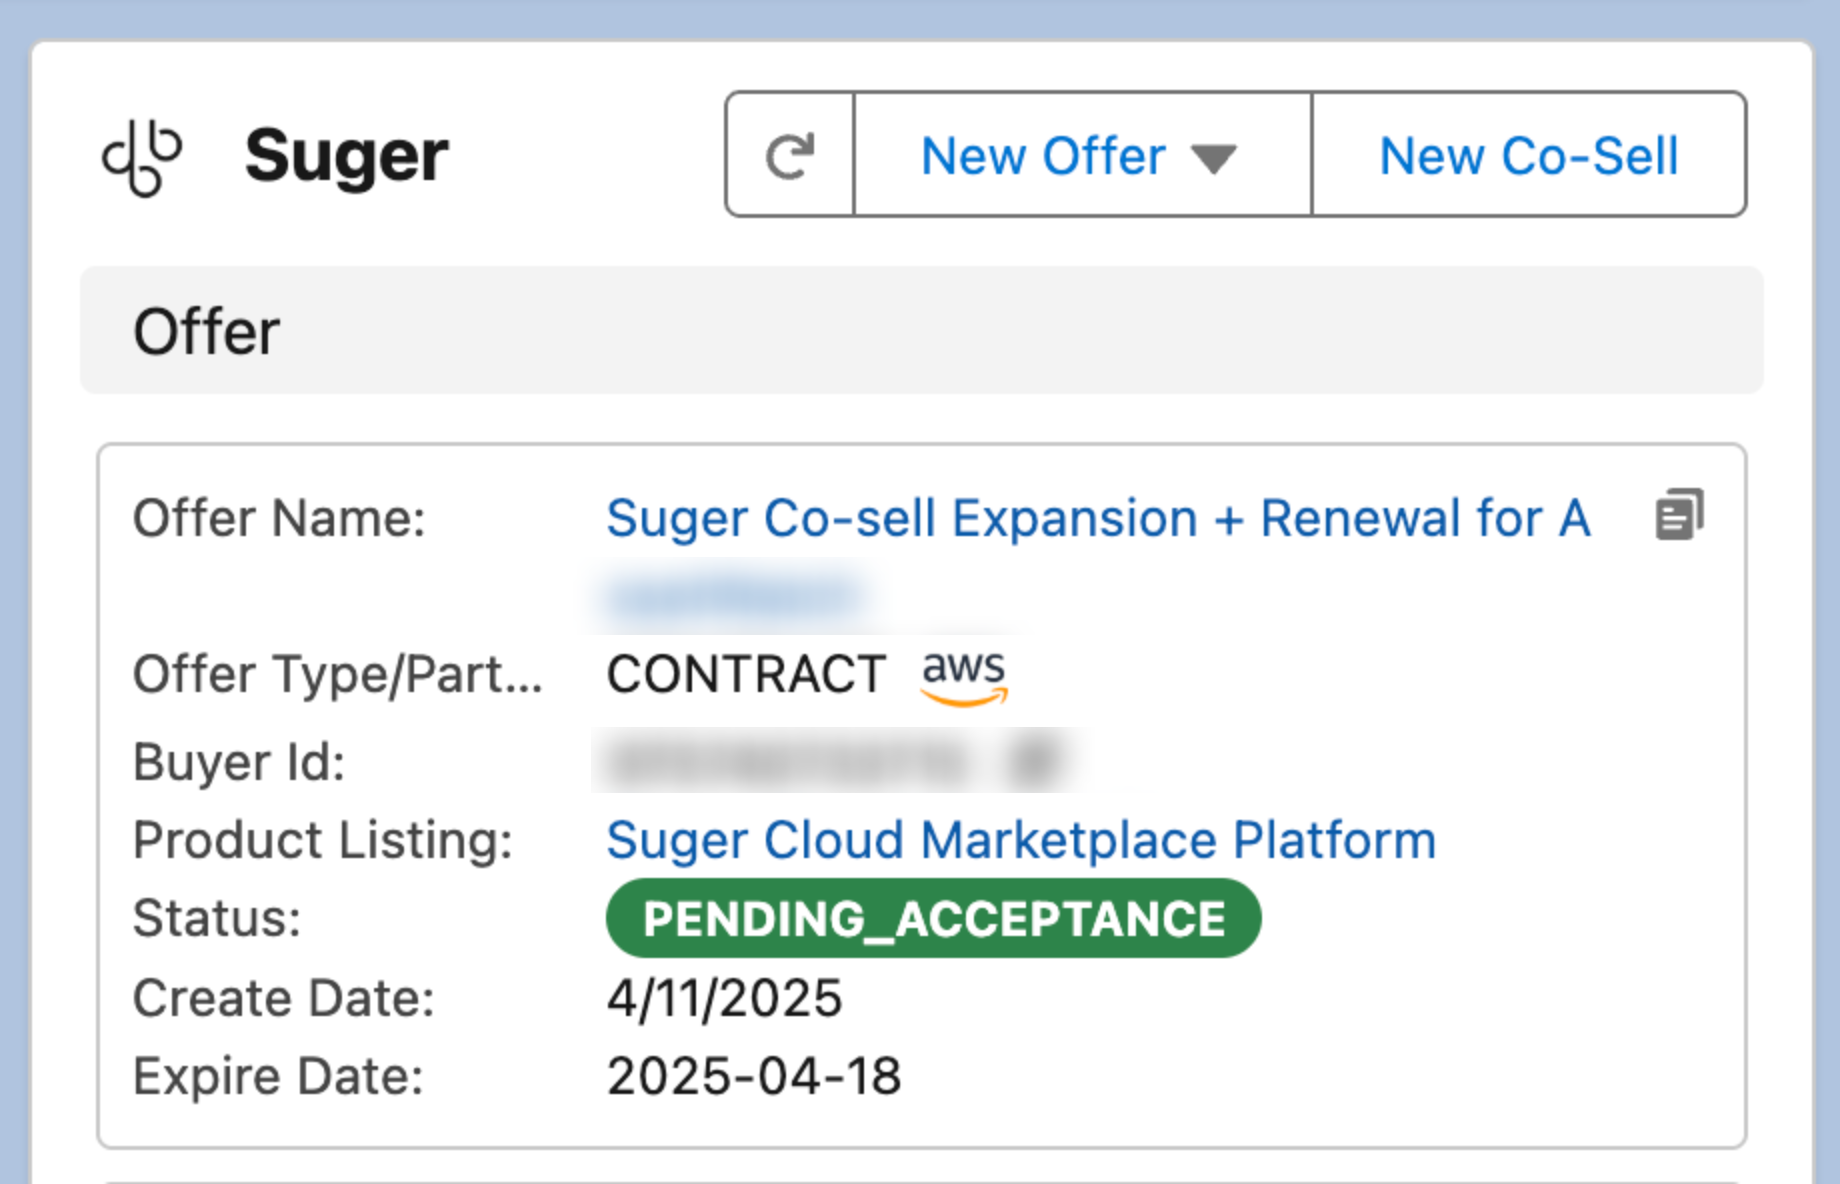
Wait up to 5 minutes, then refresh the widget. The offer status updates to one of the following:
Create Success— the offer was successfully created in the marketplace but has not yet been sent to the buyer.Pending Acceptance— the offer has been pushed to the marketplace and the buyer has been notified.
Create Failed— Fours could not complete the offer’s creation on the marketplace. The marketplace may have refused it before anything was created — its shape, term, or replacement target was rejected pre-flight — or the create may have failed partway through and left something behind. Open the offer: the error Fours recorded, when there is one, is shown on the offer page. If Edit Draft is offered, use it to correct the offer and submit it again. Offers refused pre-flight in the past may showInvalidinstead; to try again, Clone the offer and create the copy.
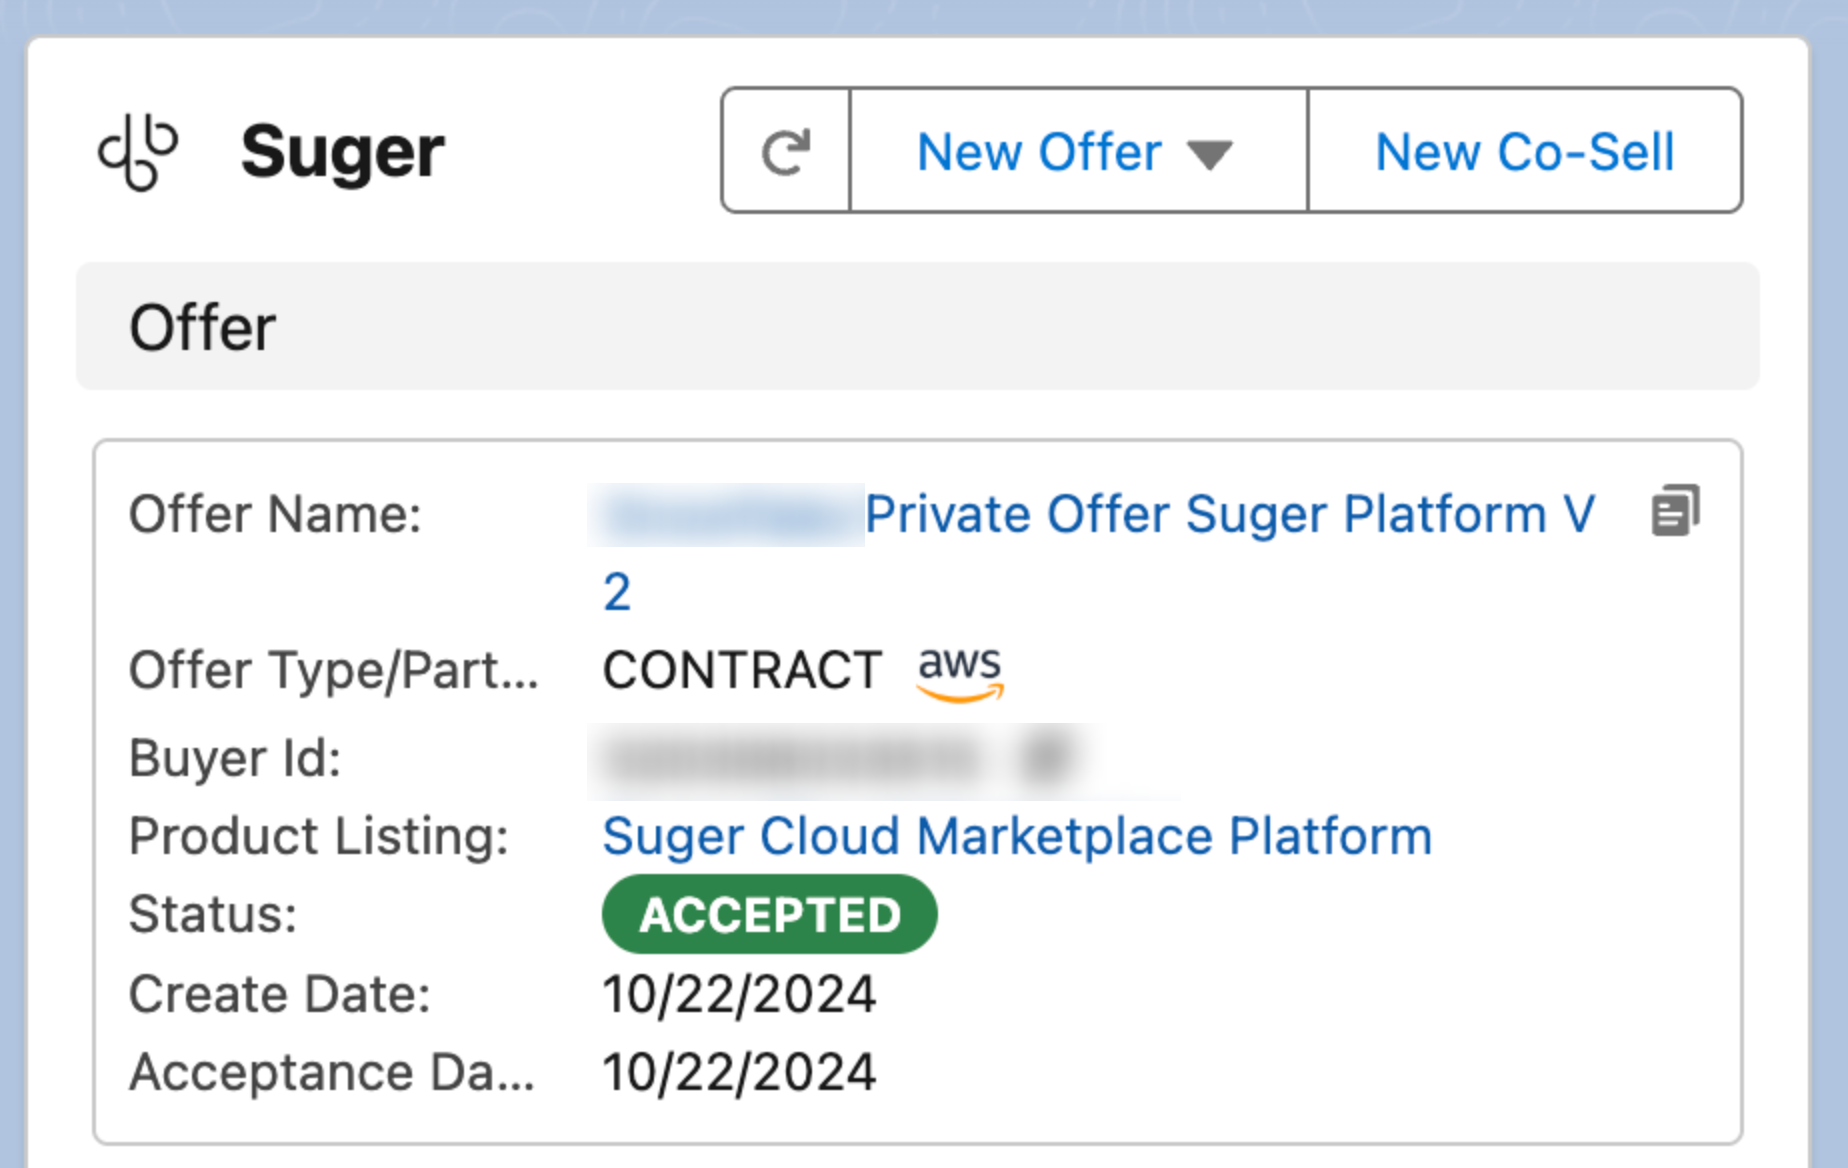
- When the buyer accepts the offer, the widget updates to show
Accepted, and you’ll see the corresponding Offer object linked within the widget.
- Click the offer directly in the widget to open a detailed view, including pricing, contact information, term details, and entitlement data.
What’s on the offer detail page
Beyond the standard offer fields, the offer detail page shows a few sections only when they apply to that offer. If you don’t see one below, it means the condition for it wasn’t met — not that data is missing.
Buyer payment term (AWS)
AWS offers carry a Buyer payment term row in Offer Information, showing the term as its friendly label (Net 30) rather than its raw duration. On a reseller authorization or CPPO — inbound or outbound — the same row is relabelled Maximum buyer net payment term, because on those the value is the ceiling the ISV set rather than the term the buyer actually gets.
The row is hidden on non-AWS offers, and on an AWS offer where the buyer is using their AWS account default, so it never renders as a bare dash.
Renewal offers (AWS and Azure)
An offer is recognized as renewing an existing agreement on both AWS and Azure — AWS marks it on the offer’s metadata, Azure through the private offer’s customer contract renewal flag. Whichever cloud it came from, the offer reads as a renewal wherever the app shows renewal status.
Replaced Offer ID and Replaced Offer (GCP)
GCP replacement and amendment offers carry two extra rows in Offer Information, so you can trace the new offer back to the one it supersedes:
| Row | What it shows |
|---|---|
| Replaced Offer ID | The marketplace ID of the offer this one replaces. |
| Replaced Offer | A link straight to the replaced offer’s record in Salesforce. |
Both rows appear only on GCP replacement and amendment offers. Replaced Offer is additionally omitted until Fours has resolved the replaced offer into a record it can link to — if you see the ID but not the link, the replaced offer hasn’t synced yet.
GCP dates in Pacific time
GCP’s Producer Portal shows a private offer’s dates on the Pacific clock, and so does the offer page. On a GCP offer, dates read as a Pacific date and time with the PST or PDT label — for example 8/31/2026, 11:45:00 PM PDT — so everyone sees the same value whatever their own timezone.
| Row | What it shows |
|---|---|
| Expire Date | 11:45 PM Pacific on the last day the buyer can accept — the time GCP itself displays. |
| Acceptance Date | When the buyer accepted. |
| Start Date, End Date | GCP only: the offer’s term start and end. Each row is hidden until the offer has that value — a pending offer may have no start yet, and a pay-as-you-go offer has no end. |
Offers on other marketplaces keep showing the date alone.
Note for Buyer (GCP)
- A GCP offer that carries a note for the buyer shows a Note for Buyer row in Offer Information. It is hidden on non-GCP offers, and on a GCP offer that has no note, so it never renders empty.
Universal PAYG discount banner
When a GCP offer was priced with a single discount across all usage rather than per-dimension rates, a banner sits at the top of Offer Information stating the discount — for example, 20% off all usage, captioned Universal PAYG discount. It is there so a reviewer doesn’t read the absence of a per-dimension breakdown as missing pricing.
Dimension Tags (read-only)
If your organization uses dimension tagging to build discounts (see Dimension-tag discounts below), the offer detail page shows the tag configuration the offer was built with, as a read-only Dimension Tags section directly above the pricing section. You cannot edit it here — this is the record of how the offer was priced.
| Cloud | Where it appears |
|---|---|
| AWS | One panel at the offer level, above Usage Dimensions. |
| GCP | One panel at the offer level, above Usage Dimensions. For prepay offers, tag groups are set per payment installment, so you get one panel per installment. |
| Azure | One panel per plan, above Azure Pricing — matching the way Azure offers configure discounts per plan. A plan with no dimensions shows nothing. |
Clone a private offer
You can quickly create a new offer based on an existing one.
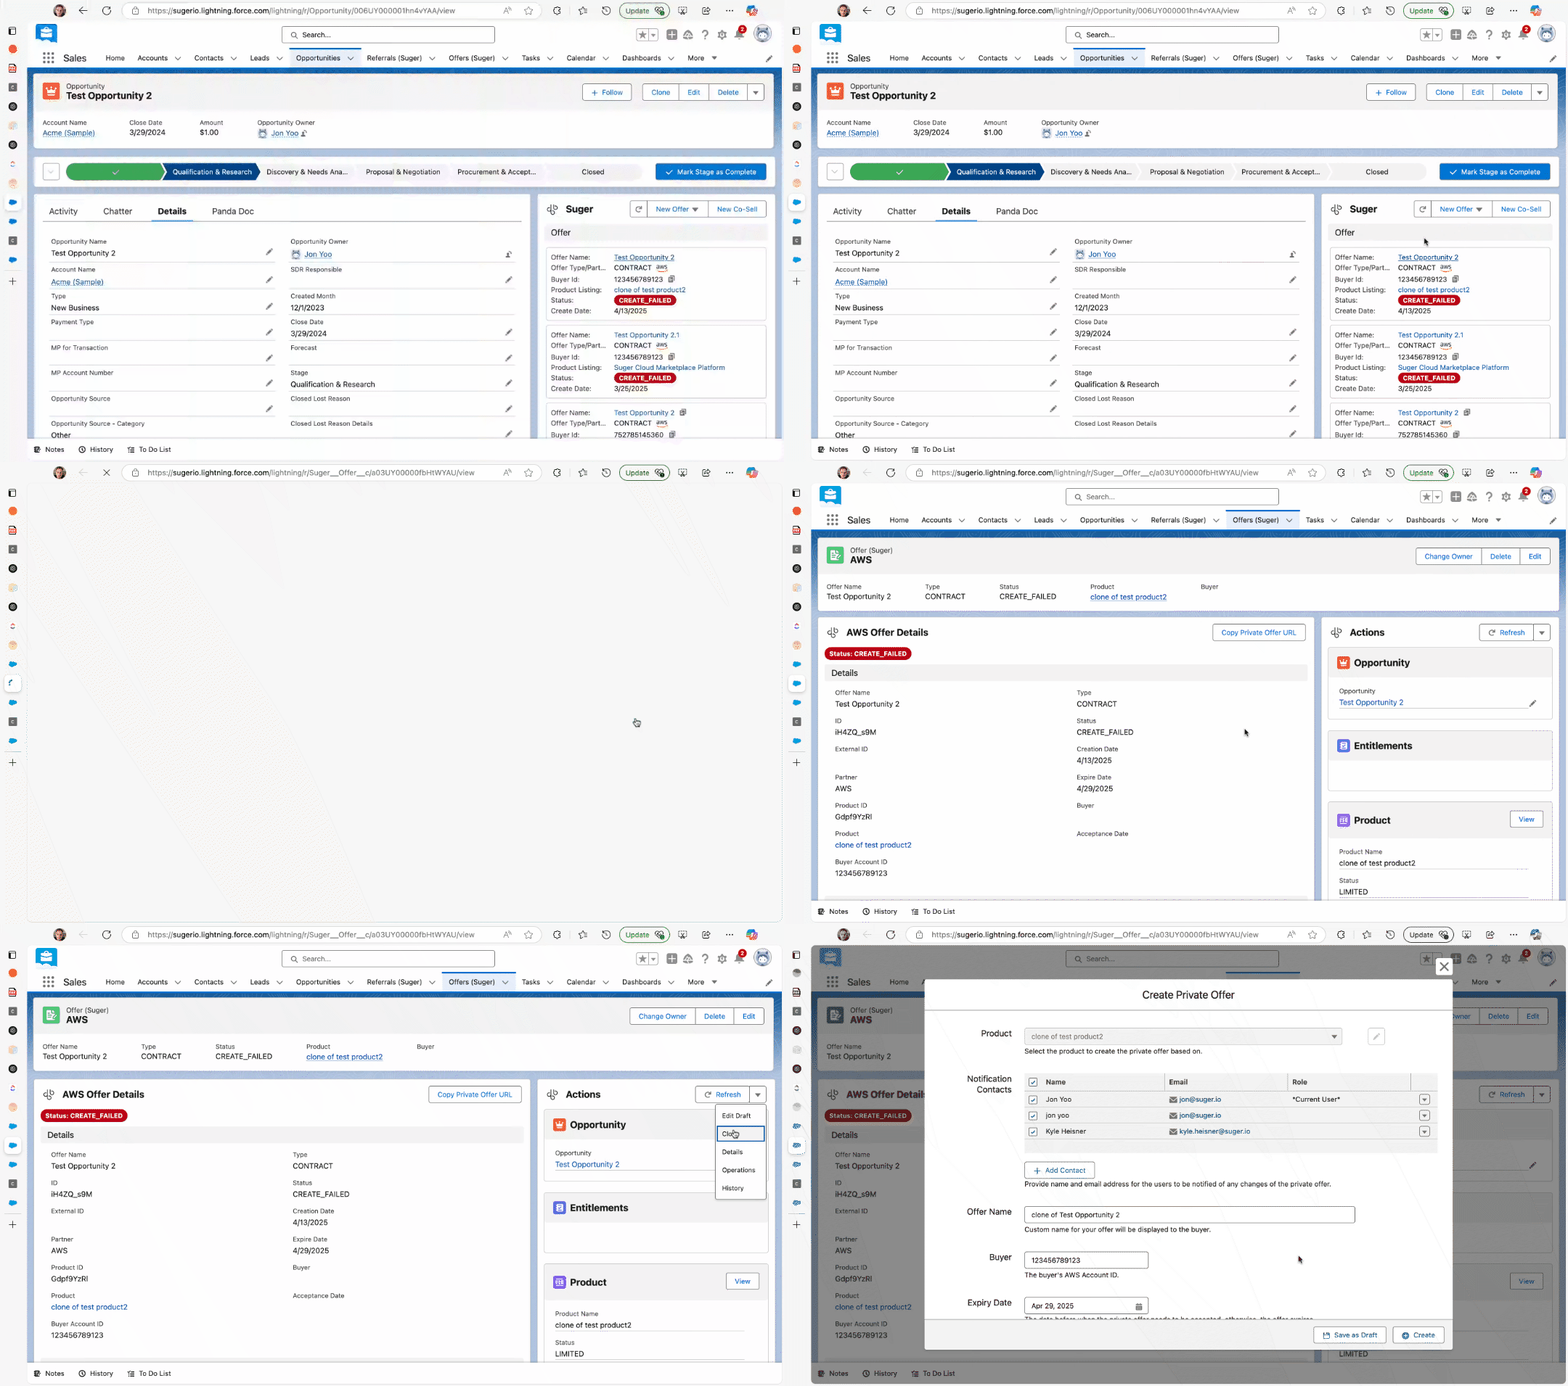
- Open the Opportunity that contains the existing offer.
- In the Fours widget, click the offer you want to clone.
- In the top-right corner of the offer view, locate the arrow-down button next to the Refresh icon.
- Click the dropdown and select Clone.
- A new offer form opens with pre-filled details from the original offer. Make any necessary changes and click Create to submit.
EULA files on a clone. A clone reuses the original’s EULA files only when they are files your organization uploaded to Fours. If any one of them is not — an offer synced from the marketplace, for example, carries the marketplace’s own link — the clone clears the whole EULA file list but keeps the EULA Type and attach options you chose. The EULA section then reads The EULA file from the original offer can’t be reused. Upload it again. until you attach a file, so upload the agreement again before you submit.
What a GCP clone copies. Cloning a GCP private offer carries the original’s negotiated terms into the new form — customer and provider details, notes, deal type, payment recurrence and schedule, duration, features, and proration setting — including when the original was created in GCP’s Producer Portal. Payment installments come along only when the original’s Payment Recurrence is Custom, or was never recorded; on a Monthly, Quarterly, or Yearly original they are dropped, because the form edits installments only on Custom. A discount on a metric the selected plan no longer prices is removed too, and a warning says so — Removed the discount on 1 metric the plan no longer prices or Removed the discounts on {n} metrics the plan no longer prices — followed by the metric IDs, up to five and then and {n} more. The original’s error messages, notifications, acceptance date, and marketplace-side offer identity are cleared, so a clone of a failed offer opens without the original’s error. A resale authorization (CPPO_OUT) is cloned through the resale-authorization form instead, and this cleanup does not apply to it.
GCP replacement offers: term and cancellation
Cloning a GCP offer produces a replacement offer, and its form carries two controls that decide how the new offer relates to the one it replaces.
-
Change Offer Duration — a toggle whose own help text reads: “Off keeps the replaced offer’s end time (coterm). Turn on to set your own term via Offer Duration.”
- Off (the default) — the replacement coterms to the replaced offer: it ends on the same date, and the form shows that date as a read-only Offer End Date.
- On — an Offer Duration field appears and you set the term yourself. Its unit follows the Payment Recurrence you selected.
-
Cancel the existing offer at the publishing of this offer — a checkbox in the Existing offer card. When checked, the original offer is cancelled automatically once the new offer reaches pending acceptance status. This only affects whether the original offer is still visible and acceptable; it does not touch an existing subscription if the buyer had already accepted the original offer.
On a Monthly replacement offer, the Proration switch is shown read-only. GCP does not allow the proration policy to change on an amendment, so the form carries over the replaced offer’s setting: On, Off, or Not set (GCP default) when GCP created the original offer under its own default.
A replacement needs an offer GCP still considers live. If GCP shows the offer you are amending as ended — expired, cancelled, lapsed, or failed approval — Fours refuses the replacement when you click Create, with an Invalid offer message: The offer you are amending ({offer ID}) has already ended on GCP and can no longer be replaced. If this buyer has an active successor offer for the same billing account, amend that one instead — otherwise create a new offer. While GCP is still settling the offer’s state, the message names it instead, for example … is in state OFFER_EXPIRED on GCP and can no longer be replaced. … An entitlement that is pending cancellation is the exception: its offer has run its term, but you can still amend it.
Manage an existing offer
Once a private offer has been created from an opportunity, you can manage it without leaving Salesforce. Open the Opportunity that contains the offer, then click the offer in the Fours Widget to open the Offer Page. From there you can extend the expiry date, cancel the offer, notify contacts, download the EULA file, and export the offer’s terms as a PDF.
Extend a private offer
Extend Expiry Date is offered only where the marketplace accepts the change, so the action is absent rather than failing:
| Marketplace | Can extend? |
|---|---|
| Any marketplace | Never on a channel partner’s resale offer (CPPO): the channel partner creates and owns it. |
| AWS | Yes — except a resale authorization (CPPO_OUT). AWS rejects any change to a released resale authorization. |
| Azure | Only on V2 / V3 pricing (newCustomizedPlans, saasNewCustomizedPlans, vmSoftwareReservations). Not on V1. |
| Oracle | No — Oracle Marketplace does not support extending an offer’s expiry date. |
| GCP and the rest | Yes. |
The offer must also be in Pending acceptance, Expired, or Update failed. An offer the buyer has already accepted has an agreement behind it, and its expiry date no longer governs anything.
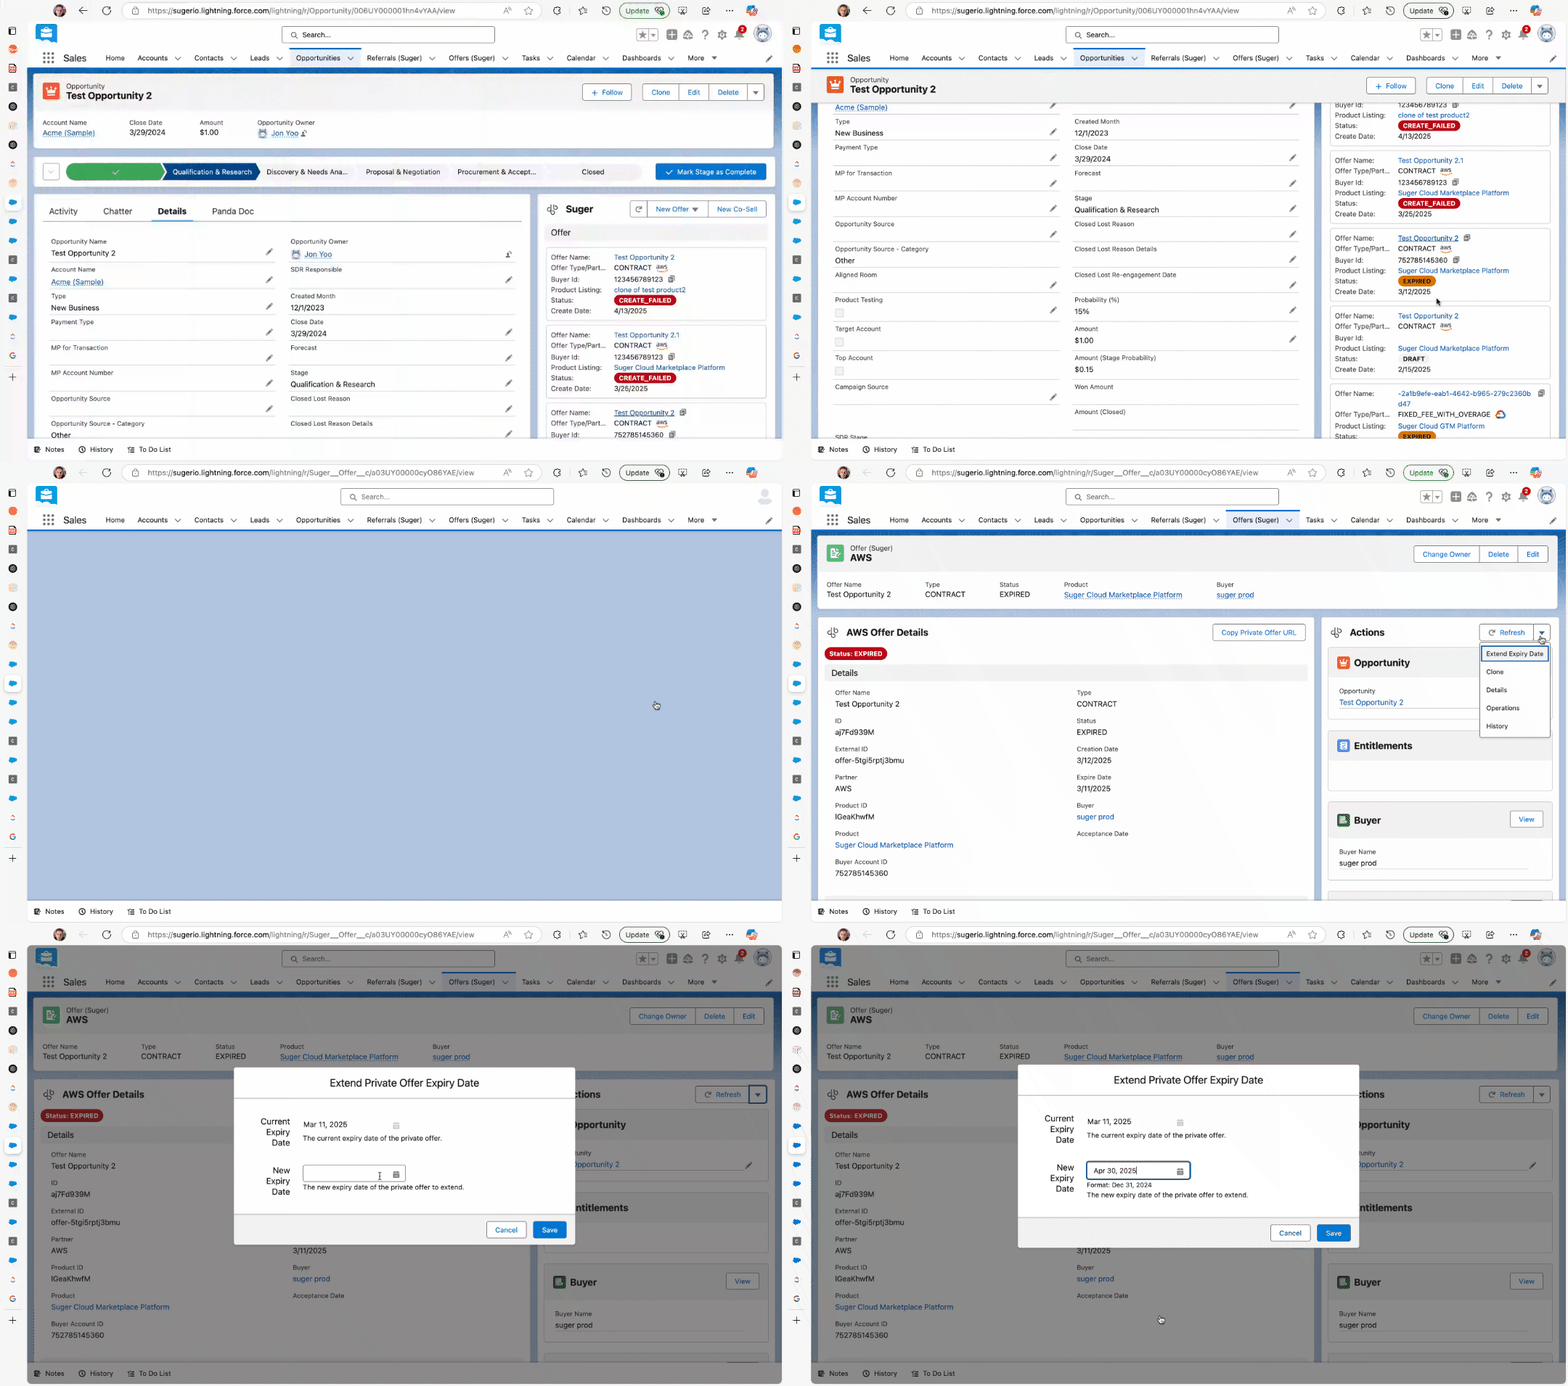
- Open the Opportunity that contains the private offer.
- In the Fours Widget, click the offer you want to extend.
- Click the arrow-down button next to the Refresh icon in the top-right corner.
- Select Extend Expiry Date from the dropdown menu.
- Update the Expiry Date to a new future date, then save.
Cancel a private offer
Cancel Offer is not offered on a channel partner’s resale offer (CPPO), which the channel partner creates and owns.
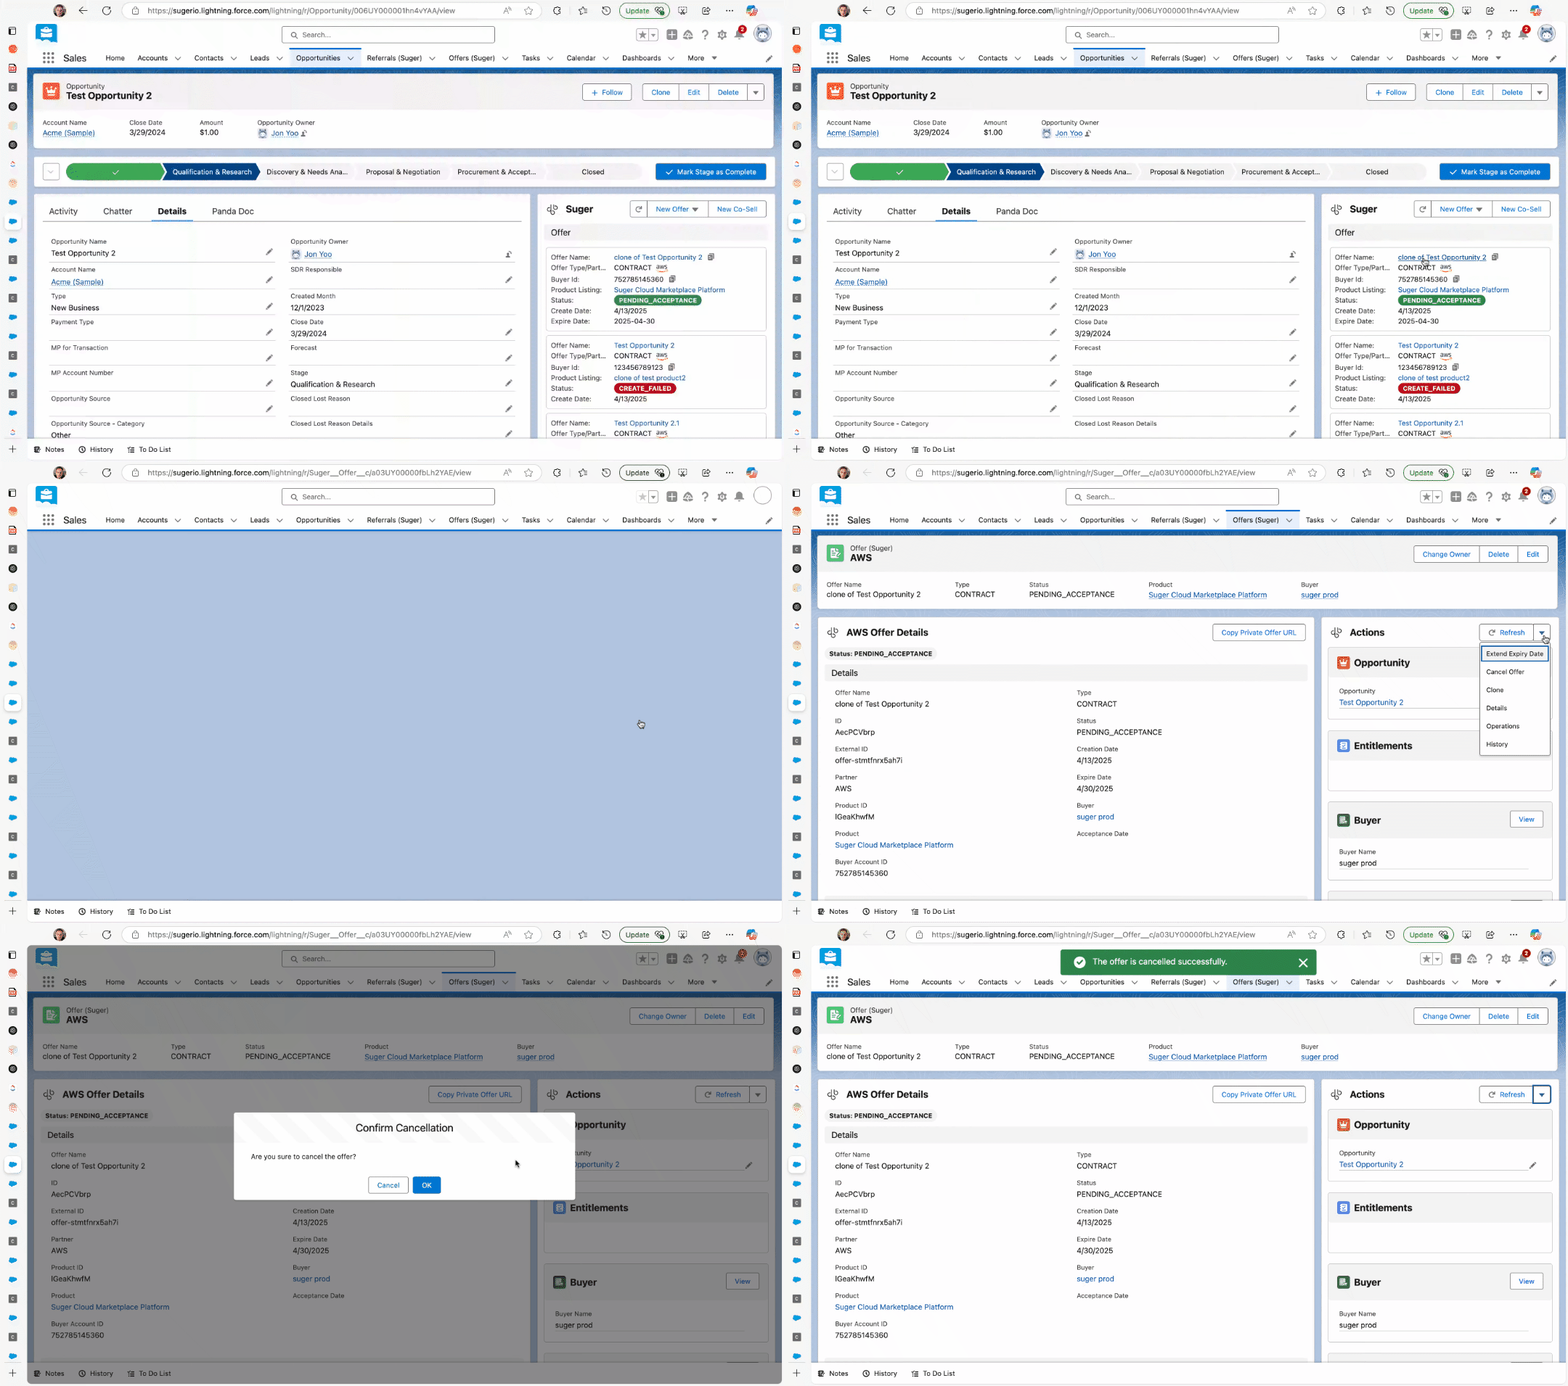
- Open the Opportunity that contains the private offer.
- In the Fours Widget, click the offer you want to cancel.
- Click the arrow-down button next to the Refresh icon in the top-right corner.
- Select Cancel Offer from the dropdown menu.
- Confirm the cancellation when prompted.
Notify contacts
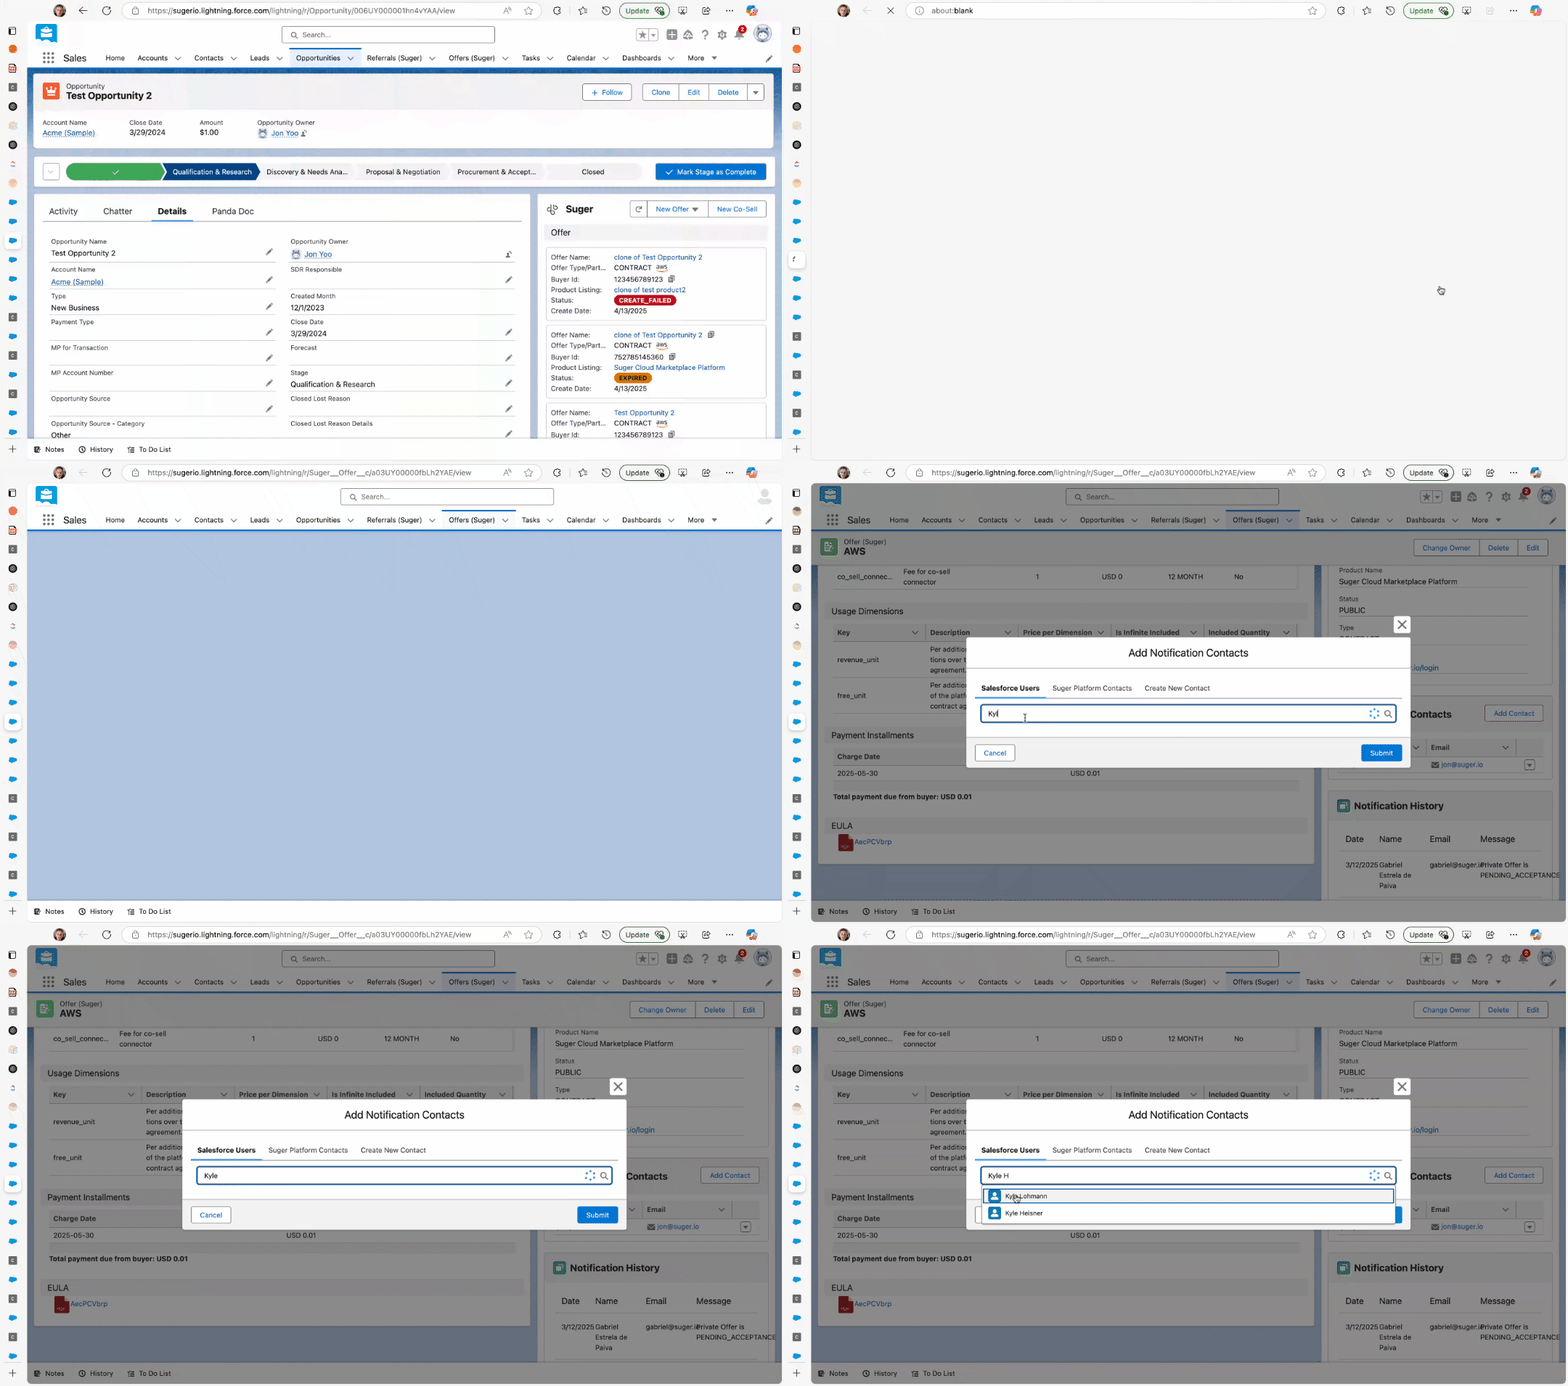
- Open the Opportunity that contains the private offer.
- In the Fours Widget, click the offer you want to notify contacts about.
- Find the Notification Contacts card on the right side of the Offer Page.
- Click Add Contact.
- Choose the contact(s) you want to notify and confirm. The picker opens on Create Offer Contact, where you type a new person’s name and email; to pick someone who already exists, switch to Salesforce Contacts, Salesforce Users, or Fours Platform Contacts.
Whether Fours’ notification email actually goes out is decided by your organization’s email notification settings in the Fours console: it is sent only while Enable Email Notification is on and the Notify offer contacts row is enabled, and the contacts you pick reach it through that row’s Offer Notification Contacts rule. See Notify contacts.
Download the EULA file
- Open the Opportunity that contains the private offer.
- In the Fours Widget, click the offer you want to review.
- Scroll down to the bottom of the Offer Page.
- The EULA file is available in the last section of the Offer Page.
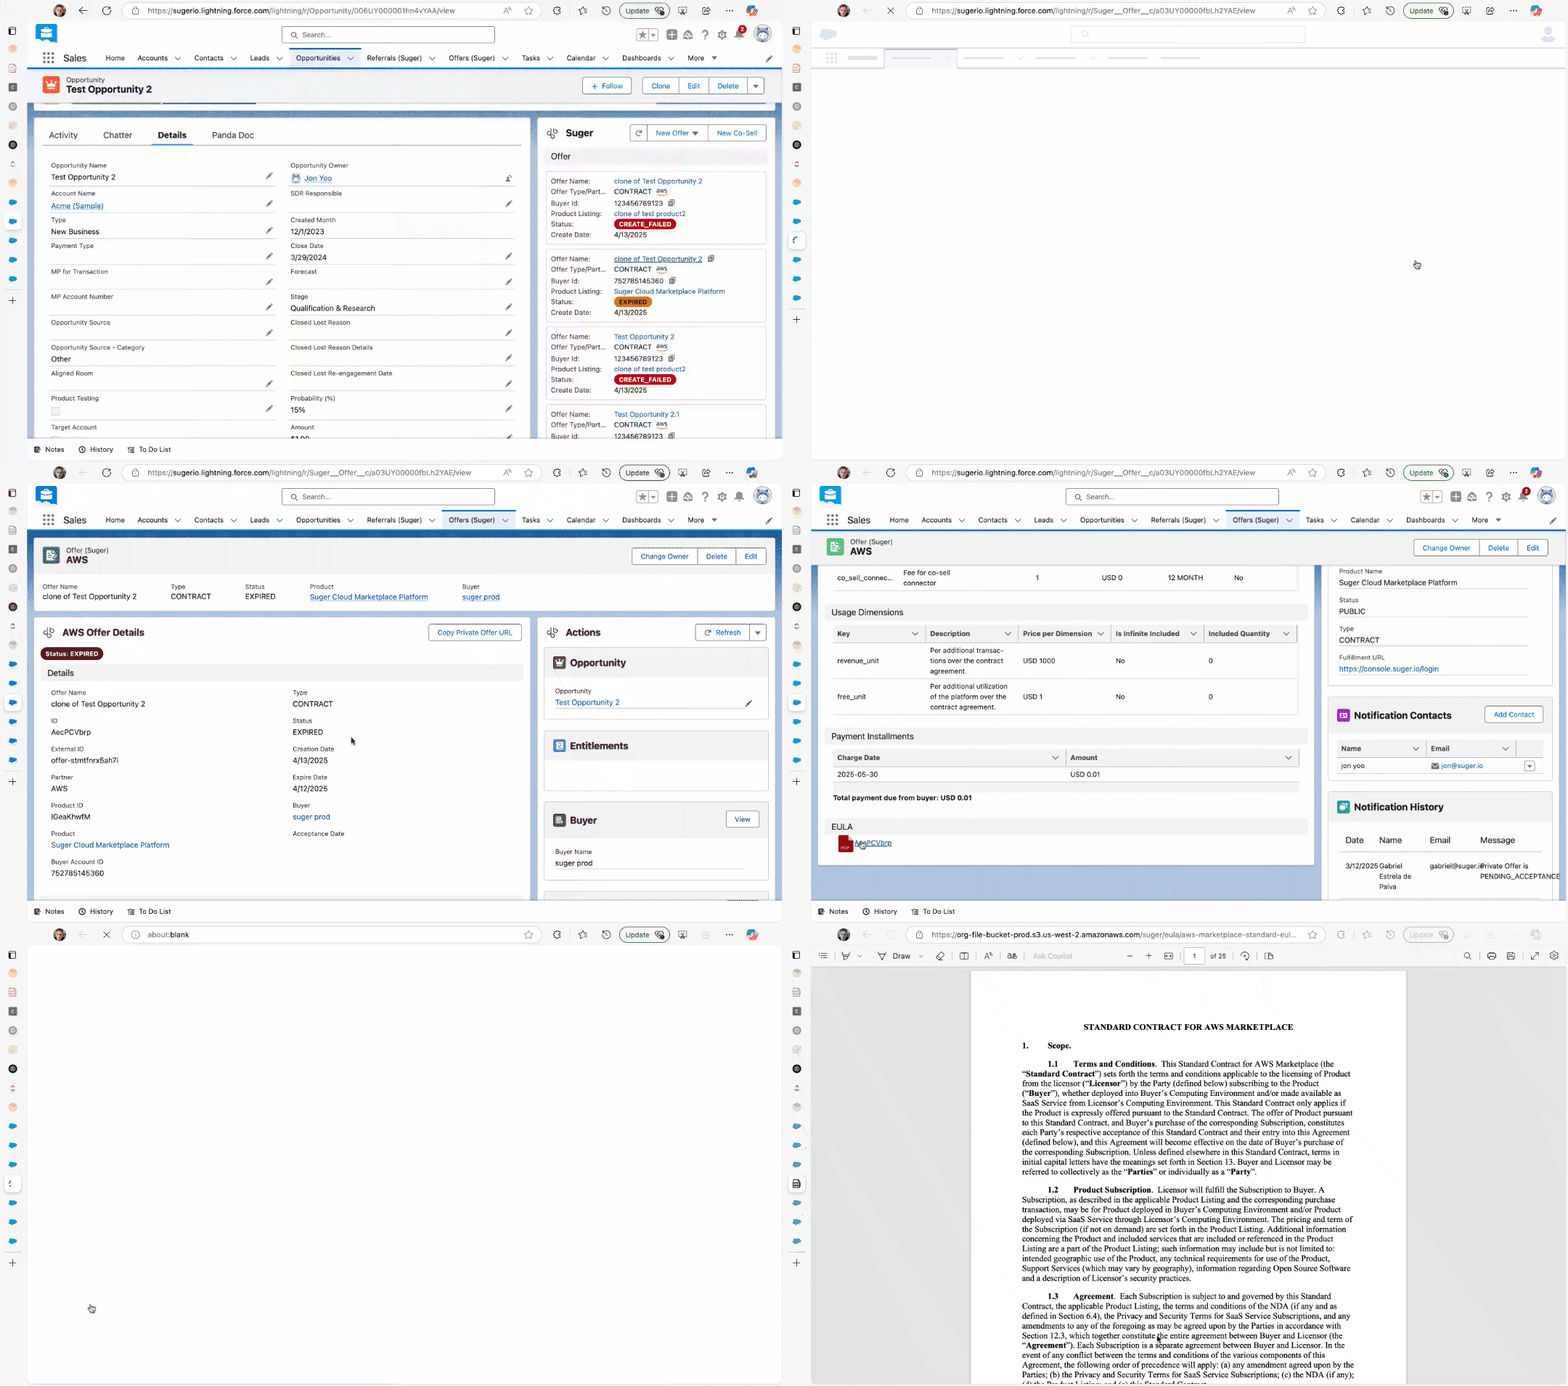
Once an offer is past Draft, clicking its EULA opens the file in a new browser tab. Fours fetches a current download link at the moment you click, rather than reusing the link saved on the offer, which can expire — so allow pop-ups for Salesforce. If the file cannot be opened, an Unable to open EULA message gives the reason: Allow popups for Salesforce, then try again. when the browser blocked the new tab, The EULA download link is unavailable. Please try again. when Fours returned no usable link, or the error Fours reported.
Export the offer’s terms as a PDF
Export PDF turns an offer’s current terms into a PDF you can pass to the people who review the deal on the buyer’s side. It is offered only while the offer is in Pending acceptance.
- Open the Opportunity that contains the private offer.
- In the Fours Widget, click the offer you want to export.
- Click the arrow-down button next to the Refresh icon in the top-right corner.
- Select Export PDF. The PDF opens in a new browser tab, so allow pop-ups for Salesforce.
For what the PDF contains and leaves out, see Export the offer’s terms as a PDF in the Fours Console guide.
If the PDF cannot be opened, an Unable to export the offer PDF message gives the reason: Allow popups for Salesforce, then try again. when the browser blocked the new tab, The PDF download link is unavailable. Please try again. when Fours returned no usable link, or, when the PDF could not be created, a message asking you to try again in a minute and to contact support if it keeps failing.
Configure CRM field mapping for private offers
Configuring Salesforce private offer field mapping lets you auto-generate private offer fields from your CRM, so information is pre-populated when sending offers from Salesforce. This saves time and reduces manual entry errors during deal submission. Field mapping is set up in the Fours Console by your Salesforce admin.
-
Access the Fours Console — the central hub for managing configurations and settings.
-
Open Offer, then select Settings at the bottom of the page’s section rail, on the left.
-
Select the CRM sub-tab.
-
Click New Config in the Salesforce block.
-
Choose the Cloud partner and associated CRM for which you want to configure the field mapping.
-
Map Salesforce fields to the fields relevant to private offers. For example, associate offer names with opportunities, the buyer AWS account ID with the corresponding field, and offer expiration dates with the relevant fields.
-
Save the configuration.
Skip the entitlement picker on an amendment
New Offer → Amendment Offer (and the New Amendment Offer via Fours quick action) normally opens the Create Amendment Offer dialog so you can pick the entitlement to amend from its Suggested list. The list leaves out entitlements for products you couldn’t choose on a new offer from the same opportunity or quote, such as a product your organization’s List Products Filter excludes. To skip that step, map metaInfo.baseEntitlementExternalId in your private offer field mapping to a Salesforce field that holds the entitlement’s marketplace ID — for example Suger__Entitlement_External_ID__c. The form then opens straight on the AWS agreement-based offer, Azure upgrade offer, or GCP replacement offer for that entitlement.
Only the mapping for the cloud your Cloud Partner Selection script returns counts. If the mapped entitlement can’t be found or can’t be amended, a Mapped entitlement can’t be amended warning gives the reason and the picker opens as usual.
When the form opens straight on the entitlement, the amendment-offer banner naming it ends with a Change link that reopens the entitlement picker, so you can pick a different one — on the AWS, Azure, and GCP amendment forms.
An AWS entitlement bought through a channel partner’s resale offer can’t be amended. Its card in the Suggested list carries a CPPO - No Amends badge and a Create New CPPO button, and picking it in the search opens a Cannot Amend This Entitlement dialog with the same button. Create New CPPO opens Create Resale Authorization with the entitlement’s product already selected, so you can issue a new resale authorization instead. If your field mapping picks a different product, the form keeps the entitlement’s product and warns Product mapping mismatch — The CRM mapping selected a different product. The original product is selected; review and enter the resale authorization details. — and none of the mapped values are filled in. Without permission to create AWS offers, the button is disabled with You do not have permission to create AWS offers. Contact your administrator.
Add a related record as a EULA source
The Salesforce block on the same CRM sub-tab holds Offer Created From — the Salesforce object a private offer is created from and your field mapping reads, such as Opportunity or Quote — and, beneath it, an optional EULA Document Source. Setting it points the Select from … files button at a related record instead of the record the offer is started from.
- In the Fours Console, open Offer, select Settings in the page’s section rail, then its CRM sub-tab, and find the Salesforce block.
- Check Offer Created From is the object your team starts offers from.
- In EULA Document Source, pick one lookup field on that object. The list holds the object’s direct lookups to a single other object — lookups to User are left out — and Related object: below it names the object the lookup points at. If a field you just created in Salesforce is missing, click the refresh icon beside the list.
- Click Save.
Choose None to remove the lookup; the offer forms then offer the files of the record the offer is started from. Changing Offer Created From clears it, because a lookup belongs to one object. If a saved lookup no longer exists, the block says Configured lookup {field} is unavailable. Select another lookup or clear it., and an object with nothing to pick reads No supported lookup fields on this object.
Only one direct lookup is supported. To reach an Agreement through an Opportunity’s primary Quote, start offers from the Quote and configure the Quote’s Agreement lookup. Changing the setting never alters the EULA files on offers you have already created. The rest of these settings are covered in Private Offer Field Mapping.
AWS private offer required fields
| Field Name | Source | Description / Purpose |
|---|---|---|
| Salesforce Opportunity ID | Salesforce Field (Id) | Identifies the Opportunity associated with the offer. Required for linking the private offer to the correct Salesforce record. |
| Renewal Offer Type | Salesforce Field | Indicates whether the offer is new or a renewal. |
| Product ID | Salesforce Field (Fours Product Id) | Maps the Fours product to the AWS listing product ID. Required for AWS to recognize which listing the offer belongs to. |
| Offer Name | Expression: {{ .Name }} - {{ .Account.Name }} | Defines the custom name for the offer as it appears in AWS Marketplace. Usually combines Opportunity and Account names. |
| Buyer AWS Account ID | Salesforce Field | The buyer’s AWS Account ID — needed so AWS can associate and allow that buyer to view and accept the private offer. |
| Contacts | Salesforce Field / Manual Entry | Contact names and emails of people who should be notified when the offer is ready. Can include the Opportunity owner and additional internal contacts (for example, {{ .Owner.Name }}, {{ .Owner.Email }}, or manually added users like your teammate). |
| EULA Type | Salesforce Field | Specifies which End User License Agreement (EULA) to attach — for example, “Standard AWS Terms” or a custom EULA. |
| Offer Expiry Date | Salesforce Field | The date before which the offer must be accepted, or it expires (format: YYYY-MM-DD). |
| Offer End Date | Salesforce Field | The date when the offer will officially end or expire (format: YYYY-MM-DD). |
| Start Date | Salesforce Field | The start date for the offer (by default, the acceptance date). |
| Script (Optional) | Custom Script | Used to fill any remaining fields not mapped above. Optional but useful for automation or custom rules. |
Troubleshooting
| Issue | Possible cause | Resolution |
|---|---|---|
| No New Offer button visible on the opportunity | Fours permission set not assigned, or the Fours widget is not on the page | Check your permission set assignment, and add the widget if it’s missing. |
| Product list is empty | No products have been set up in Fours, or your permission set restricts which clouds you can see | Confirm that products exist in the Fours Console. A cloud-specific permission set only shows products for that cloud. |
| Form fields are blank — not pre-filled from the opportunity | Field mapping has not been configured | Field mapping is an optional admin setup. Contact your Salesforce admin to configure it. |
| Copy Offer URL button does nothing after the offer is created | The marketplace hasn’t finished processing the offer yet | Wait 3–5 minutes, then refresh the page. The URL appears once the marketplace confirms the offer. |
| Offer was created but doesn’t appear on the opportunity | Sync between Fours and Salesforce is delayed | Offer records sync on a schedule. Refresh after a few minutes. If it still doesn’t appear, check the Fours Console to confirm the offer was created successfully. |
| Unable to open EULA when you click an offer’s EULA | The browser blocked the tab the EULA opens in, or Fours could not return a current download link | For Allow popups for Salesforce, then try again., allow pop-ups for your Salesforce domain and click the EULA again. For The EULA download link is unavailable. Please try again., try again in a moment, and contact support@suger.io if it keeps failing. |
| Invalid offer — Could not determine the offer being replaced. Reload the entitlement and try again. — when you create a GCP replacement (amendment) offer | Fours could not tell which GCP offer the new one replaces: neither the entitlement nor its offer names it | Reload the entitlement and create the replacement again. If the message persists, contact support@suger.io. |
| Invalid offer — The offer you are amending (…) has already ended on GCP and can no longer be replaced. — when you create a GCP replacement (amendment) offer | GCP shows the offer you are amending as expired, cancelled, lapsed, or failed approval | Amend the buyer’s active successor offer for the same billing account, if there is one; otherwise create a new offer. See GCP replacement offers. |
| Month 12 is after the last month of this 12-month contract. Use month 11 or earlier. under a Renewal payment schedule row — or in an Invalid offer message when you click Create — on an AWS offer with renewal terms | A row of the Renewal payment schedule is numbered past the last month of the contract term, which runs from month 0 | Edit the row so it falls in the term’s final month — month 11 on a 12-month term — then click Create again. See Configure renewal terms (AWS). |
| The GCP offer’s expiry date won’t accept a date more than 3 months out | GCP’s three-month acceptance window. The GCP offer forms and the Extend Private Offer Expiry Date dialog now block dates more than three months out — and dates before the offer’s start or end — directly in the date picker, with an inline hint, so the limit is enforced before you submit. The create API still enforces it as a backstop. | Pick an expiry date within the three-month window shown in the picker’s hint. |
Frequently asked questions
Can I create offers for AWS, Azure, and GCP from the same place?
Yes — as long as you have products set up for each cloud in Fours and the right permission set assigned. The product selector in the offer form shows products across all clouds you have access to.
Can I create an Agreement-Based Offer (ABO) from Salesforce?
Yes. Agreement-Based Offers are supported from Salesforce — you don’t need to use the Fours Console for this, and the AWS form asks whether the offer is a renewal (see Offer purpose).
What is field mapping and do I need it?
Field mapping is an optional configuration that automatically pre-fills offer form fields with data from the Salesforce opportunity — like buyer name, contract value, or close date. Your Salesforce admin sets this up. You can still create offers without it, but you’ll need to fill in all fields manually.
The offer was created successfully but the buyer can’t find the link. What do I do?
Open the offer record in Salesforce and click Copy Offer URL, then send that link directly to the buyer. Make sure at least 3–5 minutes have passed since the offer was created, otherwise the URL may not be available yet.
Will the offer show up in the Fours Console too?
Yes. Any offer created from Salesforce is also visible in the Fours Console under your offers list.
Dimension-tag discounts (GCP, AWS, Azure)
When your organization has dimension tagging enabled (configured in the Fours web console), the discount step of a private offer shows a tag-based discount panel in place of the per-dimension rate table, for GCP, AWS, and Azure offers:
- Build a rule from tag conditions (e.g.
regioncontainsus-east) and apply one discount to every matching dimension at once. - Apply a saved discount group from your org library, then set its discount %.
- Override individual dimensions, and set a default for everything untagged.
- The dimension list is searchable and paginated, so it stays responsive even for products with many dimensions.
GCP amendment (replacement) offers. Tag-based discounts are no longer limited to new offers. A GCP amendment offer priced postpay shows the same tag-discount panel, and reopening one re-applies the tag rules that were saved with it rather than flattening them back to per-dimension rates.
Configuration rule library. The discount panel has a rule library modal for reusing rules already saved in your org: select rules individually or with a select-all control, and a rule already applied to this offer carries an Applied badge so you do not add it twice.
Percent vs. Absolute pricing (AWS & Azure)
AWS and Azure offers can price a dimension either as a percentage off the product list rate or as an absolute negotiated price. A Percent / Absolute toggle switches between the two faces without losing the entered values:
- Percent — the tag-filter discount panel; the final rate is
list × (1 − discount%). - Absolute — a flat fixed-price editor; you enter the negotiated price directly and the panel shows the equivalent discount for reference.
When you reopen a hand-priced (legacy) offer whose rates differ from the current product list, it opens in Absolute so your negotiated prices are preserved exactly.
Azure per-plan configuration
Azure offers configure discounts per plan: each absolute-priced plan gets its own collapsible section, so plans that share a meter can be discounted independently, and a single offer can mix percentage plans with absolute plans.
For GCP prepay offers with multiple installments, each editable installment is configured independently; already-charged (locked) installments are shown read-only and are never changed.
Dimension tagging does not apply to AWS Machine Learning, AWS Professional Service, AWS Reseller, or Azure Application / Virtual Machine offers — those keep their standard pricing.
Any user who can create an offer can also save a rule as a reusable discount group to the org library. Applying discounts to the current offer never requires saving a group.
Spotted something wrong or out of date on this page? Tell us and we'll correct it.