Create Offer
Easily create private offers directly from a HubSpot deal using the Fours App.
Overview
A private offer is a custom deal you send to a specific buyer through a cloud marketplace — AWS, Azure, or GCP. It includes your negotiated pricing, contract terms, and expiration date. The buyer receives a link to review and accept the offer directly in their cloud marketplace account. Once the buyer accepts it, the contract is live and billing starts automatically through the marketplace.
After adding the Fours App to your HubSpot Console, you can create these offers straight from a deal, without leaving HubSpot. For more details on offers, see Understand Marketplace Offers.
Prerequisites
- The Fours App must be set up in HubSpot and the Fours app card must be visible on your deal pages. If you haven’t done that yet, see Configuration.
- The product you want to create an offer for must already exist in Fours. If it doesn’t, create it in the Fours Console first before continuing.
Create an offer
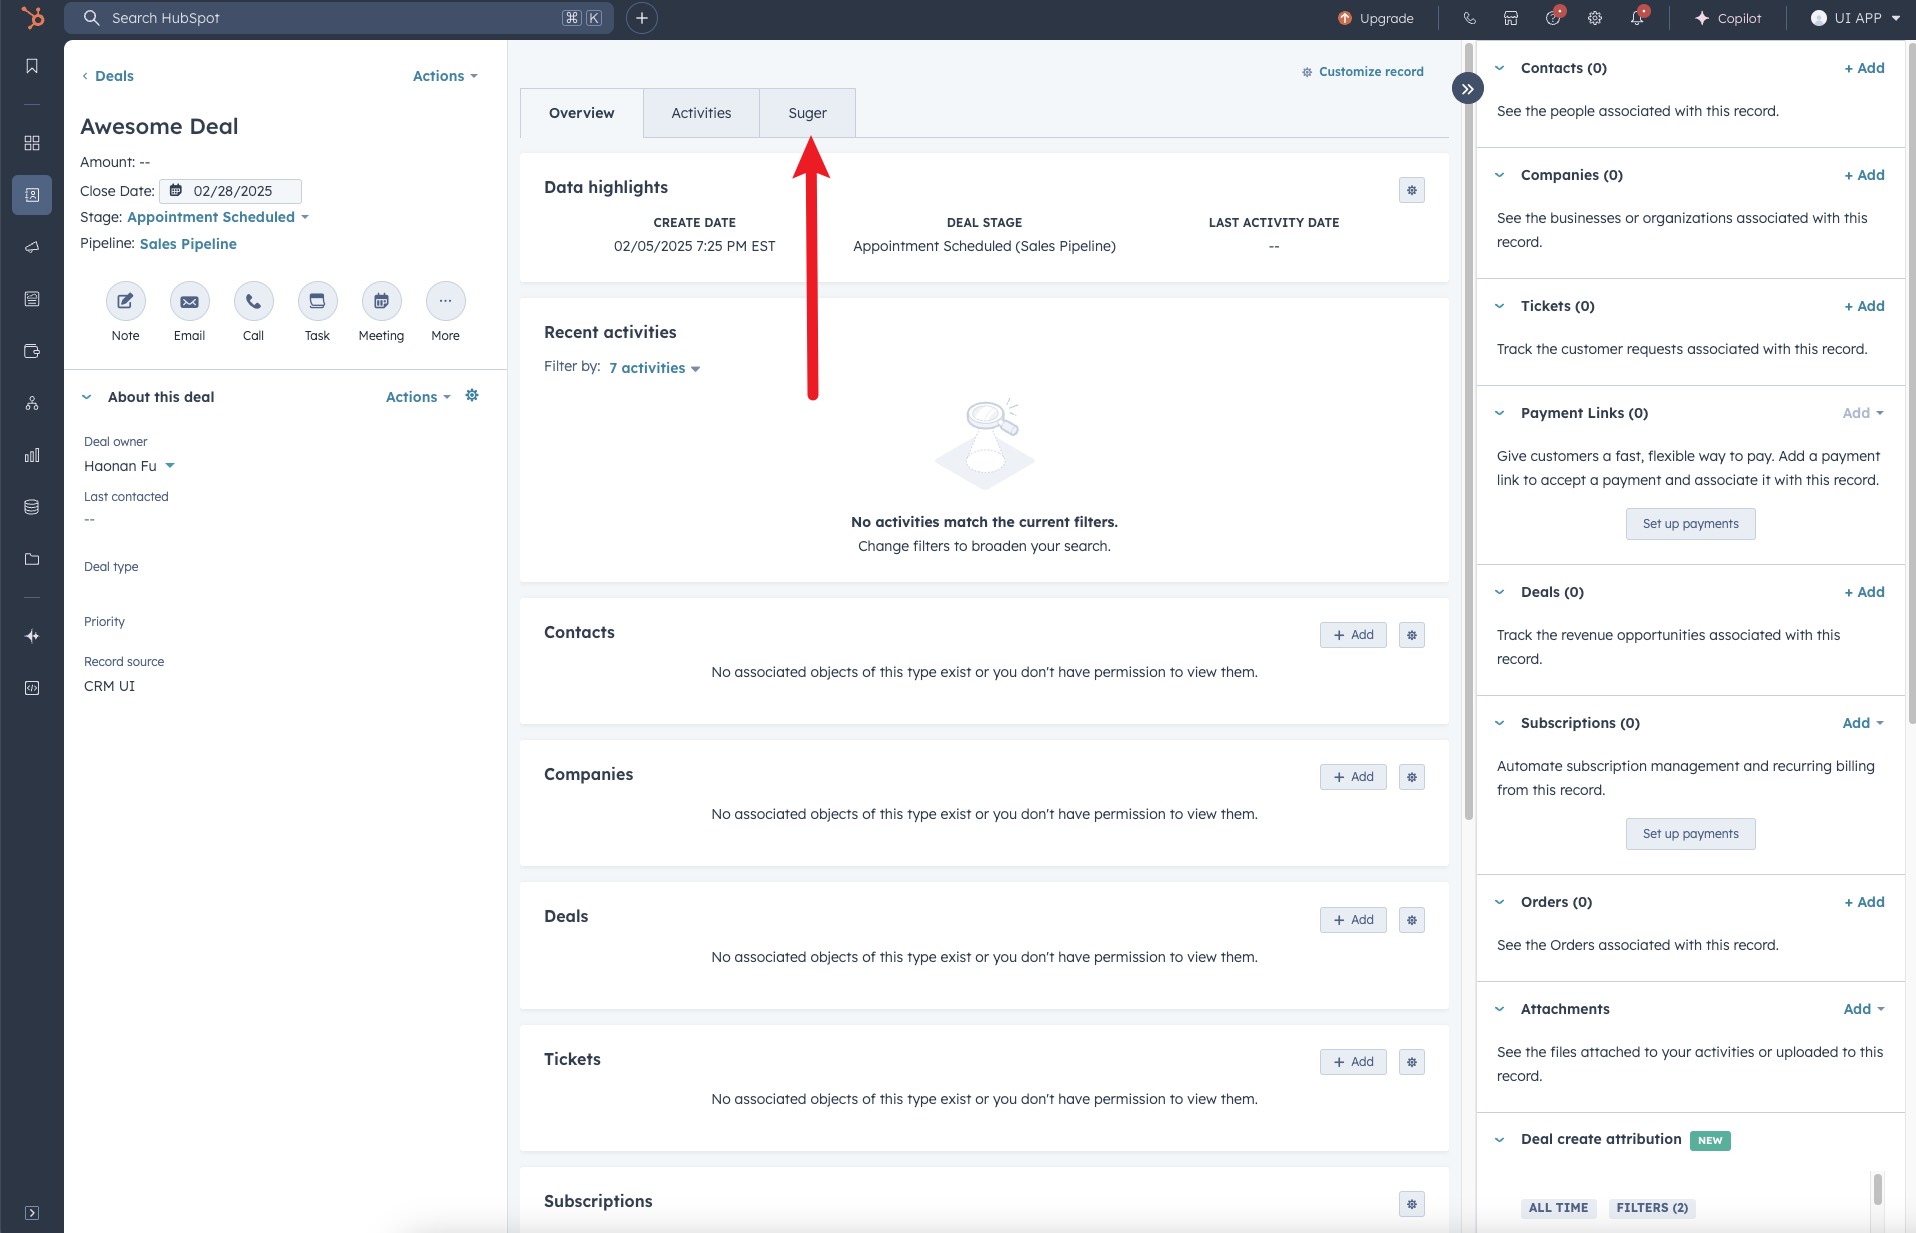
- Navigate to the deal’s detail page and click the “Suger” tab at the top of the page.
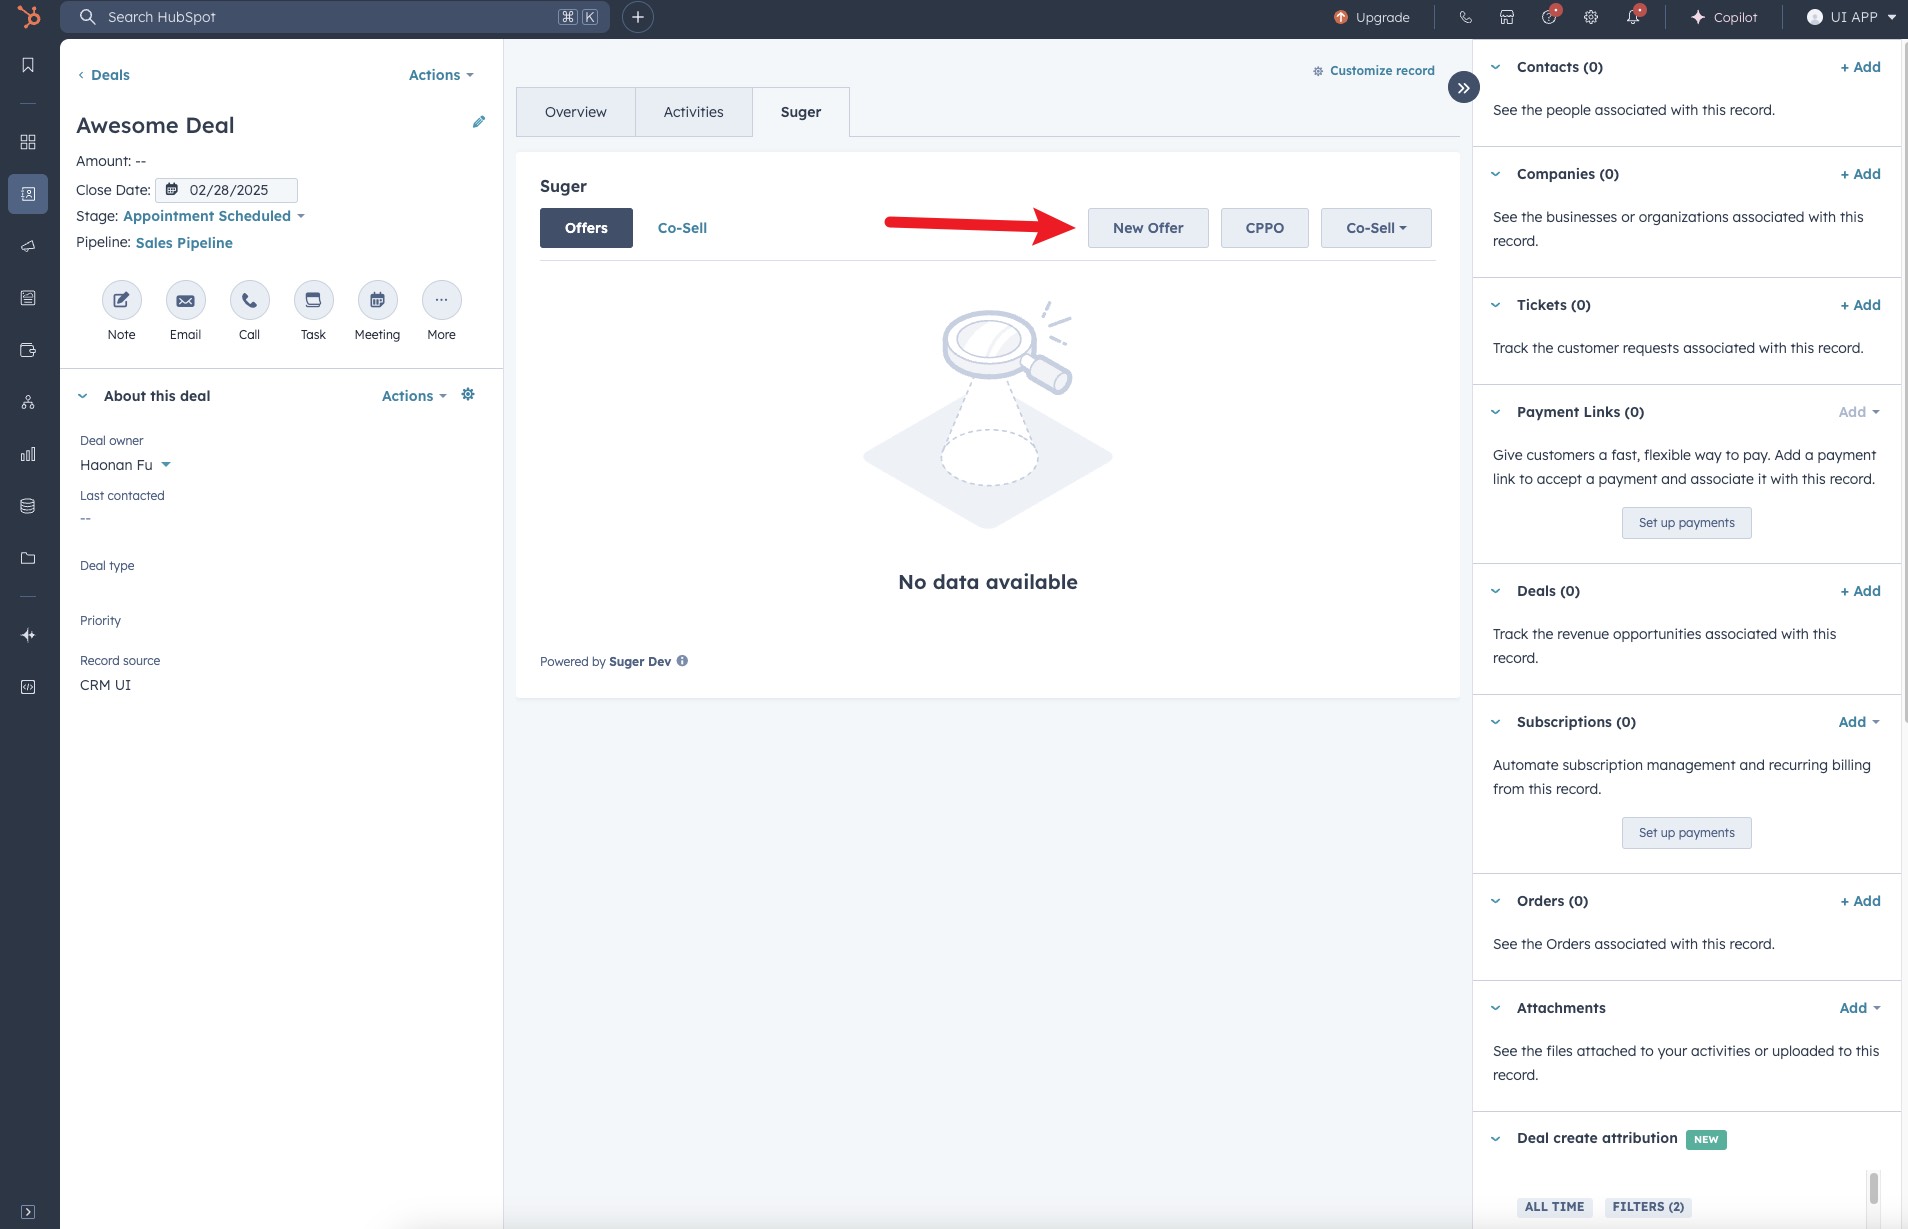
- Locate and click the “New Offer” button.
-
The Create Private Offer panel opens with “Choose the type of offer you wish to create.” Pick one of the three types:
Option Use it when Private Offer You are sending a new negotiated offer directly to an end customer Amendment Offer You are changing an offer or agreement that already exists Reseller Offer You are creating the offer as a reseller, based on an authorization an ISV granted you
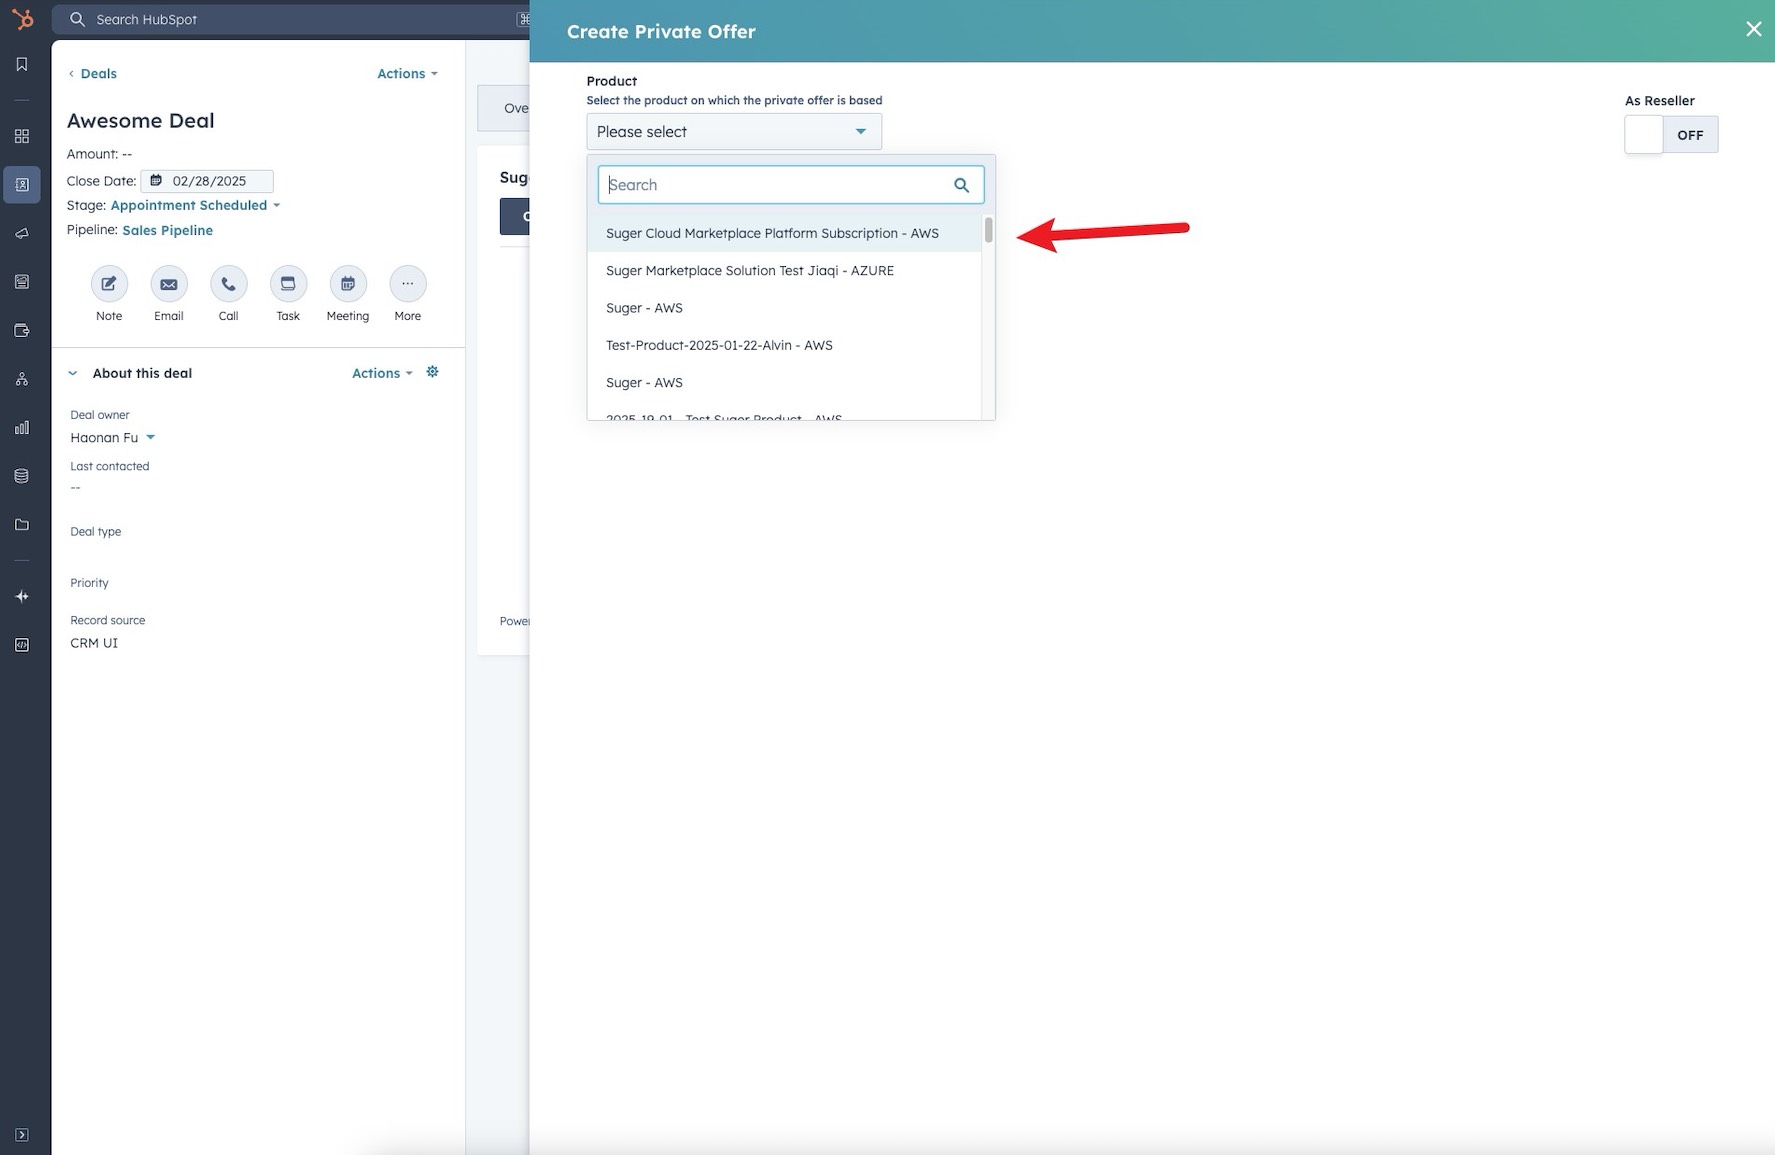
- Choose the product on which the private offer will be based. The product list shows only products available in your Fours account.
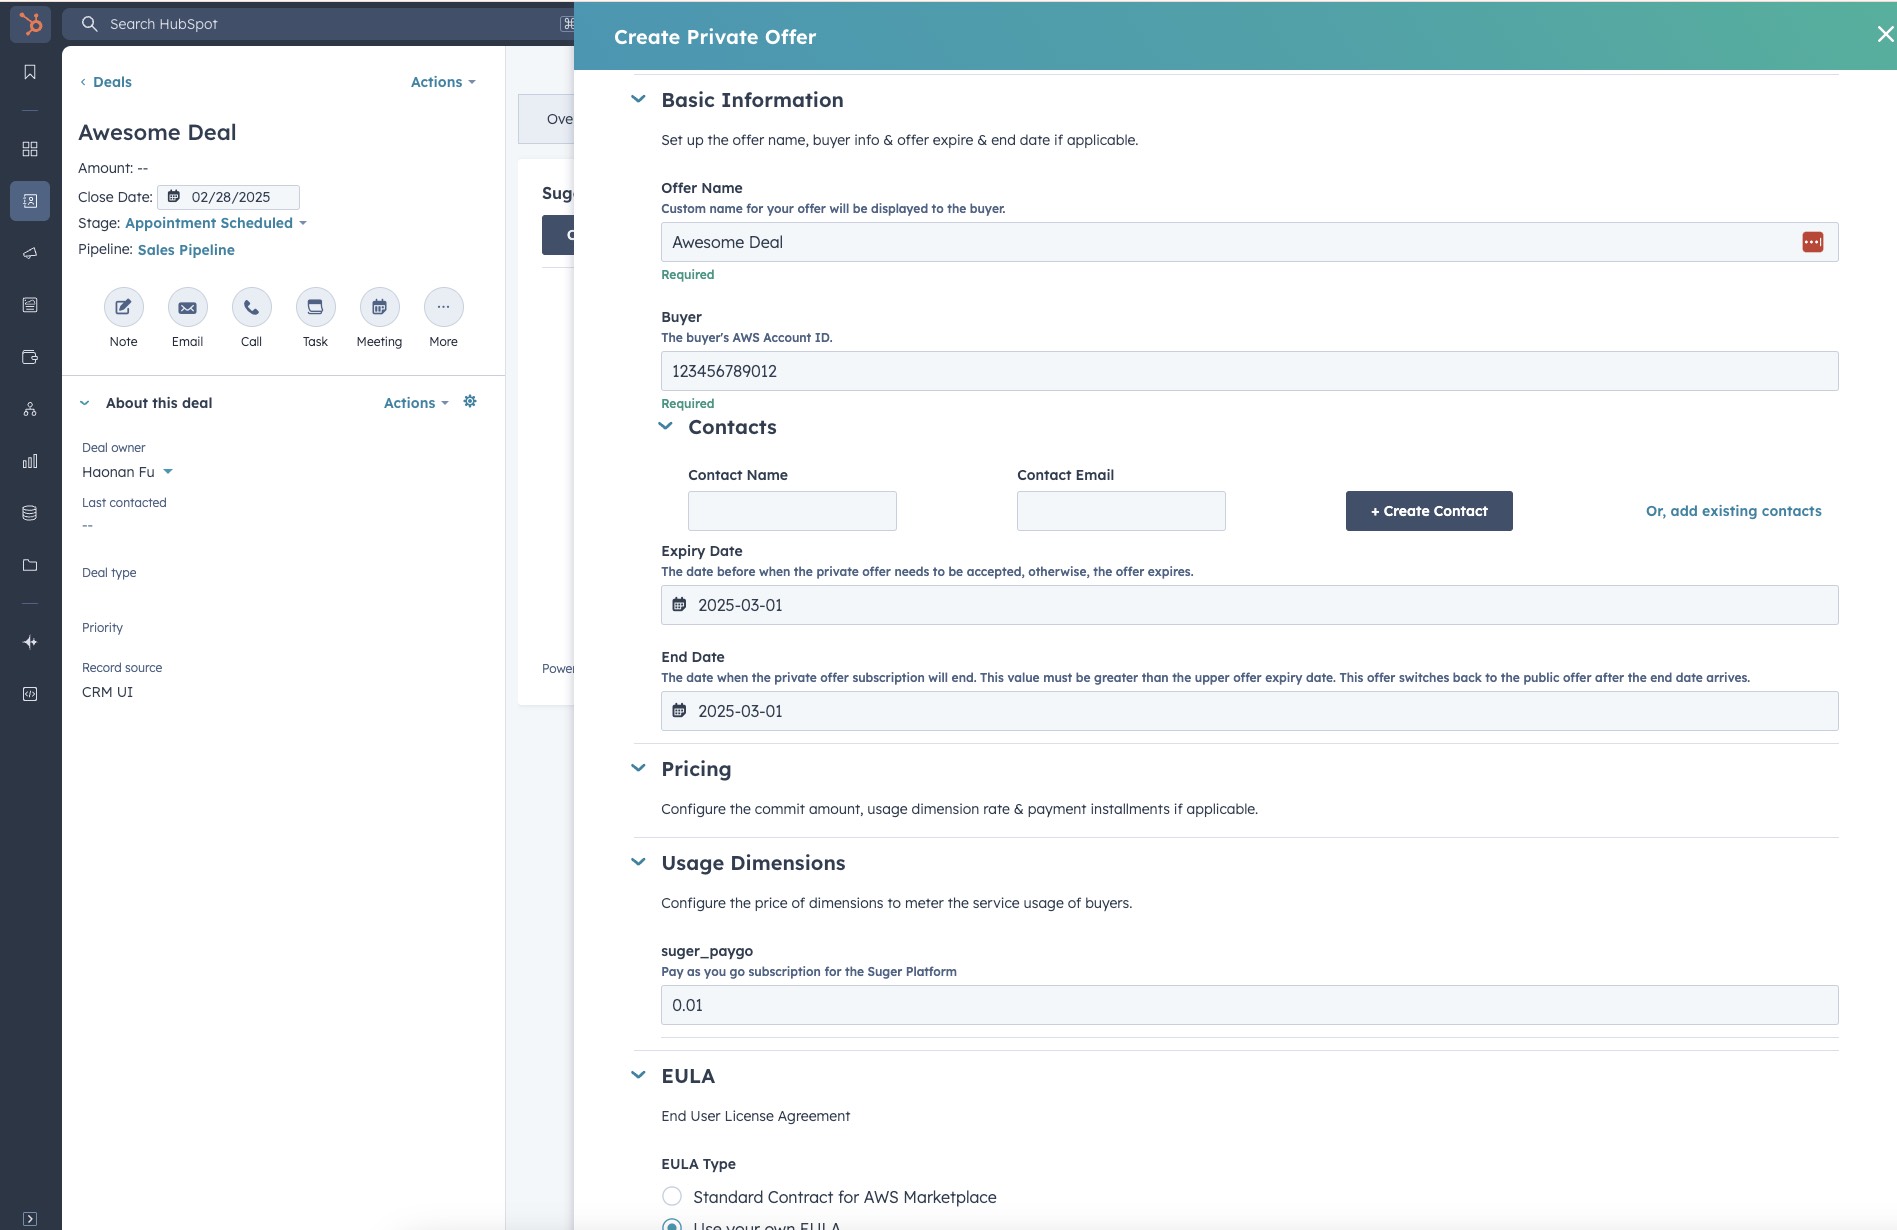
- Complete the required fields in the form. Note that the required fields may vary depending on the cloud marketplace and the type of offer.
- Once all necessary information is filled in, submit the form to create the offer.
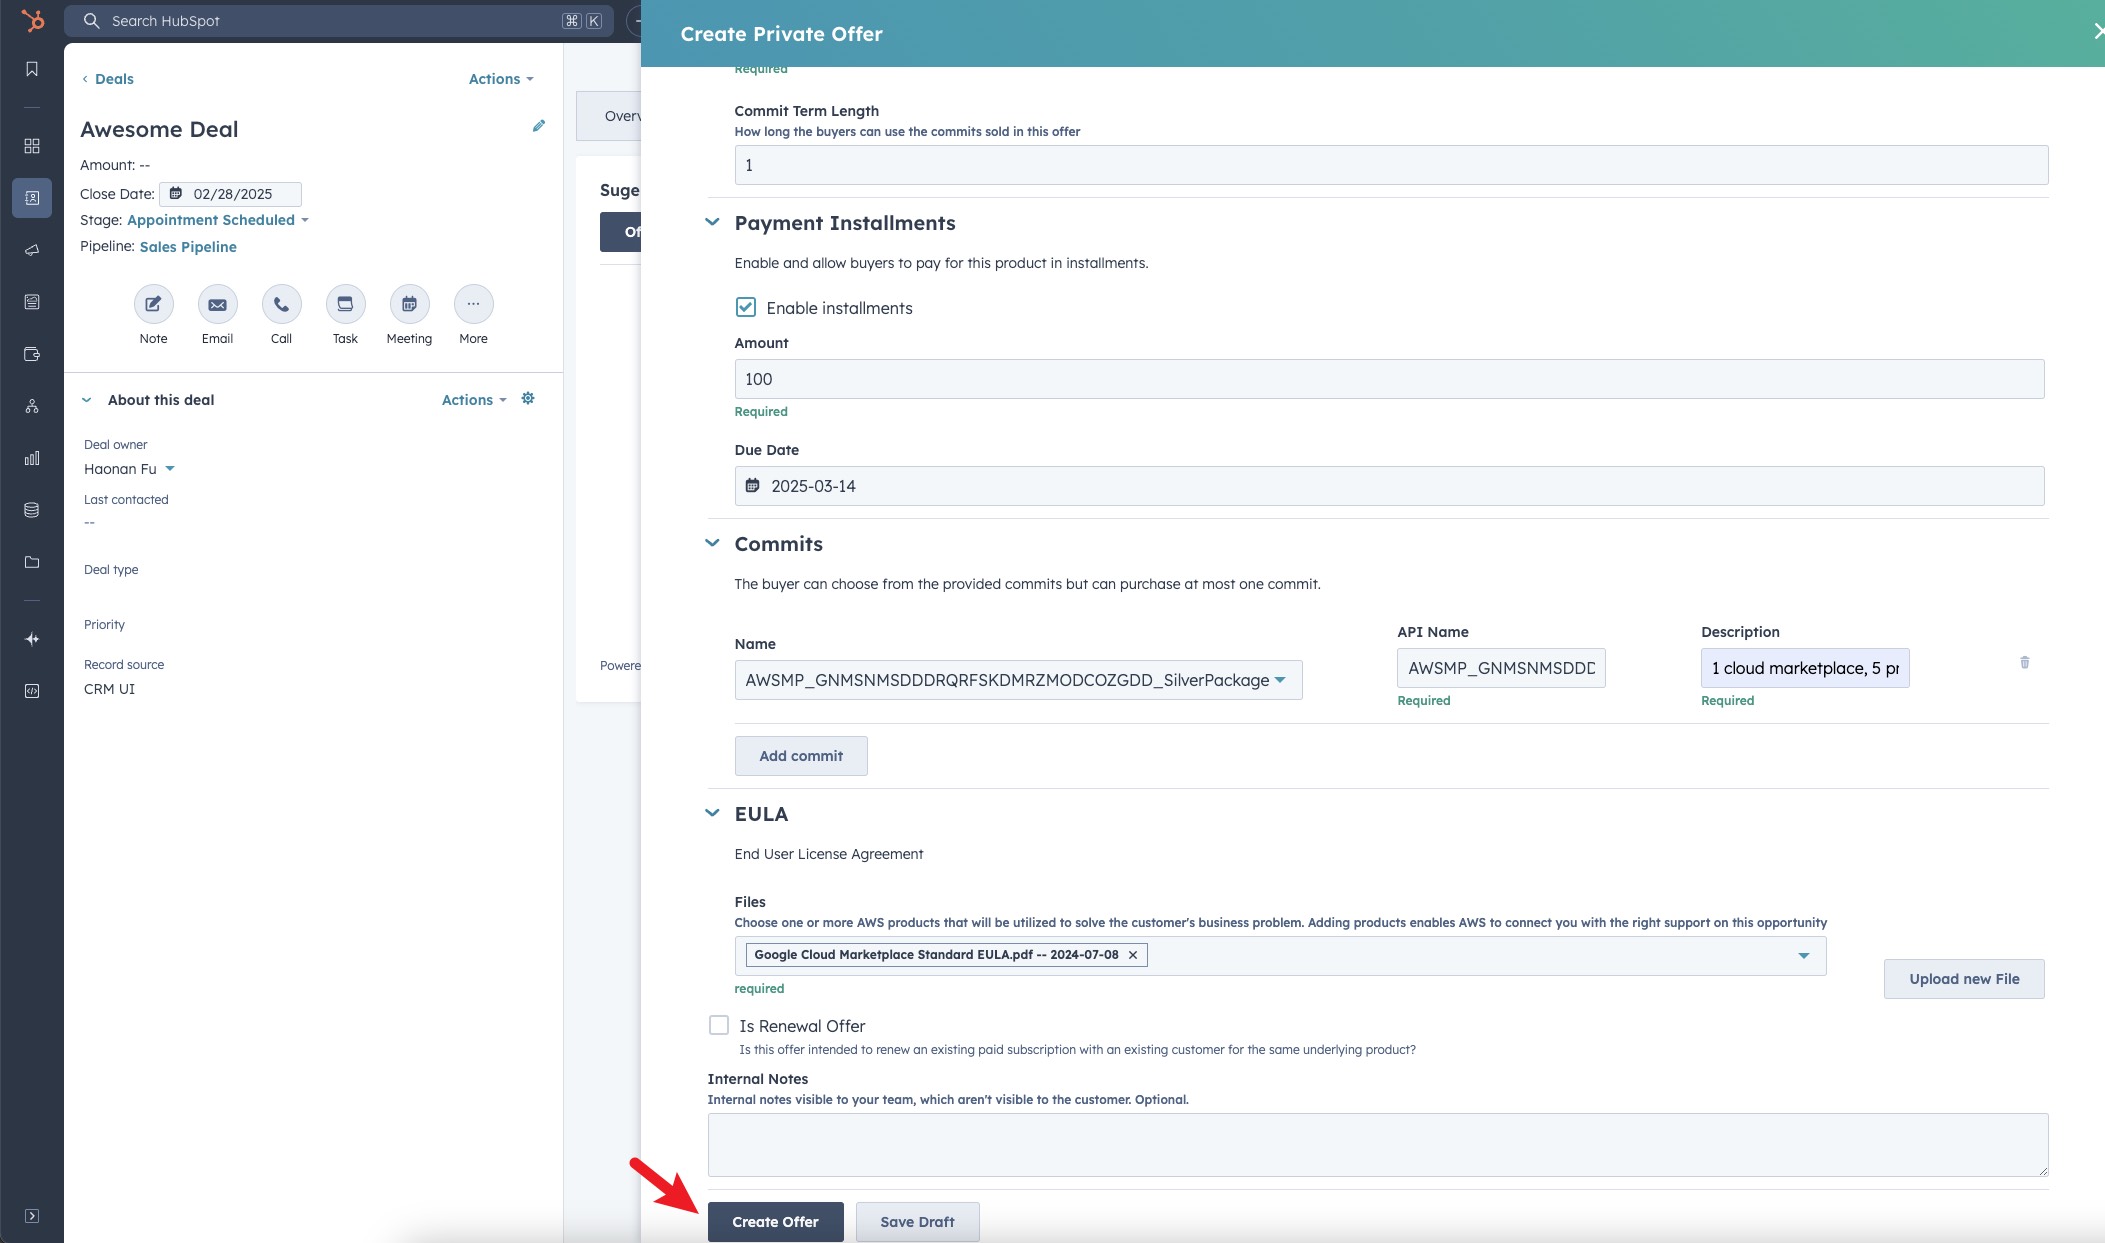
- You are all set!
Contacts on the offer
The AWS offer forms and the Azure private-offer forms (SaaS, Flat Rate, Per User and virtual machine products) have a Contacts section. Enter a Contact Name and Contact Email and click + Create Contact, or click Or, add existing contacts and pick from the deal’s HubSpot contacts in Select Contacts. The contacts are saved on the Fours offer, and Fours emails them only through the Offer Notification Contacts rule in your email notification settings.
On Azure these contacts replace the form’s old Notification contacts list of email addresses, and they are not sent to Microsoft. The Azure New Resale forms keep their email list.
AWS: buyer net payment term
Every AWS offer form — SaaS, agreement-based, container, machine learning, professional services, and reseller — carries a Buyer net payment term field. It sets how long the buyer has to pay after being invoiced.
Leave it on Customer’s net terms with AWS and nothing changes: the buyer keeps whatever terms they already have with AWS. Choose a custom term and you pick one of six:
| Option | |
|---|---|
| Net 15 days | Net 60 days |
| Net 30 days | Net 90 days |
| Net 45 days | Net 120 days |
Once the offer exists, the term is shown on the offer detail as Buyer payment term.
AWS: offer purpose on an amendment offer
On AWS, an Amendment Offer is an agreement-based offer built on the buyer’s existing agreement. Its form asks for an Offer purpose, directly under Offer Name:
| Choice | What it means |
|---|---|
| Renewal of a pre-existing entitlement | This offer renews an existing entitlement with this customer for the same product. Fours declares the offer to AWS as a renewal of an existing agreement. |
| Not a renewal | This offer does not renew a pre-existing entitlement with this customer for the same product. Nothing is declared to AWS. |
An amendment offer starts on Not a renewal, so a renewal is declared only when you choose it. A saved draft reopens on the choice it was saved with.
For more on agreement-based offers, see Agreement Based Private Offer.
AWS: the ISV’s EULA on a Reseller Offer
When you create an AWS Reseller Offer from a resale authorization, the form’s EULA section shows the agreement the ISV attached to that authorization in a read-only ISV document box: The ISV has provided an End-User License Agreement (EULA) for this resale authorization. It names the type — Custom EULA, Standard Contract, ISV Standard EULA, or EULA — and, when the document can be opened, a View EULA button that opens it in a new tab. The box appears only when the authorization carries an EULA; a custom EULA with no file attached is not shown.
To attach your own files instead, tick Add Custom EULA below the box.
AWS: pre-authorized renewal terms
The AWS SaaS, container and professional-services offer forms carry a Configure renewal terms section for pre-authorized auto-renewal. It appears whenever the selected product has at least one commit (contract) dimension. A product that also meters usage qualifies too — only the commits matter.
- Container offers also need a committed pricing model. On a usage-based or free pricing model, or for a product that is free only, the section stays hidden.
- AMI products never show it. The container offer form also handles AMI products, and for them it leaves the section out: AWS offers no auto-renewal on an AMI product.
- No commits, no renewal term. If you switch to a product without commits, any renewal term the form was carrying — for example from a draft — is dropped, so it is never submitted.
What each renewal option means is covered in Pre-Authorized Auto-Renewal. Once the buyer accepts, you manage the renewal from the deal’s Entitlements tab — see Adjust the renewal uplift.
Choose a renewal option
On a new offer the section starts on No renewal. Each option is a card of its own, and the fields for the option you pick open inside its card:
| Option | What it does |
|---|---|
| No price uplift | Renew at the same price each cycle. |
| Price uplift | Increase pricing each cycle by a Fixed percentage — the Price increase percentage, 0 to 100 — or within a Percentage range set by a Minimum, Maximum and Default uplift percentage. |
| No renewal | Do not include auto-renewal terms with this offer. |
The selected option’s card has an icon-only toggle that folds its fields away and opens them again. Folding changes nothing — the option stays selected and every value is kept — and it works even while a value is invalid; the offer still can’t be sent until you fix it. Selecting a different option opens that option’s fields.
Percentage range prefills a Minimum of 5%, a Maximum of 30% and a Default uplift percentage of 10%, so adjust the band to the one you agreed with the buyer. It also fills in the Adjustment deadline (Days before agreement expiration) with 30 days more than the renewal decision deadline — so the uplift is settled 30 days before the opt-out decision closes — or with 30 days when the renewal decision deadline is blank.
Both renewing options then ask for the Renewal decision deadline and the Renewal count — Definite, with a Number of renewals, or Indefinite. On an offer that bills in installments, they also carry a renewal payment schedule.
Renewal decision deadline
Renewal decision deadline (optional) replaces the field that used to be called Lockout period. It is the number of days before the agreement expires after which neither party can opt out of the renewal. It opens empty: left blank, the deadline is the agreement expiration date. If you set it, it must be at least 1 day, and on a percentage range the adjustment deadline must be greater than it.
Both deadlines must land inside the contract term. Each is counted back from the end of the contract, and the form works out the calendar date it lands on. A deadline that falls outside the term stops the offer before it is sent, with an alert that names the date and the term — for example:
Renewal decision deadline (800 days) falls on 2025-07-23, which is not inside the contract term (2026-10-01 → 2027-10-01).
The same check applies to the Adjustment deadline. The contract term is read from real dates: the term length — in days, months or years — added to the offer’s start date, or the start and end dates when you set the term by dates. A 12-month term from 2026-10-01 ends on 2027-10-01, 365 days later. When the offer has no start date because its term starts when the buyer accepts, the term is counted from today.
Renewal payment schedule
The renewal payment schedule sets how each renewed term is invoiced — up to 86 installments, totaling 100%. It has no switch of its own. On a SaaS or professional-services offer it appears with Enable Payment Installments, and turning that switch off removes it; on a container offer, choosing the Contract pricing with installment plan pricing model makes it appear.
It starts as a copy of the offer’s own installments. Each installment you entered for the initial term becomes a row at the same point in the renewed term, with the same share of the total, and each row keeps its own day of the month — installments on 30 September, 31 December, 31 March and 30 June stay on those month ends.
The rows count months of the agreement from the offer’s start date. With a 15 October start, an installment on 1 November still falls in the agreement’s first month, so it becomes the Agreement start date row, with Day of month 1. An offer with no start date — its term starts when the buyer accepts — counts from its earliest installment, which becomes the Agreement start date row. Either way, twelve monthly installments that begin in the agreement’s first month fill Agreement start date through Month 11 of the agreement. A few cases read differently:
- If two installments fall in the same month — the same month of the agreement on an offer with a start date, the same calendar month on one without — the rows are timed in exact days rather than months.
- Installments on the same date become one row.
- If an installment’s date is missing or invalid, an amount is missing or negative, or the amounts total zero, the schedule is a single row: 100% at the agreement start.
- A row that falls in the contract’s last month gets no day of its own; see Day of month below.
While the schedule is still exactly what was copied, changing the offer’s installments or its start date copies them again. Once you edit a row, your schedule is kept as you left it, and a draft reopened with a saved schedule keeps that schedule, apart from any day saved on the last month’s row, which is cleared.
Each row has:
| Field | What it holds |
|---|---|
| Months after agreement start or Days after agreement start | When the installment is due. The timing in words sits underneath — for example Agreement start date, Month 3 of the agreement or 45 days after the agreement starts. |
| Day of month (optional) | The billing day, on a schedule timed in months. On the row in the contract’s last month — Month 11 of the agreement on a 12-month or 1-year term, the Agreement start date row on a 1-month term — the field is locked and reads Start day: AWS bills that installment on the same day of the month the renewal starts and doesn’t allow a custom day there. The lock applies only when the term is a length in months or years; with a term set by dates, or a length in days, every row keeps its day. |
| Percentage of TCV | The row’s share, 0.01 to 100 with at most two decimal places |
| Estimated first renewal cycle payment amount | Shown when the offer’s installments carry amounts: the row’s share of the first renewal cycle — the contract total after one cycle of uplift, at the fixed percentage or the range’s default — in the offer’s currency. The rows add up exactly to that cycle’s total. |
When the installments carry amounts, Original contract total and Contract duration appear above the rows — the figures the rows are priced against. The duration reads, for example, 12 months · 365 days, or 12 months · Starts when the buyer accepts for an offer whose term starts on acceptance.
- Due date calculation — By month or By exact days — sets the unit for the whole schedule; rows no longer carry a unit of their own. Switching it converts every row at 30 days to a month.
- Renewal Payment Scheduler generates equal installments from a Payment frequency (Monthly, Quarterly, Semi-annually, Annually or Custom), a Due date calculation, a Number of installments (up to 86) and, when timed by month, an optional Day of month. Check the Plan preview, then click Create to replace the rows. On a term in months or years, the Day of month hint reminds you that the last month always bills on the renewal start day, and the preview marks that row renewal start day.
- New payment installment adds a single row. Underneath, the schedule counts its installments and shows the Allocated and Remaining percentages — whole numbers without a decimal point, as in Allocated: 100% — and, when the installments carry amounts, the Estimated renewal total: the first renewal cycle’s total in the offer’s currency, which the rows add up to once the schedule is fully allocated. It stays the same while you are still allocating.
On a term that is a length in months or years, with Due date calculation set to By month, a row that falls after the term’s last month — Month 12 of the agreement or later on a 12-month term, which a Renewal Payment Scheduler plan of 13 monthly installments would produce — is flagged under its Months after agreement start field: Month 12 is after the last month of this 12-month contract. Use month 11 or earlier. Clicking Create Offer doesn’t send the offer while a row is past the term: a Validation Error alert carrying the same message appears and nothing is submitted, so move the row inside the term — or rebuild the schedule with fewer installments — and click Create Offer again. This applies to the SaaS, container and professional-services forms.
Azure: start and end months
On the Azure SaaS and virtual machine offer forms, the Start Date and End Date are picked as a month and a year, not a day (the Expiry Date is still a day):
- Start Date — choose Accepted Date, when the customer accepts the offer, or Specific Month, the first day of the month you select. With Specific Month, pick a Start month and a Start year; a line beneath reads, for example, Offer starts 2027-02-01 00:00:00 UTC — always the first day of the selected month.
- End Date — pick a month and a Year. The line beneath reads, for example, Offer ends 2027-12-31 23:59:59 UTC — always the last day of the selected month.
The year lists run from this year to five years ahead. A month you can’t use is left out of the list. A month or year already on the offer — from a draft, for example — stays selected even when it falls outside those limits, and shows its error until you change it. The limits: a start month must begin after the offer’s Expiry Date and after today, and an end month must end after the expiry date and after a specific start month. A date the form can’t accept shows The start date must be later than the expiry date., The start date must be in the future., or The end date must be later than the start date. (or … than the expiry date.). On the virtual machine form, Specific Month with no start month chosen stops with Start date is required when using specific start date option.
Month boundaries are Microsoft’s rule: its private offer FAQ says a private offer set to a specific month starts on the first day of the month and ends on the last day, in UTC, and that specific start and end dates can’t be selected. For how the dates relate to the buyer’s subscription, see Create an Azure private offer.
Azure: automatic subscription activation
An Azure SaaS offer form carries Automatically activate the subscription on purchase.
- Checked — Azure activates the SaaS subscription automatically once the customer purchases the offer.
- Unchecked — your team activates it.
The checkbox appears only when your Azure integration is set to self-managed subscription activation and the offer uses V2 pricing. On any other combination it is hidden, because the setting cannot be carried on the offer at all. See Azure Marketplace integration settings.
Azure: custom contract terms and renewal
On an Azure offer, the Contract Duration toggle includes a Custom option. Choosing it reveals two more fields:
- Custom Duration Unit — months or years.
- Custom Duration Value — the length. The helper text is “1–120 months or 1–10 years; month values divisible by 12 must use years”, so a 24-month term has to be entered as 2 years.
A custom term also makes Renewal Behavior required, and its “no renewal” option is hidden — Azure will not accept a custom-term offer without a renewal decision. The options are:
| Renewal Behavior | What happens at the end of the term |
|---|---|
| No renewal configured | The subscription does not renew. Not available when the term is custom |
| Renew into private offer | The customer rolls into the private offer pricing again |
| Renew into public offer | The customer rolls onto your public marketplace listing pricing |
When you pick a renewal that continues the subscription, set Renewal Contract Duration and Renewal Billing Frequency underneath it.
Two defaults are worth knowing, because they changed:
- Choosing Custom now pre-selects Renew into public offer. If you want the customer to roll into the private pricing again, change it yourself — the form no longer assumes it.
- Renewal Contract Duration is seeded with the shortest published term on your base plan, and the dropdown is ordered shortest first.
Flexible schedule is never offered under Billing Frequency when your base plan is a multi-market plan, one whose recurring price is set per market, because Fours’ flexible schedules carry USD installments only. Pick another billing frequency for such a plan. The same holds for a multiparty private offer created with New Resale. (An Azure Amendment Offer is not available in the HubSpot app.)
GCP: usage plan pricing model
When the plan you pick for a GCP offer is a usage plan, the form asks for a Usage Plan Pricing Model. Until you choose one, its description reads “Select the pricing model for the usage plan.” Once you do, the description shows the hint GCP’s Producer Portal gives for that model:
| Usage Plan Pricing Model | Description once selected |
|---|---|
| Commitment discount with additional usage at list price | The customer promises to pay a discounted amount. All usage, including overages, is list price. |
| Commitment with all usage discounted | The customer promises to pay an amount. All usage, including overages, is discounted. |
| Usage-based discount only | The customer pays a discounted amount for what they use |
The field appears on every GCP form that prices a usage plan: a Private Offer, an Amendment Offer, and a resale authorization created with New Resale. On an amendment, keep the model of the offer you are replacing — GCP refuses an amendment that changes it. The form fills the model in from that offer when it can; if the field is empty, choose the model the original offer uses. How each model charges for usage is explained in Usage-Based Offers.
GCP: expiry within three months
Google Cloud Marketplace requires an offer to expire within three months. On a GCP offer that limit applies to the Expiry Date, and on a GCP resale authorization to the Acceptance Due Date. The date picker still lets you choose a later date, but Fours refuses the offer when you submit it, before anything is sent to Google, and the error alert names the date you picked and the last one you can use — for example:
the offer expiration date (January 5, 2027) is too late. Google Cloud Marketplace requires offers to expire within 3 months, so choose a date on or before December 22, 2026
Pick that date or an earlier one and submit again. Saving a draft does not check the date; the check runs when you submit. How the last allowed date is worked out is covered in Set pricing information.
Manage an offer after it is created
Each row in the Offers tab has an actions menu:
| Action | What it does |
|---|---|
| Cancel Offer | Cancels the offer so the buyer can no longer accept it |
| Extend Expiry Date | Pushes the offer’s expiry date out |
| Edit Offer Info | Edits the offer’s descriptive information |
| Clone Offer | Starts a new offer pre-populated from this one. Not available on agreement-based (amendment) offers, on a reseller’s offer to the buyer (CPPO), or on a resale authorization you received (CPPO_IN). A resale authorization you sent (CPPO_OUT) can be cloned |
| Edit draft | Reopens an offer that never reached the marketplace so you can correct and resubmit it. Shown on DRAFT, CREATE_FAILED, and INVALID offers |
EULA files on a clone. A clone copies the original’s EULA files only when Fours can attach them again. A file it can’t reuse — for example the marketplace’s link on an offer synced from AWS, Azure or Google Cloud — is cleared together with the rest of that EULA’s files, and the form shows The EULA file from the original offer can’t be reused. Upload it again. Upload the files again before you click Create Offer. The EULA type and the attach options stay as they were, except on a Google Cloud resale authorization, whose custom reseller agreement type is cleared along with its file. A resale authorization’s reseller agreement files follow the same rule — see Create CPPO.
When Extend Expiry Date is available
Extend Expiry Date is offered when the offer’s status is one of:
| Status | Why it is extendable |
|---|---|
| PENDING_ACCEPTANCE | The buyer has not accepted yet and needs more time |
| EXPIRED | The offer lapsed and you want to revive it |
| UPDATE_FAILED | A previous extend attempt failed — extend again to retry it |
It is never available in these cases:
- CPPO offers. A CPPO is created and owned by the reseller, so the ISV cannot extend it.
- AWS resale authorizations (CPPO_OUT). AWS does not support extending an authorization.
- Azure offers on v1 pricing. Only v2 and v3 Azure pricing can be extended.
- Azure resale authorizations. They have no expiry date to extend — see Azure: grant a resale authorization.
GCP: replaced offers
When a GCP offer replaces an earlier one, the offer detail shows Replaced Offer ID — the identifier of the offer it supersedes. Once Fours resolves that identifier, a Replaced Offer row appears with the replaced offer’s name, so you can see at a glance which offer this one took over from.
GCP: dates in Pacific time
On a GCP offer’s detail, Start Date, Expire Date, Accept Date and End Date show a date and time in Pacific time, with PST or PDT — for example 8/31/2026, 11:45:00 PM PDT — rather than a UTC date. Pacific time is the calendar GCP Marketplace keeps, so the dates line up with GCP’s Producer Portal.
Fours also counts a GCP term from the Pacific calendar day it starts on. An offer whose term starts when the buyer accepts, and that was accepted in the Pacific evening, no longer shows an end date one day later than the Producer Portal.
The Offers table still lists Create (UTC) and Expire (UTC) in UTC, so a GCP offer’s expiry can read one day later there than in the offer detail.
What happens next
After you submit the offer:
- Fours creates the offer and links it to the HubSpot deal.
- The offer is sent to the cloud marketplace for processing.
- Once the marketplace confirms the offer, the offer status updates and the offer URL becomes available.
- Copy the offer URL and send it to the buyer — they use it to review and accept the offer in their cloud marketplace account.
- The offer is also visible in the Fours Console under your offers list.
Troubleshooting common issues
| Issue | Possible cause | Resolution |
|---|---|---|
| No Suger tab visible on the deal page | The Fours app card has not been added to the deal layout | Follow Configuration to add the app card |
| No New Offer button visible inside the Suger panel | The HubSpot integration connection has been disrupted | Go to Fours Console → Settings → Integrations → HubSpot and click Verify to re-verify the connection |
| Product list is empty | No products have been set up in Fours | Confirm that products exist in the Fours Console before creating an offer |
| Form fields are blank — not pre-filled from the deal | Field mapping has not been configured | Field mapping is an optional admin setup. Contact your admin to configure it |
| Offer URL is not available after the offer is created | The marketplace has not finished processing the offer yet | Wait 3–5 minutes and refresh the page. The URL appears once the marketplace confirms the offer |
| An error alert says the offer expiration date (…) is too late when you submit a GCP offer | The Expiry Date is more than three months away, which Google Cloud Marketplace does not accept | Pick the date the message names, or an earlier one, and submit again — see GCP: expiry within three months |
| A Validation Error alert includes Month 12 is after the last month of this 12-month contract. Use month 11 or earlier. when you click Create Offer on an AWS offer | A row in the renewal payment schedule is timed after the contract’s last month — Month 12 of the agreement or later on a 12-month term | Fix the row the form flags: move it into the term, or rebuild the schedule with fewer installments, and click Create Offer again — see Renewal payment schedule |
| Offer was created but is not visible on the deal | Sync between Fours and HubSpot is delayed | Refresh the page after a few minutes. If it still doesn’t appear, confirm the offer was created successfully in the Fours Console |
Frequently asked questions
Can I create offers for AWS, Azure, and GCP from HubSpot?
Yes — as long as products are set up for each cloud in Fours. The product selector in the offer form shows all available products across clouds.
What is field mapping and do I need it?
Field mapping is an optional configuration that automatically pre-fills offer form fields with data from the HubSpot deal — like company name, deal value, or close date. It saves time and reduces manual entry errors. You can still create offers without it, but you’ll need to fill in all fields manually.
Will the offer show up in the Fours Console too?
Yes. Any offer created from HubSpot is also visible in the Fours Console under your offers list.
Can I link offers that weren’t created from HubSpot to a deal?
Yes. In the Fours Console, Bulk link on the Offers page links many private offers to HubSpot deals at once: pick a deal for each offer in the dialog, or upload a CSV of deal IDs. Each linked offer then appears in its deal’s Offers tab. See Bulk link offers to Salesforce or HubSpot.
The buyer can’t find the offer link. What do I do?
Open the offer in HubSpot or in the Fours Console and copy the offer URL directly. Make sure at least 3–5 minutes have passed since the offer was created — the URL is not available until the marketplace confirms it.
Spotted something wrong or out of date on this page? Tell us and we'll correct it.