Create and Assign Partner Journeys
Build reusable, step-by-step playbooks that guide partners through onboarding and other key milestones, then assign them to partners and track progress from one place.
Overview
Journey Templates are reusable, step-by-step playbooks for onboarding and other key milestones in your partner program. You create the template once, assign it to partners as needed, and track progress centrally instead of managing each task by hand.
Create a Template
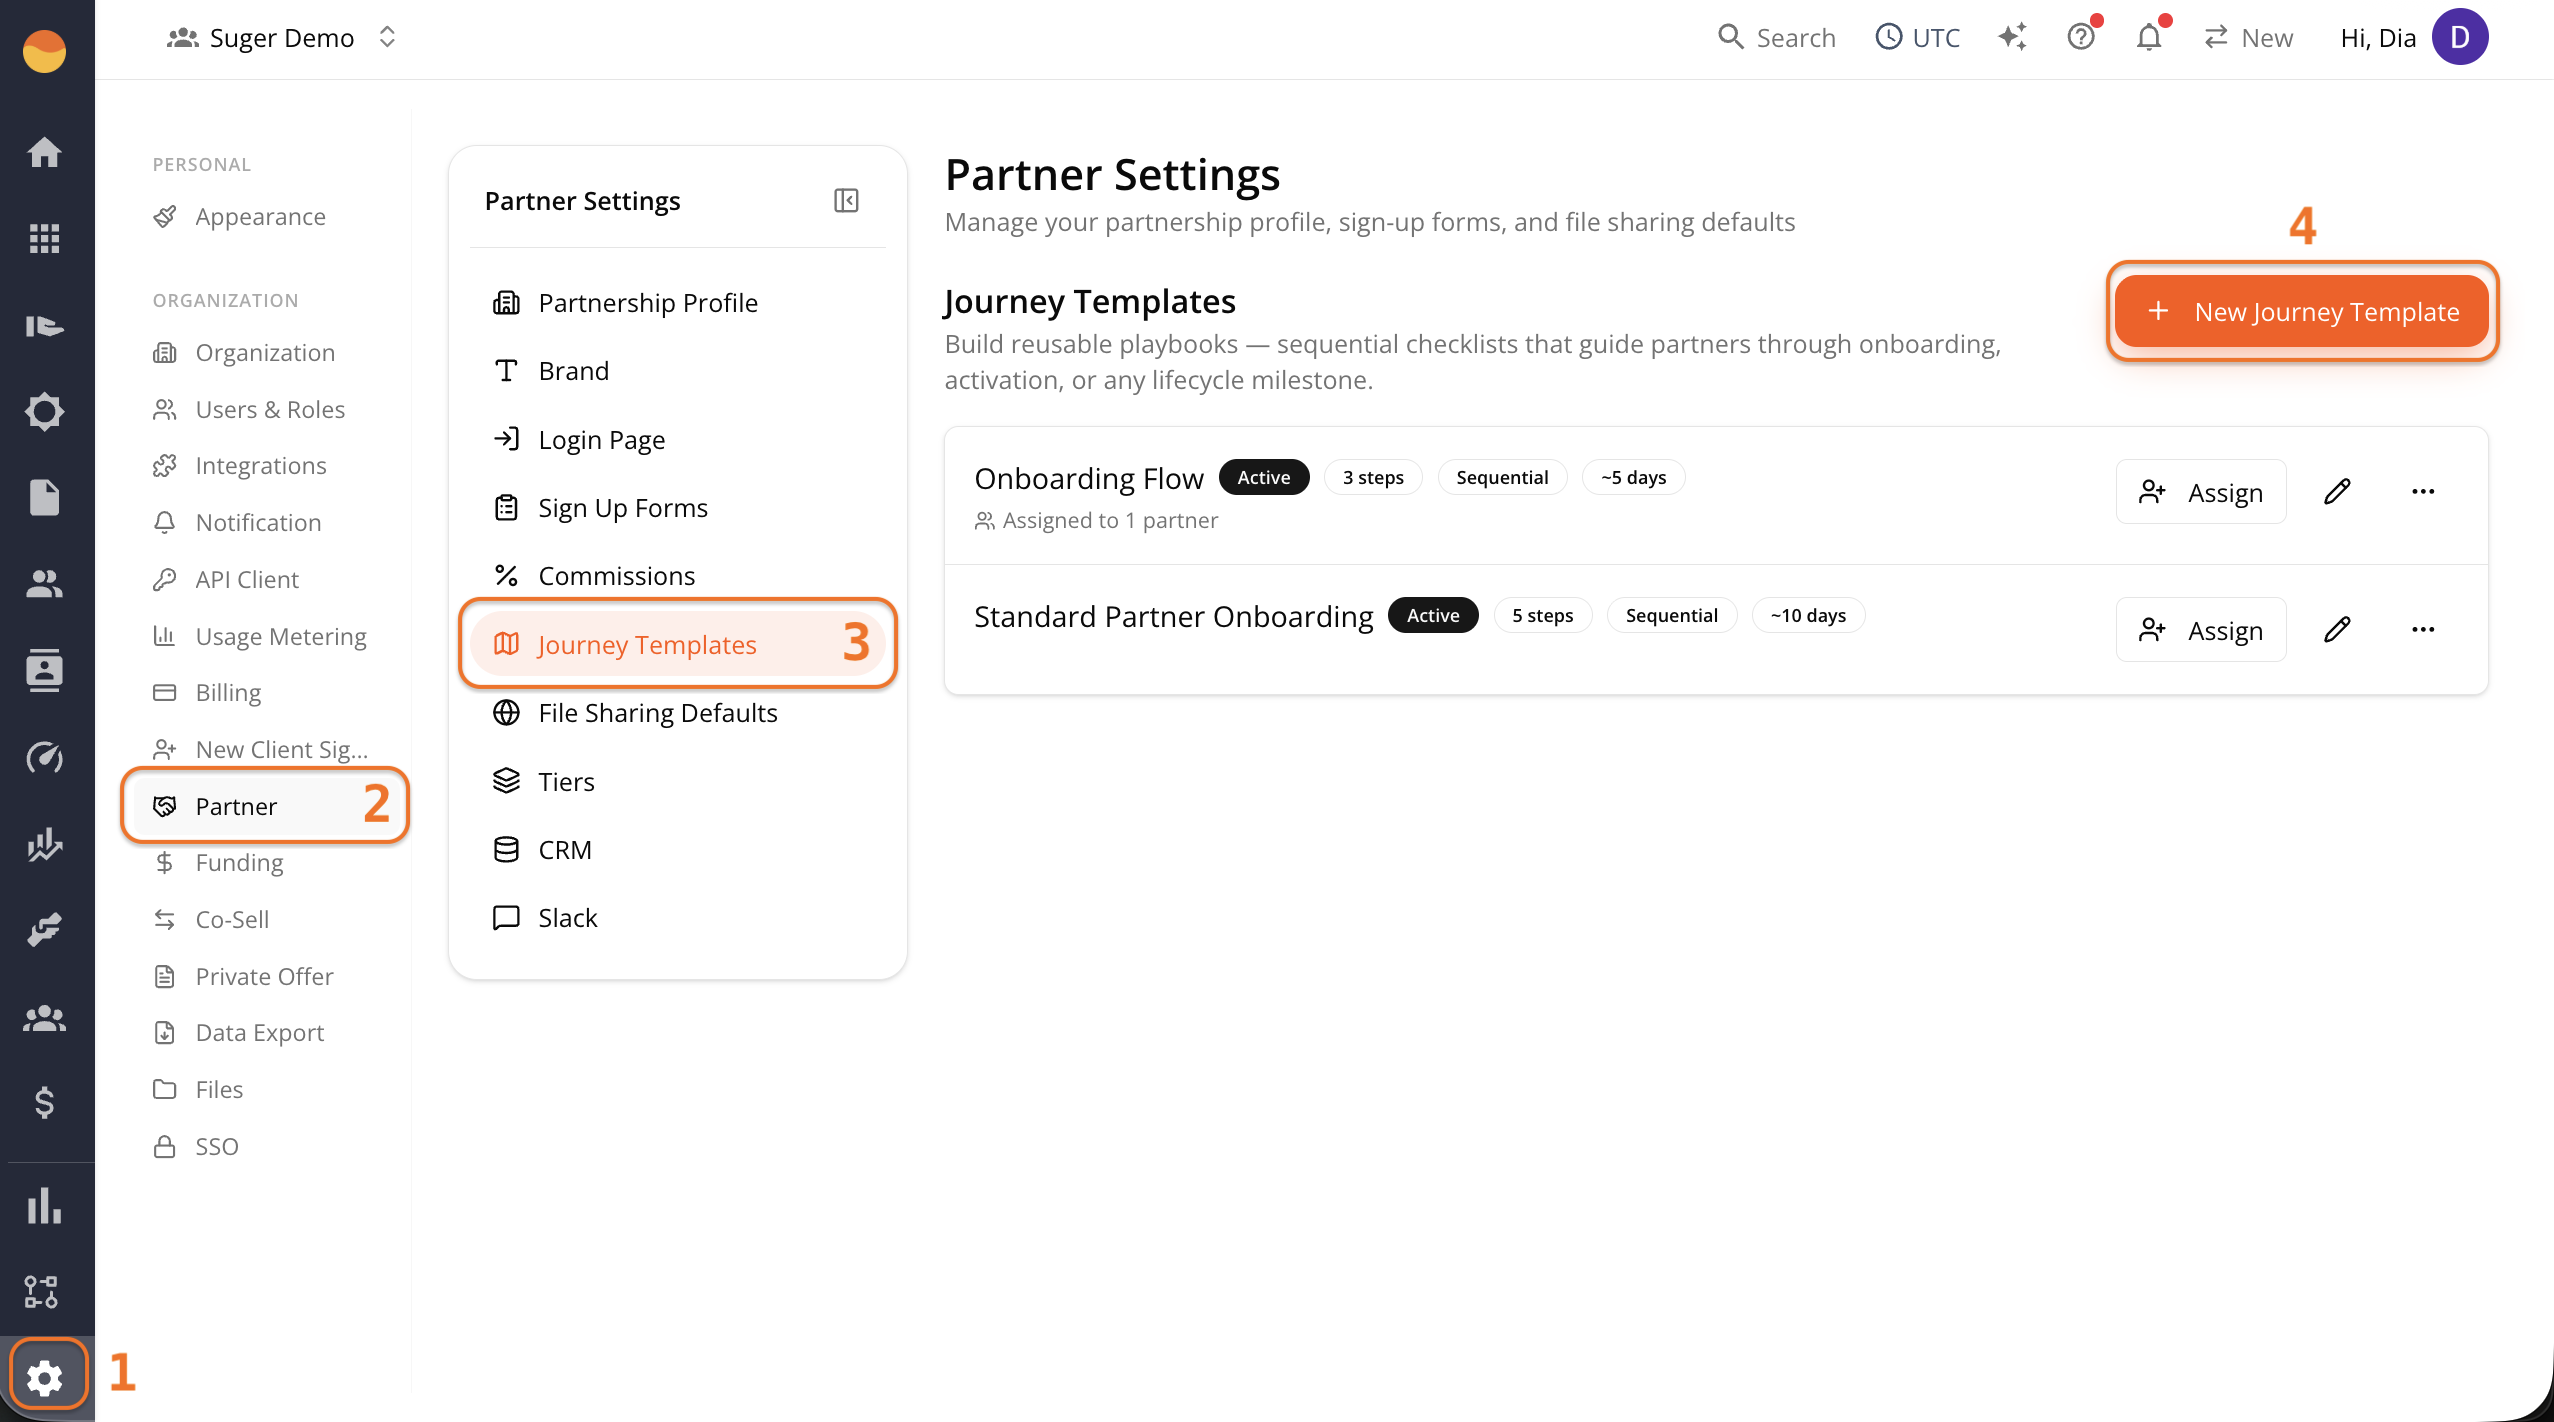
- Go to Fours Console, then Partners.
- Click Settings at the bottom of the rail, then Journey Templates.
- Click + New Journey Templates.
-
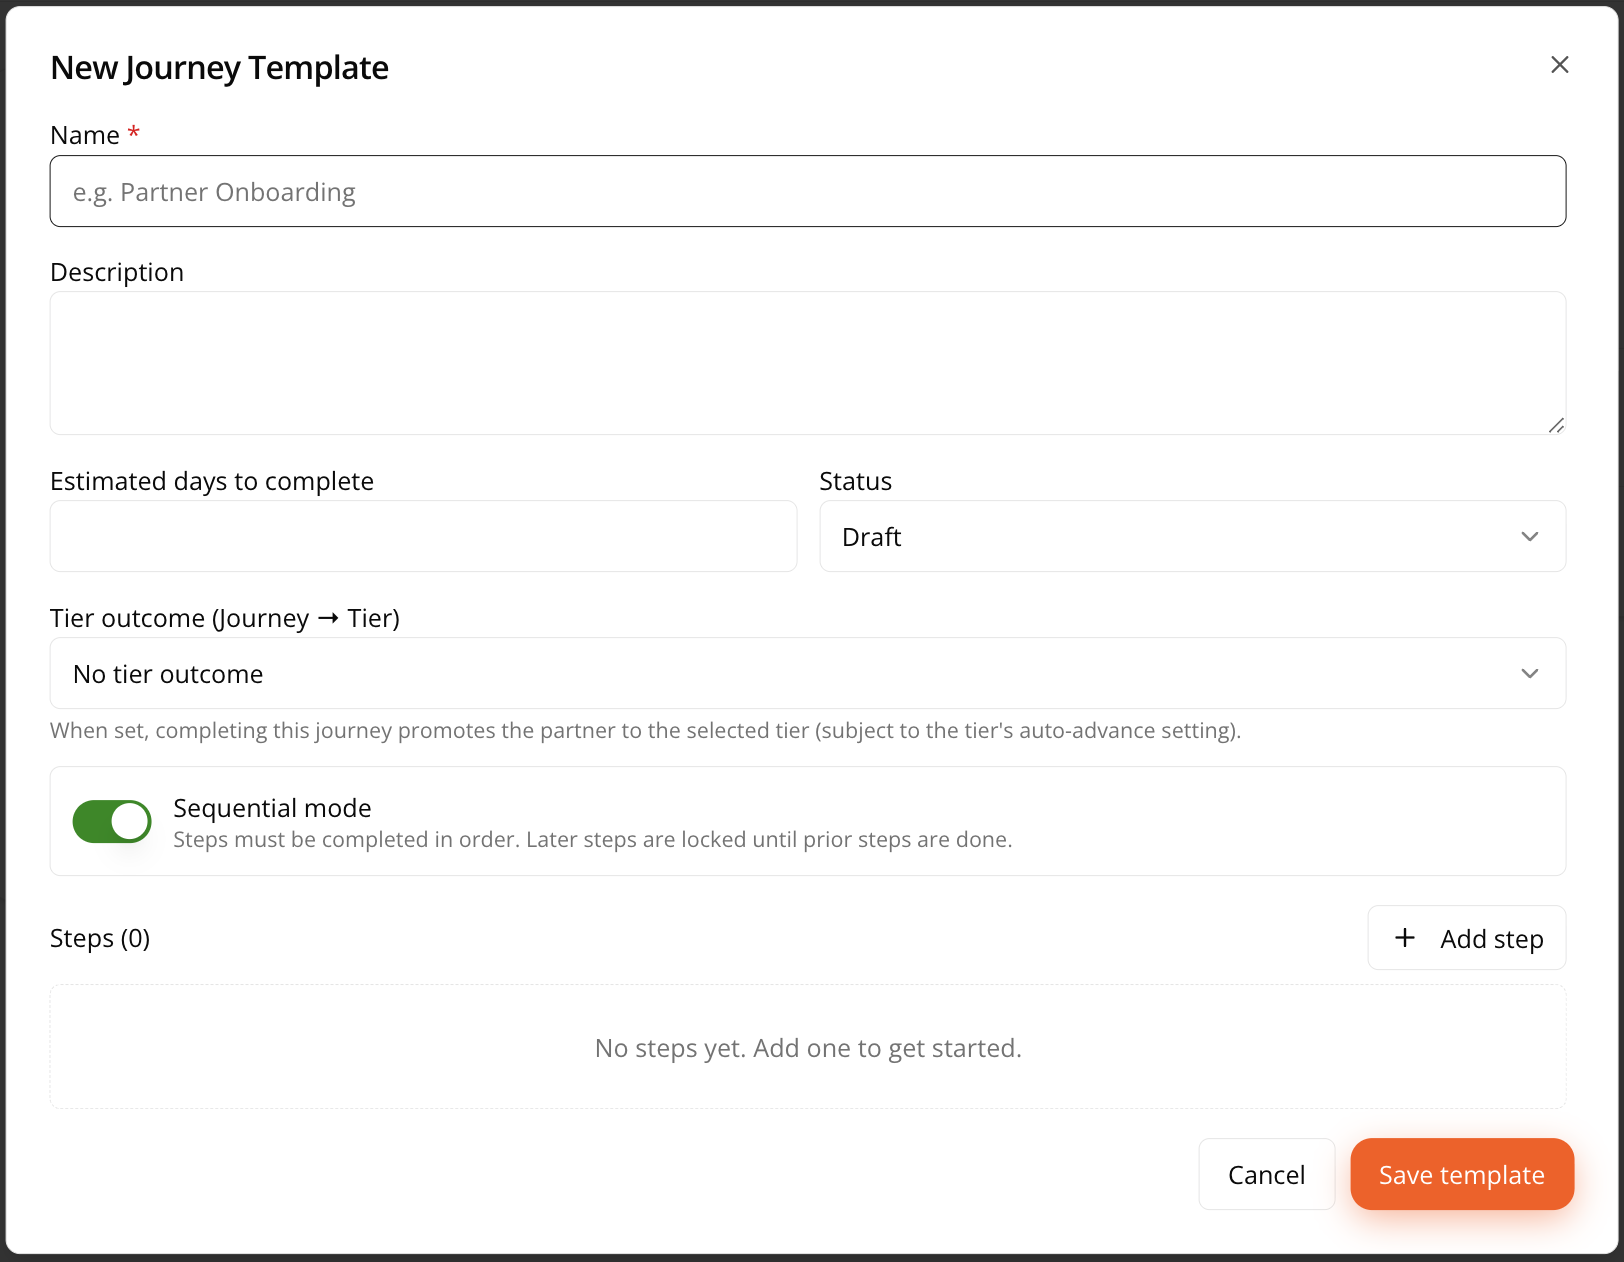
Fill in the journey template details:
- Name — What the template is called, for example “Partner Onboarding.”
- Description — A short description of what this journey is for.
- Estimated days to complete — A rough duration estimate, shown later as a reference (for example “~5 days”) wherever this template appears.
- Status — Draft while you’re still building it, or Active once it’s ready to be assigned. Only Active templates make sense to assign to real partners.
- Tier outcome (Journey → Tier) — Optional. If set to something like “Promote to Gold,” completing this journey automatically promotes the partner to that tier, subject to that tier’s own auto-advance setting. Leave this as “No tier outcome” if this journey isn’t meant to affect tier standing.
- Sequential mode — Toggle on if steps must be completed in order, with later steps locked until earlier ones are done. Toggle off if partners can complete steps in any order.
-
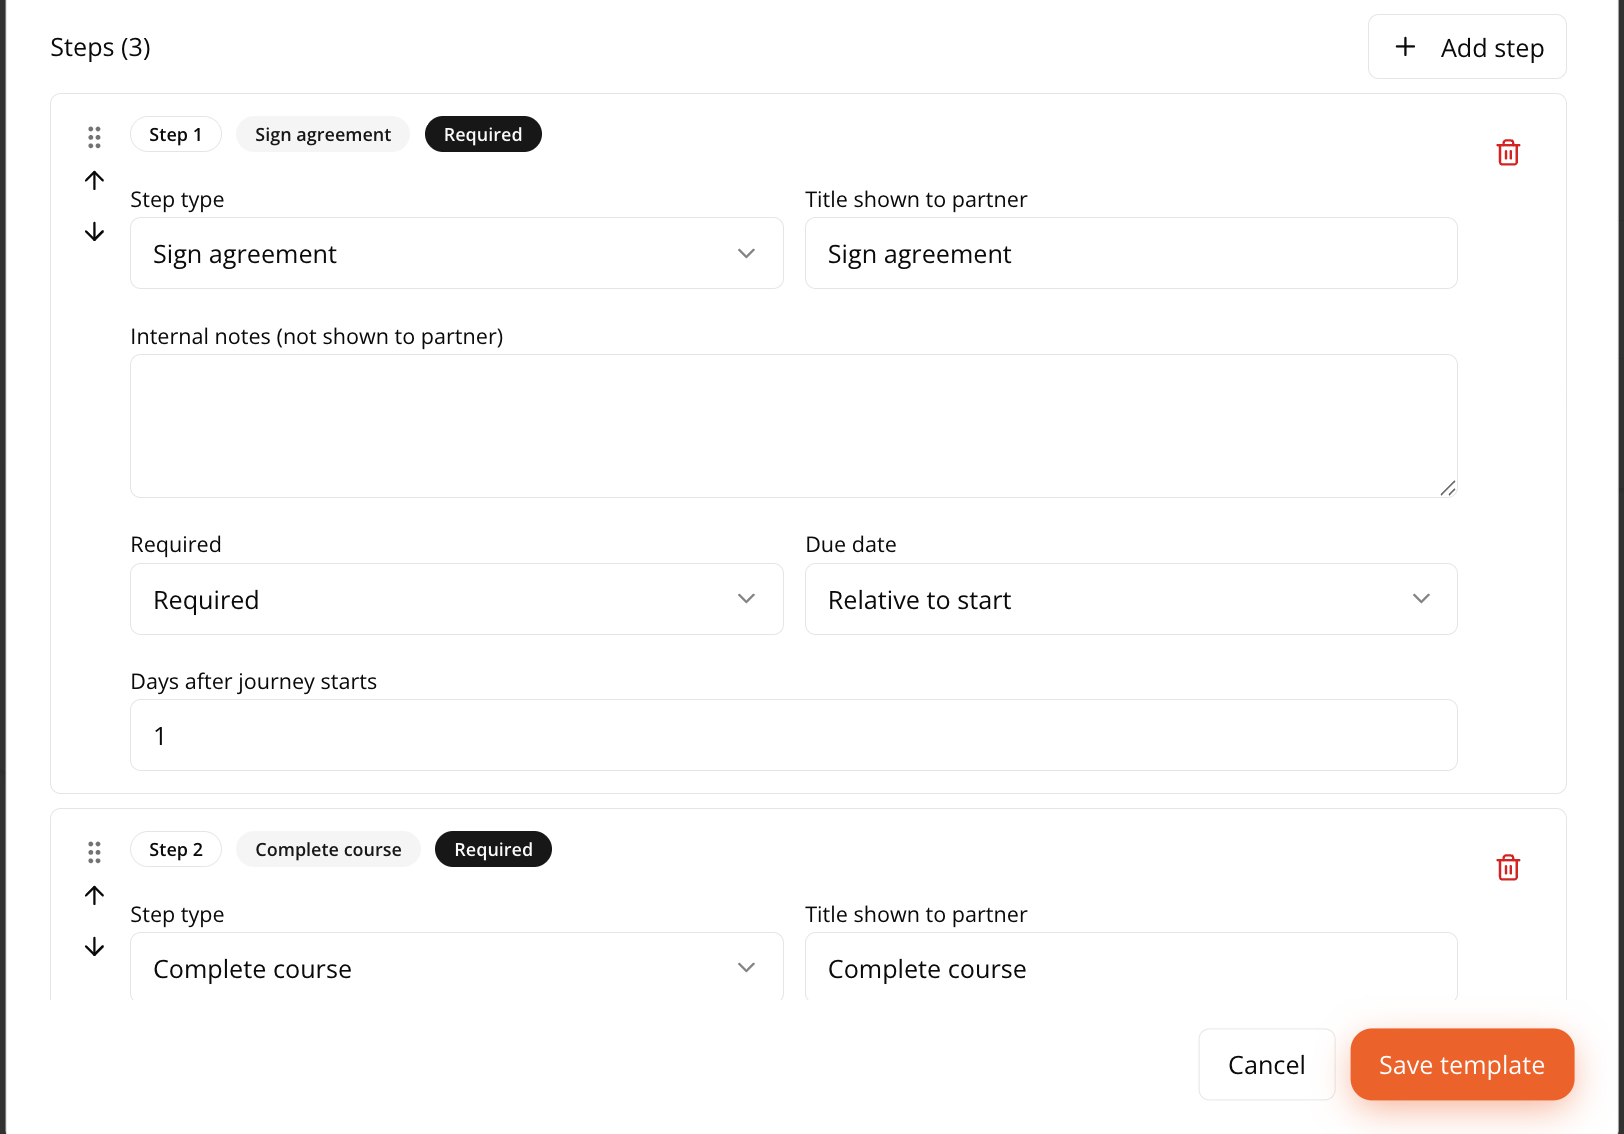
Click + Add step to add each milestone to the journey. For every step, you’ll set:
- Step type — What kind of action this is:
- Sign agreement — A step where the partner needs to sign a contract or NDA, like “Sign NDA & Partner Agreement.”
- Upload document — A step where the partner submits a file, like partner documentation you need on record.
- Complete course — A step tied to training content, like an onboarding course.
- Earn certification — A step tied to a certification requirement.
- Register a deal — A step where the partner’s first deal registration counts as completion.
- Custom task — The catch-all. You can optionally link this step to a Task.
- Title shown to partner — The label the partner actually sees for this step.
- Internal notes — Notes for your own team, not visible to the partner.
- Task template — Optionally link this step to an existing task template, if one applies.
- Required or Optional — Whether this step must be completed to finish the journey, or whether it’s a nice-to-have.
- Due date — Either “No due date” or “Relative to start” (due some number of days after the journey is assigned).
- Step type — What kind of action this is:
-
Use the up/down arrows or drag handle to reorder steps, and the trash icon to remove one. Add as many steps as the journey needs, then click Save template.
Define the Task Inside a Custom Task Step
A Custom task step doesn’t have to point at a task template you built earlier. Two tabs let you decide:
- Create new task — write the task here, inside the step.
- Select template — pick an existing task template from the Task template dropdown.
Choosing Create new task gives you three extra fields:
| Field | What it does |
|---|---|
| Priority | URGENT, HIGH, NORMAL, or LOW. Drives how the task sorts on the Tasks page. |
| Auto-assign by role | Picks the assignee by role rather than by name, so the same template works for every partner. |
| Tags | Free-form labels for filtering later. |
Whichever tab you use, a task is created and linked to each partner at the moment the journey is assigned. Its title and due date come from the step above, so you don’t set them twice.
Auto-assign by role
Auto-assign by role offers None plus two roles:
| Role | Resolves to |
|---|---|
| Partner Manager (internal) | The partner manager on your side of the relationship. |
| Champion contact | The partner’s champion contact. |
Resolution happens per partner when the journey is assigned, which is the point — one template, correctly assigned across every partner you give it to.
Assign a Journey Automatically to Every New Partner
A Default onboarding template picker sits above the template list. Choose one, and that journey is assigned the moment a partnership becomes Active — the partner starts onboarding without anyone remembering to assign it.
Only Active templates can be the default, so only those are offered in the picker. Choosing none leaves the manual flow below exactly as it was.
Two things make an auto-assignment legible rather than mysterious:
- The template list shows the chosen one as Default — auto-assigned, and each template’s usage reads as an
(n manual, n auto-assigned)split, so you can tell deliberate assignments from automatic ones. - When a partnership is approved, the partner record shows a banner naming the journey that was auto-assigned and saying it is this organization’s default onboarding template for new partners.
Assign a Journey to a Partner
Once your template is Active, you can assign it to partners from several places in Fours.
From the Journey Template
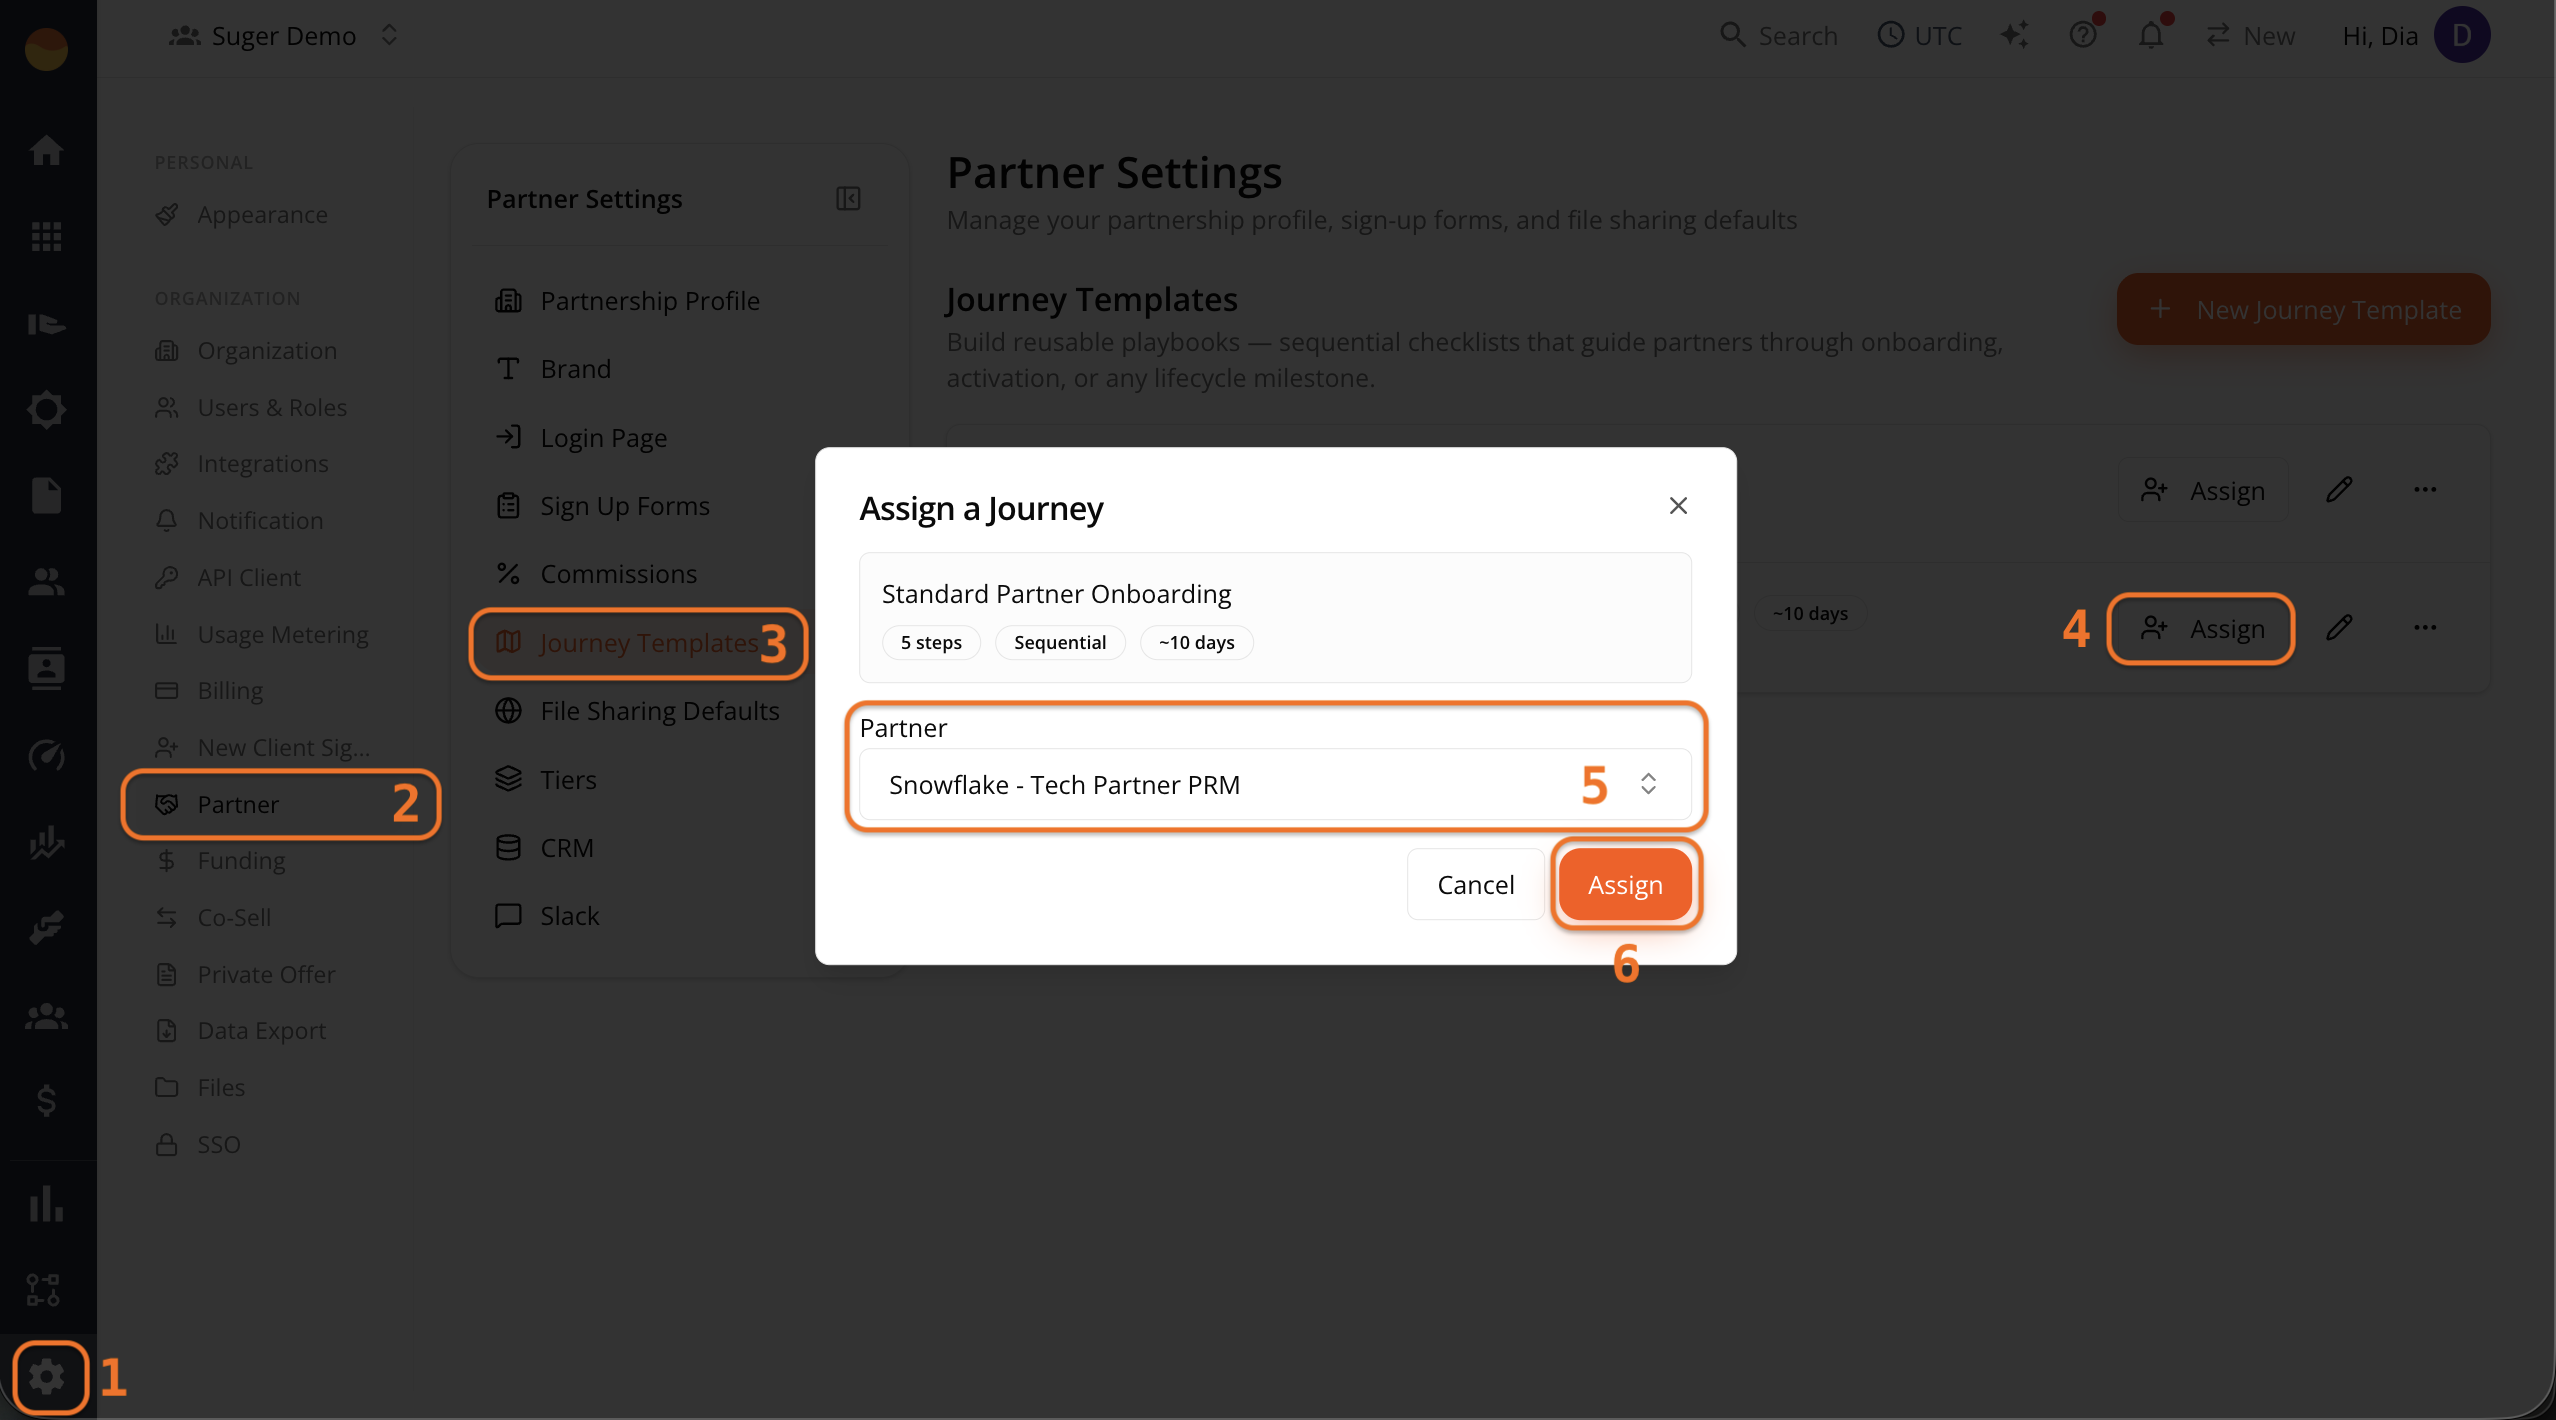
- Go to Fours Console, then Partners.
- Click Settings at the bottom of the rail, then Journey Templates.
- Find the template, and click Assign.
- In the Assign a Journey dialog, select the partner from the dropdown.
- Click Assign.
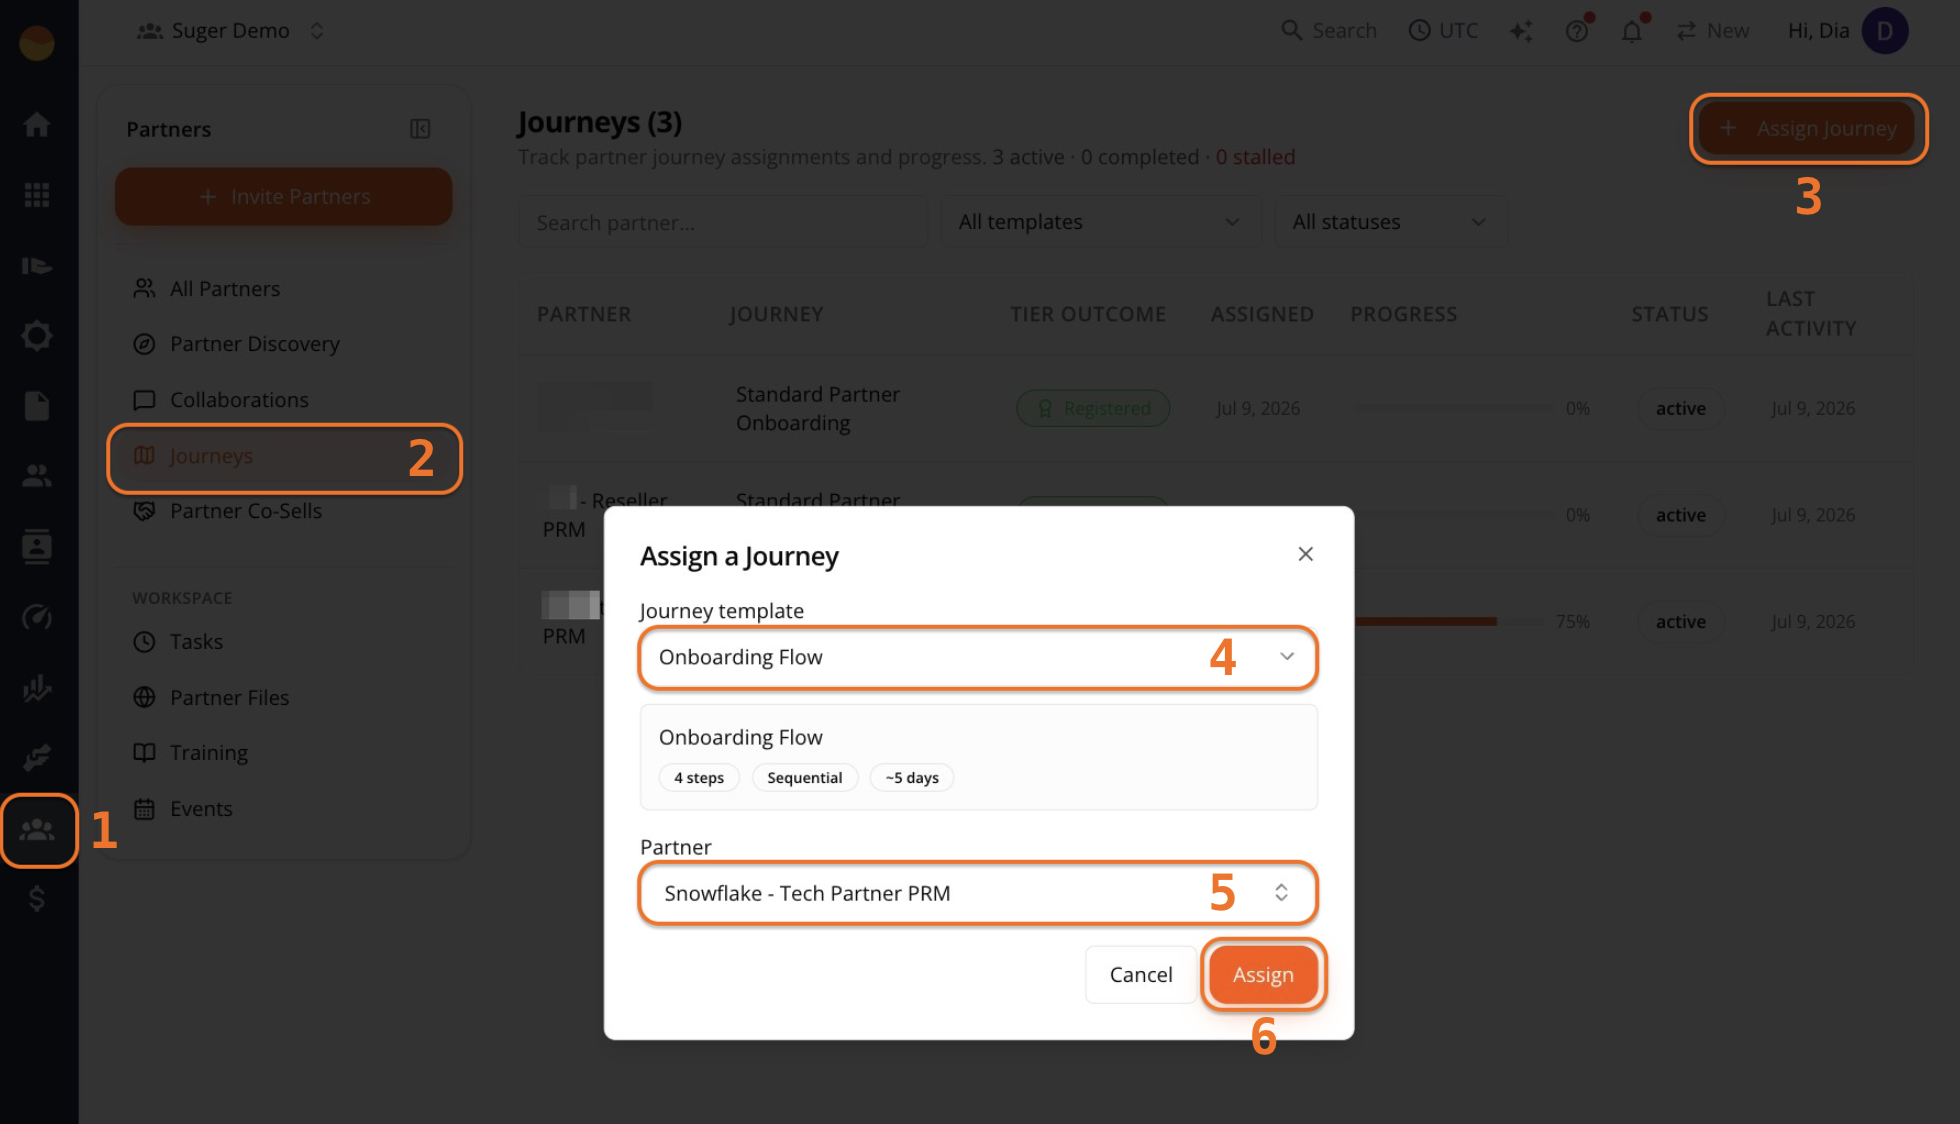
From the Journeys Page
- Go to Fours Console, then Partners.
- Go to the Journeys menu, and click + Assign Journey.
- In the Assign a Journey dialog, select the Journey template and Partner from the dropdowns.
- Click Assign.
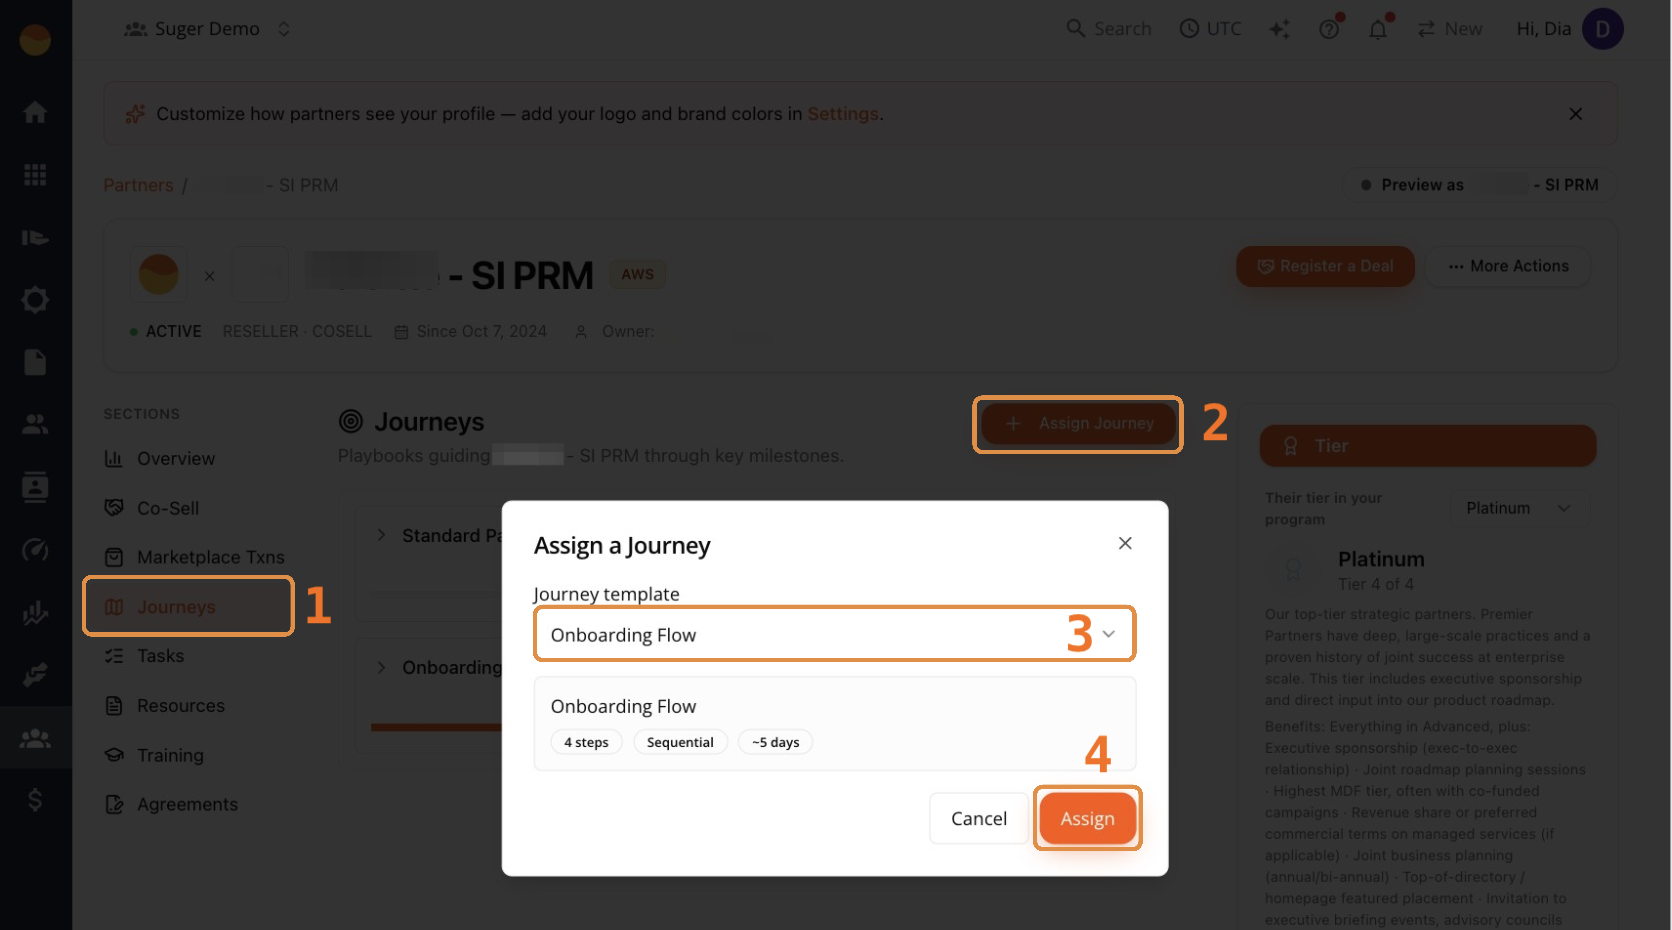
From a Partner’s Profile
- Go to Fours Console, then Partners.
- Click the partner’s name to open their profile.
- Click Journeys, then + Assign Journey.
- In the Assign a Journey dialog, select the Journey template, then click Assign.
Assign to Several Partners at Once
The partner field in Assign a Journey takes more than one partner. Onboarding a cohort is one action, not one per company.
Search your partners by name and tick every partner who should get the journey; more partners load as you scroll, and the ones you’ve picked stay at the top. The list offers the partners where your product is the one being sold. The confirm button counts what you selected — Assign for one, Assign to 6 partners for six — so you can check the number before committing.
Partners who already have an active assignment of that same journey are greyed out and can’t be selected, and a line under the picker tells you how many were excluded and why. This stops you accidentally issuing a second copy of a journey somebody is already halfway through.
Reference: Journey Statuses
Template status — whether a template can be handed out:
| Status | Meaning |
|---|---|
DRAFT | Editable, not assignable. |
ACTIVE | Published and assignable. |
You can move a template back from ACTIVE to DRAFT to take it out of circulation while you rework it.
Assignment status — one partner’s copy of a journey:
| Status | Meaning |
|---|---|
ACTIVE | In progress. |
COMPLETED | Every required step is done. |
ARCHIVED | Retired from the active view. |
The Journeys list and a partner’s record show these as Active, Completed, and Archived. An active journey that has fallen behind also carries a Stalled badge.
Step status — visible to the partner as well as to you:
| Status | Meaning |
|---|---|
NOT_STARTED | Nothing has happened yet. |
IN_PROGRESS | Underway. |
DONE | Complete. |
Step types — the six kinds of milestone a template can contain:
| Type | Completed by |
|---|---|
SIGN_AGREEMENT | The partner signing an agreement. |
COMPLETE_COURSE | The partner finishing a specific course. |
EARN_CERTIFICATION | The partner earning a specific certificate. |
REGISTER_DEAL | The partner registering their target number of co-sells. |
UPLOAD_DOCUMENT | The partner uploading a file. |
CUSTOM_TASK | Anything else — either a task template or a task you write inline. |
Task status — for the tasks a CUSTOM_TASK step creates:
| Status | Meaning |
|---|---|
OPEN | Not started. |
IN_PROGRESS | Being worked on. |
BLOCKED | Stopped, waiting on something else. |
COMPLETED | Done. |
Task priority, highest first: URGENT, HIGH, NORMAL, LOW.
Next Steps
Once assigned, see Track Journey Progress to check on progress and understand what the partner sees on their end.
Spotted something wrong or out of date on this page? Tell us and we'll correct it.