AWS Funding
Activate, submit, and track AWS funding requests directly in Fours.
Overview
Fours connects directly to the AWS Partner Central Funding Benefits API, so you can submit, track, and manage funding requests without leaving your workflow. Once funding is activated, you can create requests from either the Fours Console or your CRM, follow them as they move through AWS review, respond to rejections, file cash claims, and reconcile against your funding wallets.
In the Fours Console, funding is a section of the Co-Sell page: open Co-Sell › Funding. It has two views, which you switch between beside the search box:
| View | What it holds |
|---|---|
| Requests | Every request you have created, with its status and stage. This is where you draft, submit, and work a request. |
| Wallet | Your available budgets, remaining balances, and historical spend across AWS programs. |
Funding used to be its own page on the console’s main navigation. It moved into Co-Sell, and an
old funding or funding?tab=wallet link still lands on the matching view. Creating a request, or
opening one, still takes you to that request’s own page.
Before funding can be activated, two prerequisites must be in place. Once those are confirmed, a Fours admin enables funding on your ACE integration and (for Salesforce users) assigns the funding permission set.
Prerequisites
Make sure the following are in place before creating a funding request:
1. AWS ACE connected to Fours
- Your AWS ACE integration must already be set up and active in the Fours Console (go to Settings > Integrations to verify).
- This connects Fours to your AWS Partner Central account via the Partner Central API.
- If you have not yet set up this integration, complete it first before proceeding.
See AWS Partner Network API Integration.
2. ACE portal migrated to Partner Central 3.0 (PC 3.0)
- Your ACE portal must be fully migrated to Partner Central 3.0.
- This migration is a mandatory AWS requirement before funding benefits can be enabled.
- The Funding Benefits API is only available on the PC 3.0 platform.
- Contact your AWS Partner Manager if you are unsure of your migration status.
Activate funding
Before your team can submit requests, a Fours admin needs to enable the funding feature and (for Salesforce users) set up CRM permissions.
Enable funding in the Fours Console
Once both prerequisites are satisfied:
- Log in to the Fours Console.
- Go to Settings and click the Integrations tab.
- Find your AWS ACE integration and click Edit to open the configuration panel for AWS - ACE (Partner Central API).
- Turn on the Enable Funding Application toggle (“Enable funding application for AWS”), then click Save.
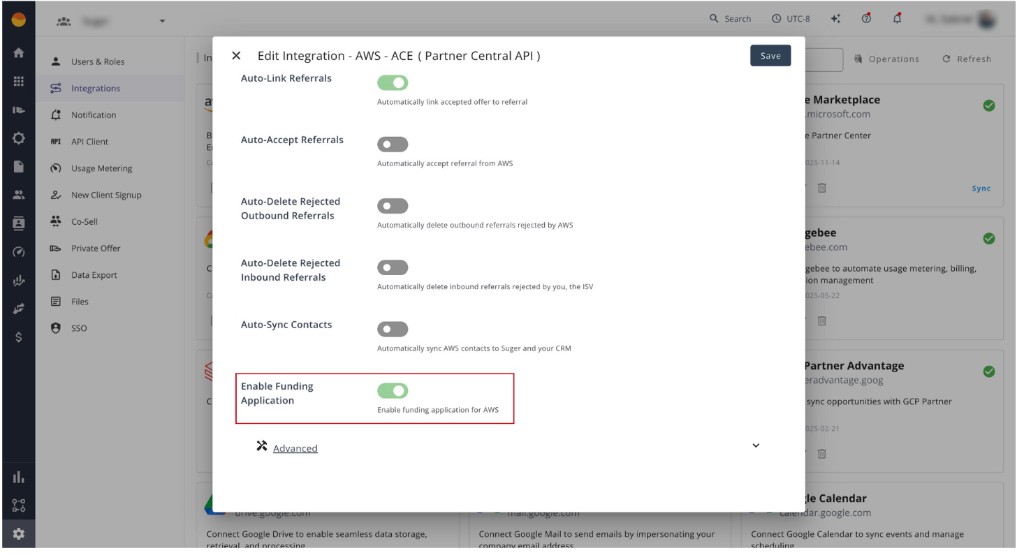
This step uses the Partner Central Funding Benefits API and only works after AWS has confirmed your Partner Central 3.0 migration. If migration is not complete, enabling funding will fail with an error.
Set up Salesforce permissions (Salesforce users only)
Without this permission set, team members will not be able to see the funding interface inside Salesforce.
- Go to User settings in Salesforce.
- Assign the Fours Funding permission set to each team member who will draft or submit funding requests.
Choose a funding program
Fours offers eight funding programs when you create a request in the Fours Console:
| Program | What it funds |
|---|---|
| Market Development Funds | Marketing activity that builds pipeline around your AWS solution. |
| Proof of Concept | A customer proof of concept or pilot on AWS. |
| Migration Acceleration Program | A customer migration to AWS, applied for per migration phase. |
| ISV Workload Migration | Migrating an existing ISV workload onto AWS. |
| MPOPP Grow | Promotional credits for your customer under the AWS Marketplace Private Offer Promotion Program (MPOPP). See MPOPP requests. |
| MPOPP Activate | Promotional credits under the same program, requested as a separate AWS benefit on the same form as MPOPP Grow. See MPOPP requests. |
| PIF: SCA GenAI Proof Of Concept Funding | A generative-AI proof of concept under the Strategic Collaboration Agreement. |
| PIF: SCA GenAI Marketing Development Funds | Generative-AI marketing activity under the Strategic Collaboration Agreement. |
Submit a funding request
Once funding is activated, you can create a request from either the Fours Console or your CRM.
- Open Co-Sell › Funding in the Fours Console, or go to the relevant opportunity in Salesforce and open the Fours component.
- Click Create Fund Request and select one of the eight funding programs above.
- In the Fours Console, optionally link the request to a CRM record: pick a Salesforce Opportunity, a HubSpot Deal, or both — each picker appears when that CRM is connected. Picking one fills the form from that CRM’s funding field mapping for the program and funding type; with no mapping for that CRM, nothing is filled in, but the link is still saved. When you edit or re-submit a request, the linked record is shown again and the form is not re-filled, so your saved values stay.
- Fill in all required project details. Use the built-in validation tool to check for missing or incorrect fields before submitting. This catches errors before they reach AWS, which helps avoid delays.
- If your POC request is over $10,000, AWS requires an AWS Pricing Calculator link plus a project plan. The MRR you enter in ACE must exactly match the calculator’s output — even a small mismatch gets the request rejected. Double-check this before submitting; it’s the single most common reason POC requests get sent back.
- Click Submit. Fours sends the request directly to the AWS Partner Central API.
Migration Acceleration Program requests
The Migration Acceleration Program (MAP) has its own requirements on top of the standard project details:
| Requirement | What to supply |
|---|---|
| Migration phase | Choose Assess or Mobilize. |
| ARR | The annual recurring revenue for the migration, which must be at least 100,000. |
| VMware attestation | Required on Mobilize only. It is not asked for on an Assess request. |
| AWS opportunity | A MAP request associates an AWS opportunity — it is not drawn against a wallet. |
The MAP request form in Salesforce
Salesforce users raise a MAP request from the Fours funding table on the opportunity: open the New Funding Request menu and choose New Migration Acceleration Program Request. That opens a dedicated MAP form rather than the generic funding form.
MAP is cash-only. There is no cash-or-credit choice to make — every MAP request is submitted as a cash request, which is why the form always includes a Cash Request Detail section.
The form is organized into five sections:
| Section | What it collects |
|---|---|
| Migration Details | The Migration Phase (Assess or Mobilize), Annual Recurring Revenue (ARR) — which must be at least 100,000 — and, on Mobilize only, the attestation that over 75% of the servers being migrated are VMware-hosted VMs. |
| Opportunity Information | The AWS Opportunity the request is associated with. Just the one field. |
| Project Information | The requester’s first name, last name, email address and job title; project name, business description, AWS Account ID, Project Start Date (UTC), Project End Date (UTC), the country and states the activity is executed in, and an optional AWS Pricing Calculator link. |
| Cash Request Detail | Currency, total cost of the project, total amount requested from AWS, and the Payee Central Account Profile ID. |
| Supporting Documents | Any documents you need to attach to the request, each with its type — see Attach supporting documents. |
Two date rules shape the request, and they are worth planning around:
- Project Start Date — the form will not accept a date less than 14 days from today. AWS’s own guidance, shown on the field, is that work must start at least 14 business days after you submit, which is the longer of the two — so leave more room than the picker strictly demands.
- Project End Date — cash claims are due 30 days after this date. The form does not enforce that deadline; it only requires the end date to fall on or after the start date.
MPOPP requests
MPOPP is the AWS Marketplace Private Offer Promotion Program: AWS issues promotional credits to a customer who buys from you through an AWS Marketplace private offer. Fours offers it as two programs, MPOPP Grow and MPOPP Activate. Each is submitted under its own AWS benefit, and both use the same request form in the Fours Console. In the Salesforce App, both opportunity panels and the Funding V2 table’s menu also carry New MPOPP Grow Request and New MPOPP Activate Request. The Fours Console form:
- Credits only. An MPOPP request is always a credit request, with no cash option.
- Opportunity. The AWS Opportunity picker lists only opportunities at Business Validation, Committed, or Launched.
- Wallet optional. Select Wallet is not required, so you can submit without drawing on a wallet.
- Buyer account and contract value. When the form fills AWS Marketplace Offer from the opportunity’s linked offer, or you pick an offer yourself, it also fills AWS Account ID with the offer’s buyer AWS account and Total Contract Value with the offer’s total contract value, replacing what a CRM field mapping filled in. A value the offer doesn’t carry is left for you to enter. AWS Account ID is still required, and must be exactly 12 digits.
- Credit amount. In the Fours form, Number of Codes is fixed at 1 and Value Per Code (USD) is 1% of Total Contract Value, rounded to the cent and recalculated whenever the contract value changes; both are greyed out. Currency is the only credit field you fill in.
- ARR optional. Annual Recurring Revenue (ARR) is not required on an MPOPP request, and is sent to AWS only when you enter it.
- Customer Also Considering is required. See Fields you may be looking for.
These are rules of the request form in Fours, not AWS’s eligibility rules for the program. AWS publishes those in its Partner Funding Benefits Guide, which needs an AWS Partner Central sign-in.
Both programs are also offered as a Program Type when you create a funding field mapping, with
CREDITS as the only Funding Type.
Fields you may be looking for
A few fields have changed, and knowing which are gone saves time hunting for them:
| Field | Status |
|---|---|
| Invoice fields | Removed. Invoicing is handled in Payee Central, not in the request. |
| Payee Central account profile ID | Required for cash programs. A 10–13 character identifier from your Payee Central profile. |
| Public Sector Agreement checkbox | Removed. |
| WWPS consent | Still present — continue to answer it on public-sector requests. |
| Customer Also Considering | Required on MPOPP Grow and MPOPP Activate requests in the Fours Console. They share the only console program form that asks for it: choose the alternative the customer is also weighing, such as Microsoft Azure, On-Premise, or No Competition. It is a funding field-mapping target on MPOPP Grow and MPOPP Activate configs only. |
Attach supporting documents
Each program’s request form has a Supporting Documents section. In the Fours Console, click Add Attachment once per file, pick the file’s type, and upload it. The type is the business use case AWS files the document under; the console labels the picker Attachment Type on Market Development Funds, PIF: SCA GenAI Marketing Development Funds, and ISV Workload Migration requests, and Business Use Case on the other programs.
Every program except ISV Workload Migration offers the same 19 types: Project Plan/Checklist, Innovation Plan, Marketing Plan, Proof of Cost, Assess Analysis Report, Well Architected Review Report, Success Criteria Report, Customer Sign Off Template, Partner Sign Off Template, Customer Satisfaction Survey (CSAT), Migration Capability Review, Migration Completion report, AWS Pricing Calculator, Migration Assessment Scope Checklist, Statement of Work, Migration Assessment Report, Managed Services Agreement, Partner Scope Checklist, and Other. ISV Workload Migration offers seven of them: Project Plan/Checklist, Migration Assessment Report, AWS Pricing Calculator, Statement of Work, Customer Sign Off Template, Partner Sign Off Template, and Other. The lists are the same in the Fours Console, the Salesforce app, and on a HubSpot deal.
Create AWS funding from a HubSpot deal
You do not have to start in the Console or in Salesforce. HubSpot users can raise a request straight from the deal they are working.
- Open the deal in HubSpot and find the Suger card on the deal record.
- Click New Funding.
- Complete and submit the request as usual.
To control how HubSpot deal fields populate a funding request, open the funding mapping configuration page in the Fours Console and set the CRM Source dropdown to HubSpot (the other option is Salesforce). Each CRM source keeps its own mapping, so configuring HubSpot does not disturb an existing Salesforce mapping.
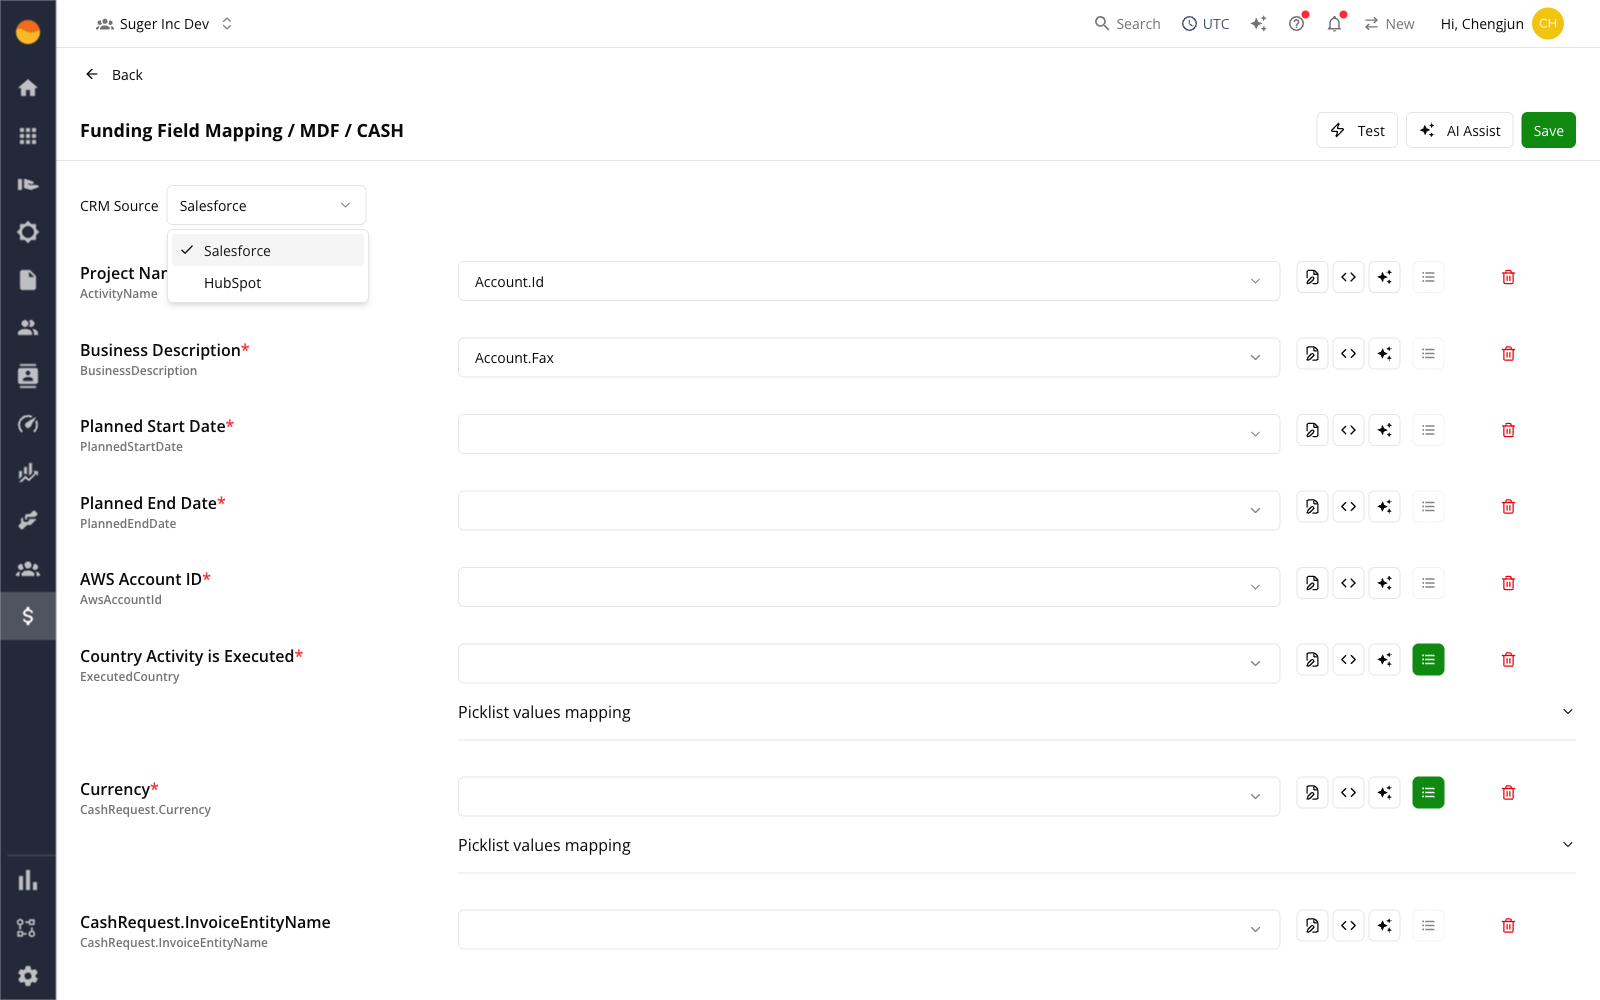
Funding mappings live on the Funding sub-tab of Co-Sell › Settings, which sellers and
resellers see (open it). They moved
there from the Funding page’s own Settings tab, and before that from the console’s main
Settings page; an old funding?tab=settings or settings?tab=funding link still lands on them.
Under Funding Configs, each saved mapping is its own card, named for
its CRM, program, and funding type — for example, AWS - HubSpot / Market Development Funds / CASH.
A Salesforce mapping and a HubSpot mapping for the same program sit side by side as two cards.
New Config asks for the CRM Partner (Salesforce or HubSpot), Program Type, and
Funding Type before it opens the mapping page, and deleting a card removes only that card’s
mapping.
Test a funding field mapping
Before your team relies on a mapping, check what it produces for a real record. On the funding field-mapping page, click Test to open the Test Funding Field Mapping dialog:
- Pick the source record. For Salesforce, select or search for an opportunity; the test runs as soon as you pick one. For HubSpot, enter the deal ID and click Run.
- Read the Result JSON.
previewholds the funding request the mapping built from that record, andvalidatelists the fields that would fail validation.
The same mapping pre-fills a new funding request started from a CRM record, so the test shows what your team will see when they start one.
How mapped values are read:
- List fields get a list. AWS fields that take several values, such as the states where the
activity is executed, receive a list even when the mapping yields a single value:
CAbecomes["CA"], and semicolon-separated multi-select picklist values are split into separate items. - Blank stays blank. An empty CRM field adds nothing to an expression’s output, so an expression that reads only that field produces an empty value.
- Salesforce: fields on related records resolve. A mapping can read beyond the opportunity
itself, for example
Account.BillingState, in direct mappings, expressions, and AI prompts. - Salesforce: the opportunity’s accepted offer. On a Salesforce opportunity the source fields
also include Accepted Offer: the most recently accepted Fours offer linked to the
opportunity. Map its fields as
_AcceptedOffer.<field>, for example_AcceptedOffer.Suger__Offer_External_ID__c. An opportunity with no accepted offer has no value there, so the mapped field is left empty. - Salesforce: a field that can’t be queried doesn’t stop the preview. The preview continues
from the base record only (the opportunity and its account) and adds a warning on
_sourcethat starts withfailed to query configured source fields, using base record only:, followed by the query error.
Track the funding lifecycle
After submission, Fours keeps your request synchronized with AWS. To stay on top of where a request stands, track two separate data points:
- Status — where the request stands: the status AWS reports (for example,
PENDING_SUBMISSION,IN_REVIEW,APPROVED, orREJECTED) and the request’s status in Fours. See Read the status. - Stage — how far the request has moved through AWS’s fund request process, from creation through the approvals to completion. See Read the stage.
Funding data is refreshed on a schedule, roughly every three hours — not in real time. A status or stage change made on the AWS side appears in Fours on the next sync rather than the moment it happens.
To filter and prioritize your requests, use the Advanced Filters in the Fours Console or your CRM. You can filter by program type, fulfillment type (Credits or Cash), or stage.
Read the status
The Requests view has two status columns. Partner Status is the status AWS reports for the request — Pending Submission, In Review, Action Required, Approved, Rejected, or Canceled — and Status is the request’s status in Fours.
Pending Submission means the application exists on AWS but has not been submitted for review: AWS gives a new application that status when it is created and returns a recalled one to it (Working with benefit applications). Fours records a request in that state as Create Failed, but the Requests view displays it as Created, not as a red failure. Only the label in the view changes: on the request’s own page, Active Status still reads Create Failed next to a Partner Status of Pending Submission. To send the request for review, open it and choose More actions > Re-submit.
Read the stage
The stepper at the top of a request’s page in the Fours Console has six steps — the same six AWS Partner Central shows for a fund request’s progress. Every step up to and including the request’s current one is checked, and the current step’s name is highlighted.
AWS reports the stage in its own terms, and Fours places the request on the matching step:
| Step | Stage AWS reports |
|---|---|
| Application creation | No stage yet — for example, a request that has not been submitted — or a value Fours does not recognise |
| Business approval | BUSINESS_APPROVAL |
| Finance approval | FINANCE_APPROVAL |
| Pre-approval | PRE_APPROVAL |
| Cash claim | Invoice or Disbursement — the claim’s two steps |
| Application completion | FULFILLMENT |
The Salesforce app’s funding page shows the same stepper once AWS has reported a stage. Where the stage appears as a label instead — the Stage column of the Requests view, the Salesforce app’s funding table and opportunity card, and the funding details on a HubSpot deal — it uses the same names, and a value Fours does not recognise is shown exactly as AWS sent it. Until AWS reports a stage, the console’s Stage column is empty, the Salesforce app shows a dash, and the HubSpot deal card leaves the field out.
The stage filter — Stage in the console, Fund Request Stage in the Salesforce app — offers Business approval, Finance approval, Pre-approval, Cash claim (invoice), Cash claim (disbursement), and Application completion. A request with no stage yet matches none of them.
What a request’s page shows
Below the stepper, a request’s page in the Fours Console is laid out in sections. Funding Request Information, Project Information and Fund Request Attachments always appear; each other section appears only when the request has something to show in it.
| Section | What it shows |
|---|---|
| Funding Request Information | The project name and description, program, ARR, type of funding, and request ID, with Active Status, Partner Status, and Status Reason when AWS gives one: AWS’s reason for the current status, followed by its reason codes in parentheses |
| Project Information | The planned delivery start and end dates, the country and states where the activity is executed, and WWPS consent |
| Cash request information | On a cash request: the costs and contributions, invoice details, the requested and approved cash amounts, and the purchase order number |
| Cash claims | The cash claims listed in the request’s AWS details, each with its start, end, and due dates, type, amount, and completion percentage |
| Cash claim plans | On a cash request: the separate claim applications linked to the request’s allocation, each with its Fund claim ID and Cash claim status and a link to its own page |
| Credit request details | On a credit request: the value per code, number of codes, requested credit amount, AWS account ID, and the credit codes, each with a copy button |
| Additional details | Fields specific to the request’s program, such as Customer Considering, Total Contract Value, or Migration Phase |
| Related | The AWS Marketplace offer and product and the co-sell referral for the request’s AWS opportunity, each a link when Fours holds the record and a copyable ID when it doesn’t, plus the Salesforce opportunity ID and HubSpot deal ID |
| Benefit allocation | The AWS benefit allocation recorded on the request: its ID, status and status reason, allocated and issued amounts, and start and expiry dates |
| Fund Request Attachments | The files attached to the request; click a file whose upload succeeded to download it. AWS’s download links expire after a while; when one has, Fours asks AWS for a fresh link as you click and opens the file with it. If AWS hasn’t provided one yet, Fours says so — try again shortly |
Respond to action required and rejections
If a request is paused or rejected, Fours gives you what you need to fix and resubmit without starting over.
If a request is flagged as ACTION_REQUIRED
- Open the request and check the Status Reason Codes. These indicate exactly what is missing, such as a project plan or design win document. In the Fours Console, Status Reason under Funding Request Information shows them, after AWS’s explanation when it gives one.
- Update the request in Fours based on the reason codes.
- Resubmit to restart the review process.
If a request is rejected
- Review the rejection reason. In the Fours Console, the request’s Status Reason shows the reason AWS gave, when it gave one. You can also find it in the automatic rejection email, in the Approval History in the action bar, or under the Actuals section of the request.
- Select Resume fund request from the action bar to reopen and update the request.
- Submit once your changes are complete.
Submit and track cash claims
Once a project is complete and your request has been approved, you can file a claim to receive your reimbursement.
A cash claim is not a second row in the Requests view. Allocations fulfilled by a disbursement are filtered out of that view, so its counts and its list hold funding requests only. Track the claim from the request it belongs to, not by looking for a separate entry. On the request’s page, Cash claims and Cash claim plans list them — see What a request’s page shows.
Cash claims themselves still work the same way on any approved cash-based request:
- Navigate to the Cash claim stage for the approved request.
- Submit your actual project expenses (actuals).
- The status updates to Awaiting Approval while AWS reviews your submission.
- Once AWS approves, Fours provides a direct link to Payee Central where you can submit your invoice.
- Track the claim until the invoice is approved and the reimbursement is finalized.
Monitor wallets and purchase orders
Open the Wallet view of Co-Sell › Funding in the Fours Console to see your available budgets, remaining balances, and historical spend across all AWS programs. An AI assistant connected to the Fours MCP server can list your AWS benefit wallets and their balances with ListFundingBenefits.
Not every program draws on a wallet — a Migration Acceleration Program request is associated with an AWS opportunity instead, so it does not appear as wallet spend.
To support internal reconciliation, open the funding details for any request to find the PO numbers associated with your approvals. In the Salesforce app, the Funding Detail page’s Cash Request Information section shows the PO Number and the Payee Central Account Profile ID for MDF and POC cash requests, and both sync to the Salesforce Funding record — see How Funding records open.
Frequently asked questions
Can I edit a request after submitting it?
Once submitted, a request’s status becomes IN_REVIEW, and it can no longer be edited through standard means. For minor corrections requested by AWS reviewers, use the Amend fund request option in the action bar.
Can I update a draft before submitting?
Yes. You can edit a draft at any time while it is in PENDING_SUBMISSION status.
Can I link a request to a specific opportunity?
Yes. Before submitting, you can associate the request with a related customer opportunity or an existing benefit allocation from within the request builder. In the Fours Console, the request form also links a Salesforce Opportunity or a HubSpot Deal — see Submit a funding request.
What happens if my request fails validation on submission?
Fours will show you the specific fields that need to be corrected. Update those fields and resubmit.
Why doesn’t my ACE opportunity show up when I submit an MPOPP (AWS Marketplace Private Offer Promotion Program) request?
Check the opportunity’s stage first: the MPOPP form in Fours lists only opportunities at Business Validation, Committed, or Launched (see MPOPP requests). The opportunity doesn’t need a linked Marketplace offer. When it has one, the form’s Marketplace Offer section fills AWS Marketplace Offer and AWS Marketplace Product from it; when it has none, pick both yourself. Either way, the offer also fills AWS Account ID and Total Contract Value (see MPOPP requests).
What happens when AWS says a Proof of Concept credit request should draw on an existing agreement allocation?
When AWS rejects a Proof of Concept credit request on submission because it should be funded from an existing agreement allocation, Fours looks for one of your funding wallets for the same program that is active and within its validity period, attaches it to the request, and submits once more. If no such wallet exists, or the second submission is rejected too, the request is not submitted and AWS’s original error stands.
Why have my funding requests stopped updating?
If AWS reports that your AWS account is no longer an active AWS partner, Fours pauses the scheduled funding sync for your organization, because retrying cannot succeed until that changes. Once your partnership is restored, contact support@suger.io to have the sync resumed.
For assistance with any step in this guide, contact your Fours Customer Success Manager.
Spotted something wrong or out of date on this page? Tell us and we'll correct it.