# Salesforce
Integrate Suger with Salesforce to create private offers, manage contracts, and co-sell across AWS, Azure & GCP Marketplaces directly from your CRM.
## Overview
This guide walks you through integrating Salesforce with Suger, enabling your sales and business teams to:
- **Create marketplace offers** directly from Salesforce opportunities
- **Manage co-sell referrals** within your existing CRM workflow
- **Sync opportunity data** between Salesforce and marketplace platforms
- **Streamline collaboration** between sales teams and marketplace operations
### How the integration works
| | |
| --- | --- |
| **Direction** | Two-way. Offers and referrals are created from Salesforce and pushed to the marketplace; marketplace state and enrichment data flow back onto Salesforce records. |
| **Source of truth** | Salesforce owns the opportunity and account records. Suger owns offers, entitlements, referrals and marketplace state, and writes them onto the linked Salesforce records. |
| **Scope** | Organization-level — the managed package is installed once per Salesforce org. |
| **Scheduled jobs** | CRM enrichment every **2 hours**. Backfill of Suger objects into Salesforce every **4 hours**. Auto-share every **3 hours**. Salesforce schema sync **daily**. |
| **Limits** | A scheduled enrichment run processes at most **20,000 Salesforce records**, and is cut off after 105 minutes so a wedged run cannot block the next one. |
### When something fails
- **A failing object type does not stop the rest.** Record writes are sent with `allOrNone: false` in batches of 200, so a rejected record does not roll back the batch — per-record outcomes are collected and the run moves on to the next object type.
- **The 4-hourly backfill does not retry itself.** It is deliberately single-attempt: a re-run part-way through could duplicate records that have no external ID to upsert against. The next scheduled pass picks the work up instead.
- **Enrichment activities do retry** — 2 to 3 attempts with exponential backoff starting at 1 second.
- **An expired session is recovered silently.** A `401 INVALID_SESSION_ID` makes Suger reload the stored credential and retry once. A `400 invalid_grant` means the refresh token is no longer usable: Suger stops, flags the integration as needing re-authorization, and notifies you rather than retrying into a lockout.
- **Fields that do not exist in your org are skipped, not failed.** If a mapped field is missing from your Salesforce schema, that field is dropped from the write and logged; the rest of the record still syncs.
:::warning
Suger owns every `Suger__*__c` record it writes and re-upserts them on each backfill. **Manual edits to those records are overwritten.** Native `Opportunity` and `Account` records are only written where you have explicitly mapped enrichment fields.
:::
## Prerequisites
- A **Salesforce Administrator** account
- A **Suger organization** account and **API Key** (see [Authenticate with the Suger API](/get-started/oauth-app/))
- Installation link for the **Salesforce package** (Production or Sandbox)
- A **current version of the Suger managed package**, if you want the fields described under [Package Fields and Sync Behavior](#package-fields-and-sync-behavior). Those fields ship with the package, so an org on an older version will not receive that data until it upgrades.
## Installation
### Install the Salesforce Package
Install the Suger package from the [AppExchange](https://appexchange.salesforce.com/appxListingDetail?listingId=a0N3u00000RMskLEAT):
1. Click **Get it Now**
> 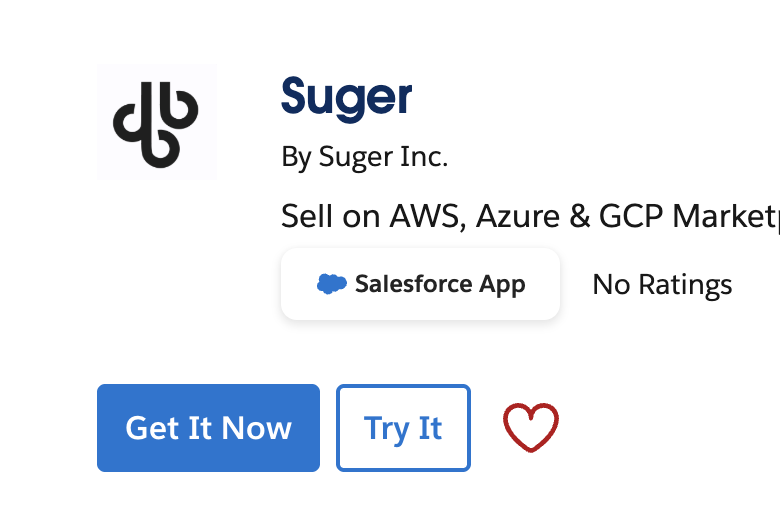 2. Log in with your Salesforce Admin account
3. Choose Install in **Production** (or **Sandbox**)
4. Select Install for **Admins Only** / **All Users** / **Specific Profiles**
5. Click Install
### Set Up Integration User
To connect Suger with Salesforce, you need a dedicated Integration User account. This user will authenticate via [OAuth 2.0 Web Server Flow](https://help.salesforce.com/s/articleView?language=en_US&id=sf.remoteaccess_oauth_web_server_flow.htm&type=5) and allow Suger to communicate with your Salesforce org using REST APIs.
Creating a dedicated Integration User ensures:
- Secure and isolated access for API calls
- Easier troubleshooting and monitoring
- No dependency on personal user accounts
#### Choose a License Type
When creating the Integration User, select one of the following license types:
| License Type | When to Use | Notes |
| ---------------------------------- | ------------------------------------------------------------------------ | ---------------------------------------------------------------------------------------------------------------------------- |
| **Salesforce License** | Required if your field mapping involves any Quote object — **standard Quote (`Quote`)** or **CPQ Quote (`SBQQ__Quote__c`)** | You must also assign a **CPQ license** to the user if you are using CPQ. The Salesforce Integration License does not grant access to Quote objects. |
| **Salesforce Integration License** | Recommended in most cases | Free license, limited to API-only users (cannot log in via UI). Use with **Salesforce API Only System Integrations profile** |
#### Create the Integration User
1. In Salesforce Setup, go to **Users** → **New User**.
>
2. Log in with your Salesforce Admin account
3. Choose Install in **Production** (or **Sandbox**)
4. Select Install for **Admins Only** / **All Users** / **Specific Profiles**
5. Click Install
### Set Up Integration User
To connect Suger with Salesforce, you need a dedicated Integration User account. This user will authenticate via [OAuth 2.0 Web Server Flow](https://help.salesforce.com/s/articleView?language=en_US&id=sf.remoteaccess_oauth_web_server_flow.htm&type=5) and allow Suger to communicate with your Salesforce org using REST APIs.
Creating a dedicated Integration User ensures:
- Secure and isolated access for API calls
- Easier troubleshooting and monitoring
- No dependency on personal user accounts
#### Choose a License Type
When creating the Integration User, select one of the following license types:
| License Type | When to Use | Notes |
| ---------------------------------- | ------------------------------------------------------------------------ | ---------------------------------------------------------------------------------------------------------------------------- |
| **Salesforce License** | Required if your field mapping involves any Quote object — **standard Quote (`Quote`)** or **CPQ Quote (`SBQQ__Quote__c`)** | You must also assign a **CPQ license** to the user if you are using CPQ. The Salesforce Integration License does not grant access to Quote objects. |
| **Salesforce Integration License** | Recommended in most cases | Free license, limited to API-only users (cannot log in via UI). Use with **Salesforce API Only System Integrations profile** |
#### Create the Integration User
1. In Salesforce Setup, go to **Users** → **New User**.
> 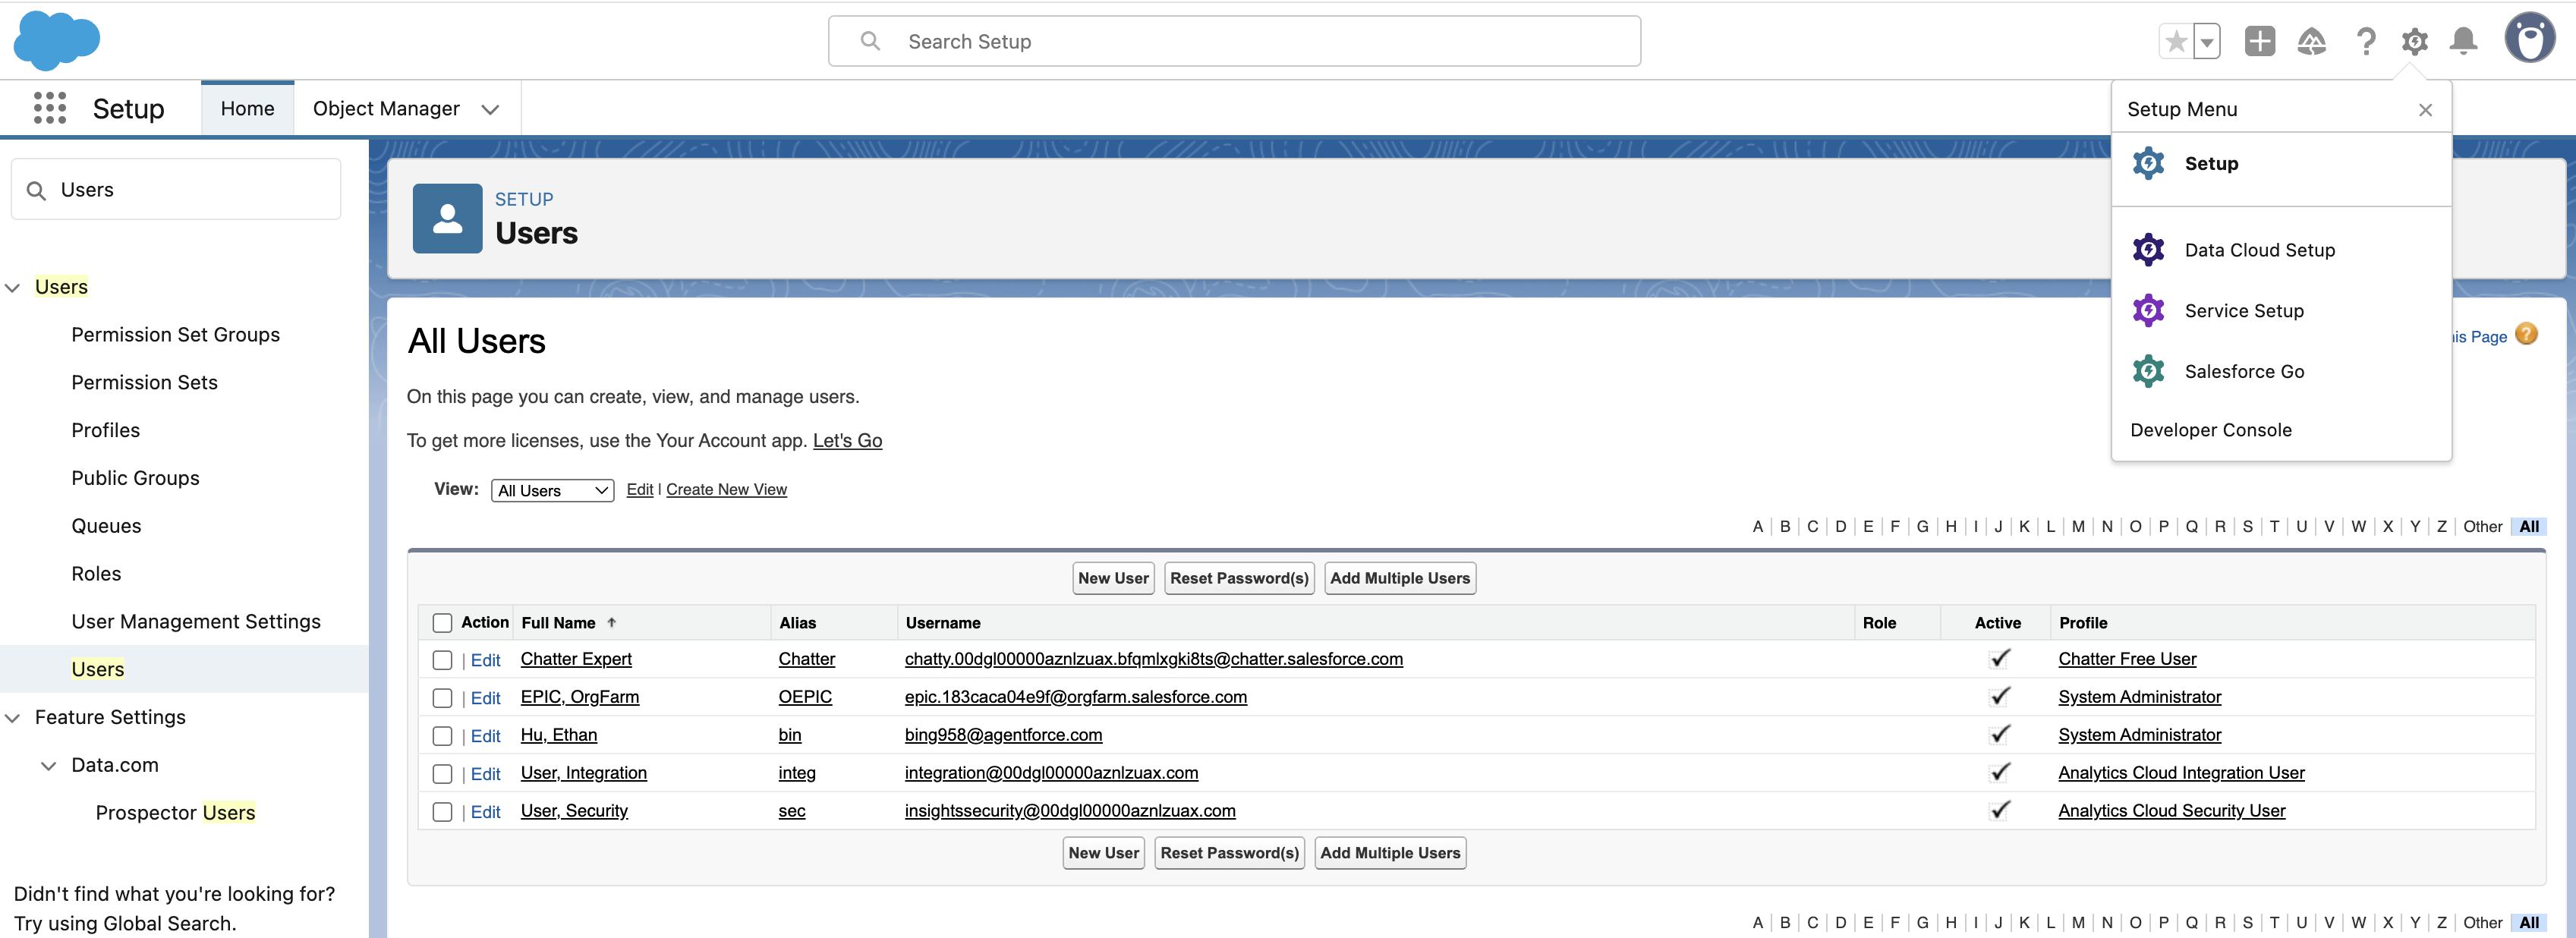 2. Enter a valid email address (required for activation).
3. Assign one of the licenses listed above.
4. For **Salesforce Integration License**, assign the **Salesforce API Only System Integrations** profile.
5. Save and activate the user.
#### Assign Permission Sets
After creating the user, assign the necessary permission sets depending on the license type. For more details, see [Assign Suger permission sets to your team](/salesforce-app/salesforce-app-assign-permission-sets/).
If using **Salesforce License**:
- Assign the **Suger Integrator** permission set.
- Create an additional permission set granting **Read** and **View All** access on:
- Account
- Contact
- Opportunity
- Any other objects/fields required in your field mapping
If you are using **standard Quote**, grant **Read** access to **Product2**, **Pricebook2**, and **Quote**. The combination of these three permissions also grants access to **QuoteLineItem** (no separate permission is required).
If using **Salesforce Integration License**:
- Assign the **Suger Integrator (Salesforce Integration License)** permission set.
- Create a new permission set (with Salesforce API Integration as the license type) granting **Read** and **View All** access on:
- Account
- Contact
- Opportunity
- Any other objects/fields required in your field mapping
- When creating this permission set, be sure to select **Salesforce API Integration** as the license. Note that it is **Salesforce API Integration**, NOT **Salesforce Integration**.
At this point, your Integration User is ready. You can now proceed to connect Salesforce and Suger via OAuth in the next step.
## Configuration
To enable two-way communication, you need to:
1. Allow Salesforce → Suger (enter Organization ID and API Key in Salesforce).
2. Allow Suger → Salesforce (authorize access via OAuth).
### Configure Salesforce to Access Suger
This step configures Salesforce so it can call Suger APIs.
1. Get your Organization ID and API Key
- **Organization ID**: found in Suger Console → **Settings** → **[Organization & Users](https://console.suger.io/settings?tab=organization)**
>
2. Enter a valid email address (required for activation).
3. Assign one of the licenses listed above.
4. For **Salesforce Integration License**, assign the **Salesforce API Only System Integrations** profile.
5. Save and activate the user.
#### Assign Permission Sets
After creating the user, assign the necessary permission sets depending on the license type. For more details, see [Assign Suger permission sets to your team](/salesforce-app/salesforce-app-assign-permission-sets/).
If using **Salesforce License**:
- Assign the **Suger Integrator** permission set.
- Create an additional permission set granting **Read** and **View All** access on:
- Account
- Contact
- Opportunity
- Any other objects/fields required in your field mapping
If you are using **standard Quote**, grant **Read** access to **Product2**, **Pricebook2**, and **Quote**. The combination of these three permissions also grants access to **QuoteLineItem** (no separate permission is required).
If using **Salesforce Integration License**:
- Assign the **Suger Integrator (Salesforce Integration License)** permission set.
- Create a new permission set (with Salesforce API Integration as the license type) granting **Read** and **View All** access on:
- Account
- Contact
- Opportunity
- Any other objects/fields required in your field mapping
- When creating this permission set, be sure to select **Salesforce API Integration** as the license. Note that it is **Salesforce API Integration**, NOT **Salesforce Integration**.
At this point, your Integration User is ready. You can now proceed to connect Salesforce and Suger via OAuth in the next step.
## Configuration
To enable two-way communication, you need to:
1. Allow Salesforce → Suger (enter Organization ID and API Key in Salesforce).
2. Allow Suger → Salesforce (authorize access via OAuth).
### Configure Salesforce to Access Suger
This step configures Salesforce so it can call Suger APIs.
1. Get your Organization ID and API Key
- **Organization ID**: found in Suger Console → **Settings** → **[Organization & Users](https://console.suger.io/settings?tab=organization)**
> 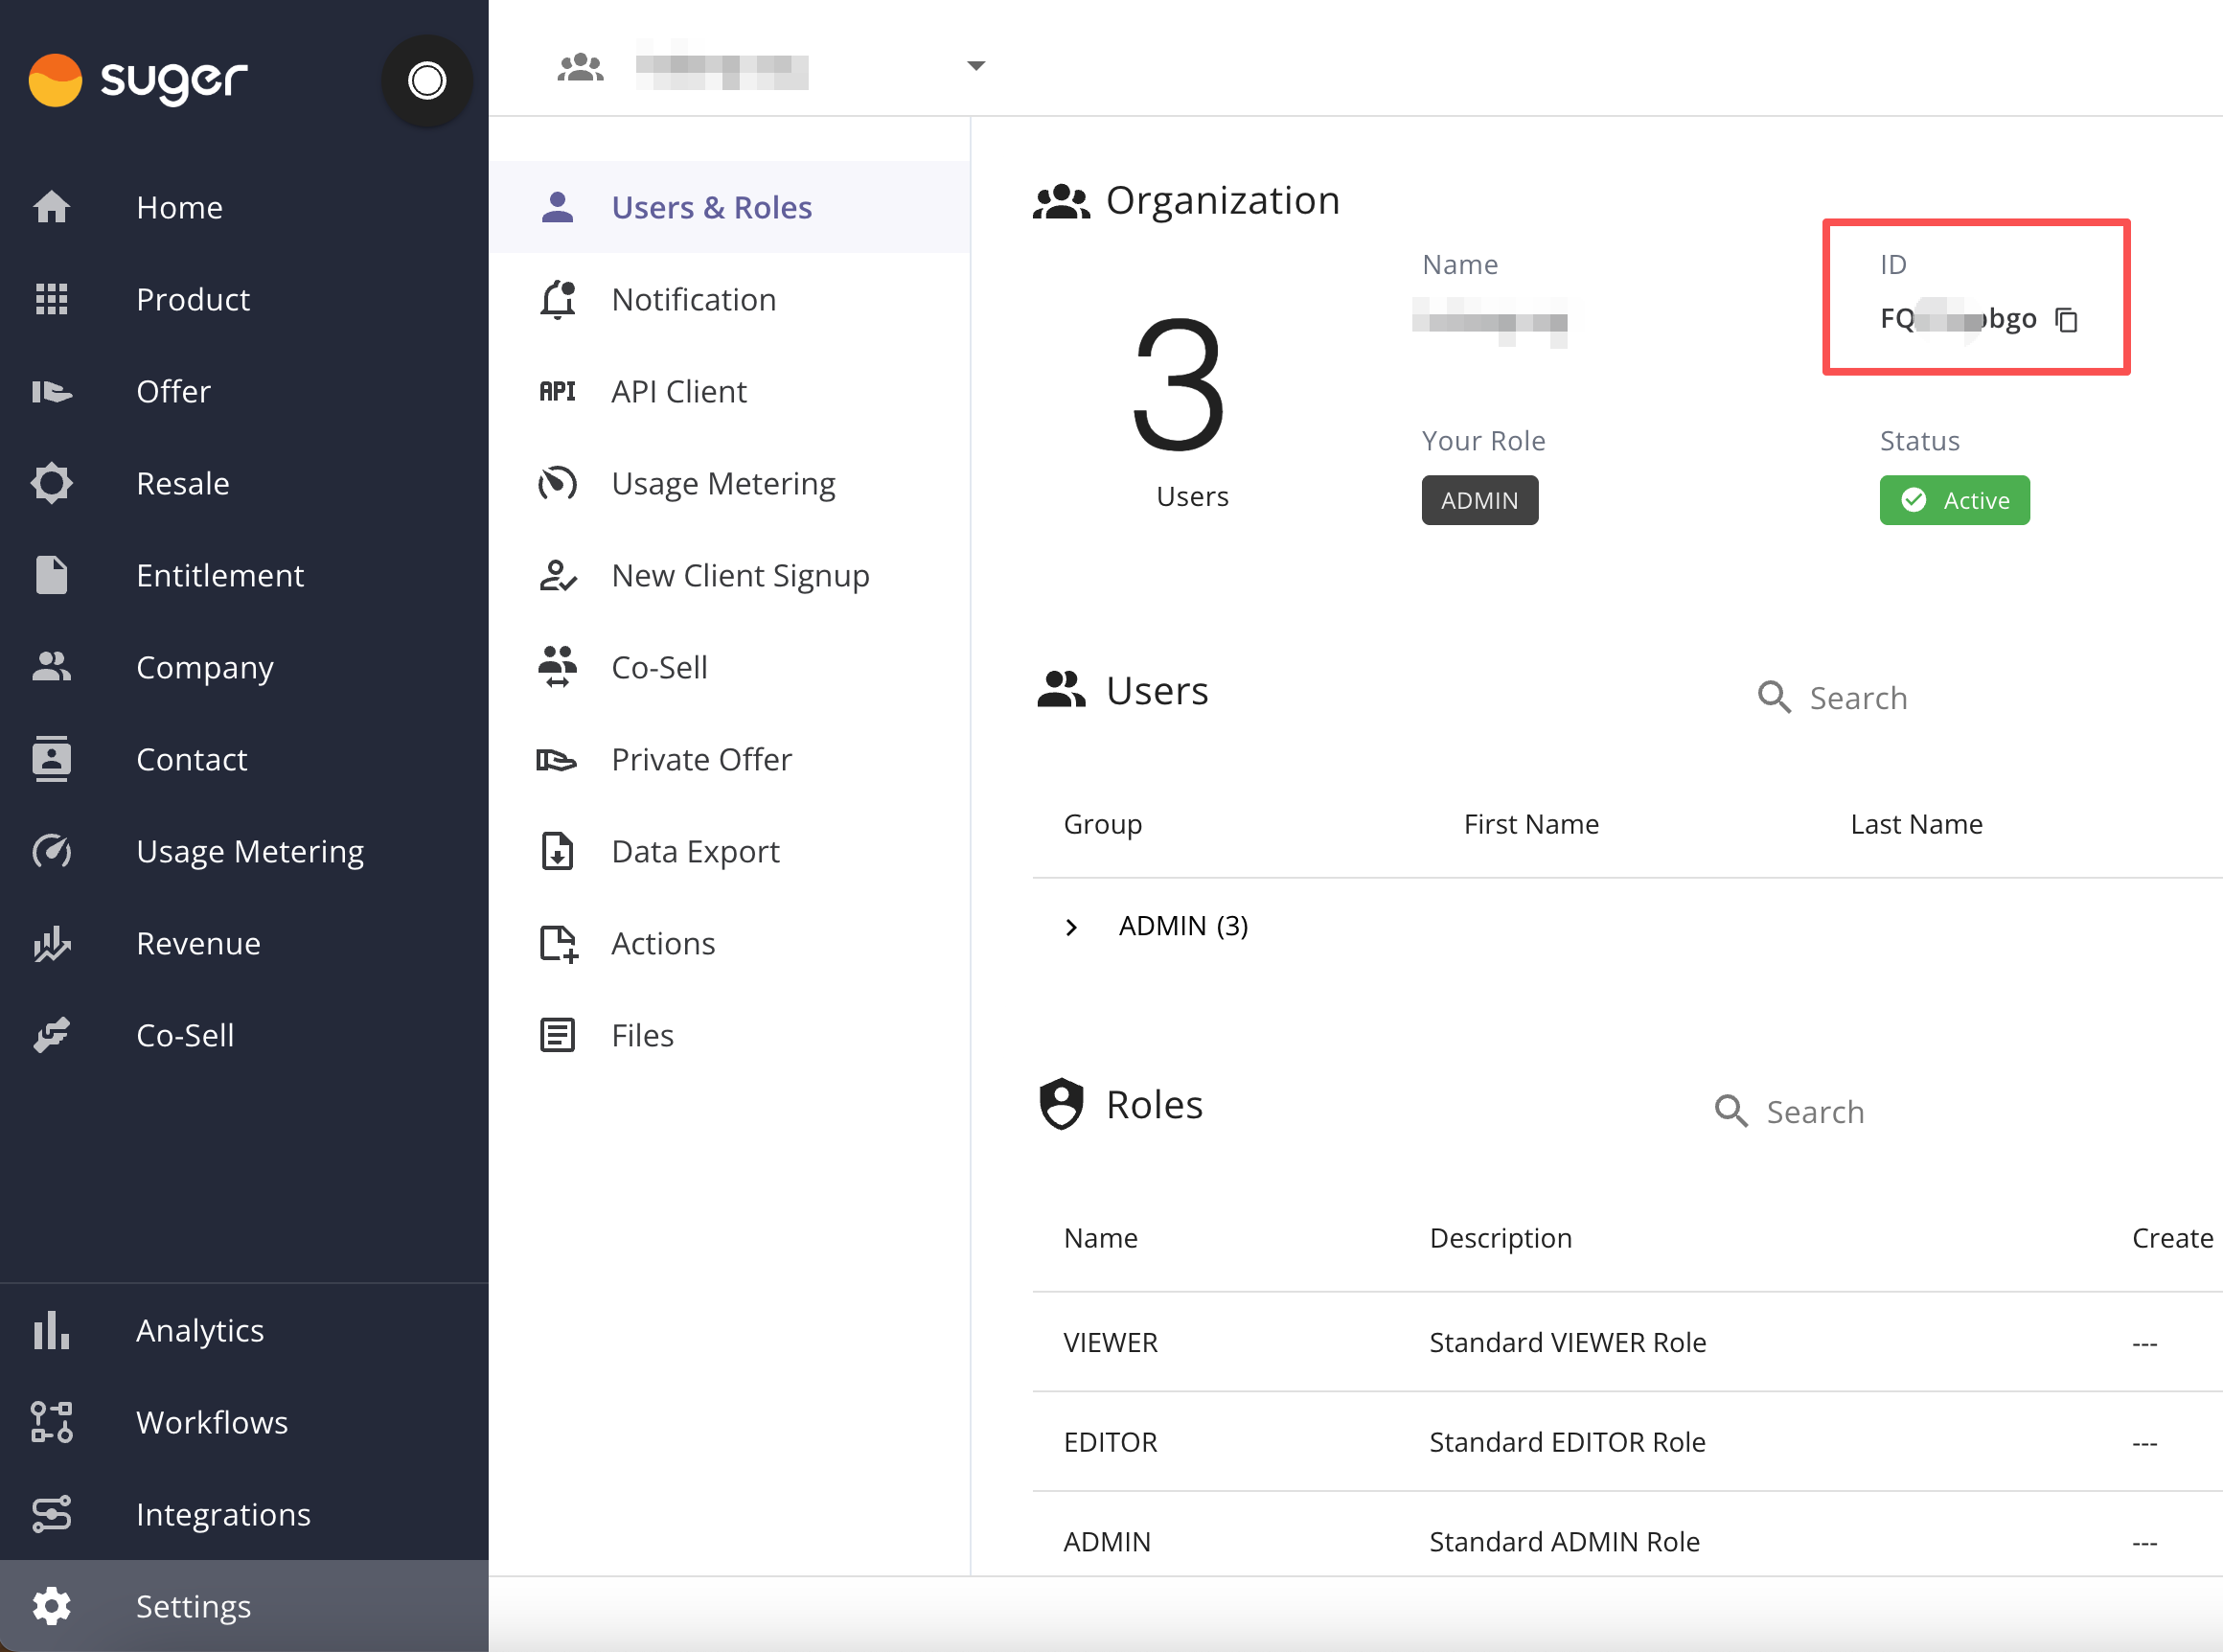 - **API Key**: generate in Suger Console → **Settings** → **[API Client](https://console.suger.io/settings?tab=api_client)**
- Follow the instructions at [API Client](https://doc.suger.io/get-started/oauth-app/#create-api-client-with-api-key)
2. Open Suger app in Salesforce
- In Salesforce, search for Suger under Apps and open it.
>
- **API Key**: generate in Suger Console → **Settings** → **[API Client](https://console.suger.io/settings?tab=api_client)**
- Follow the instructions at [API Client](https://doc.suger.io/get-started/oauth-app/#create-api-client-with-api-key)
2. Open Suger app in Salesforce
- In Salesforce, search for Suger under Apps and open it.
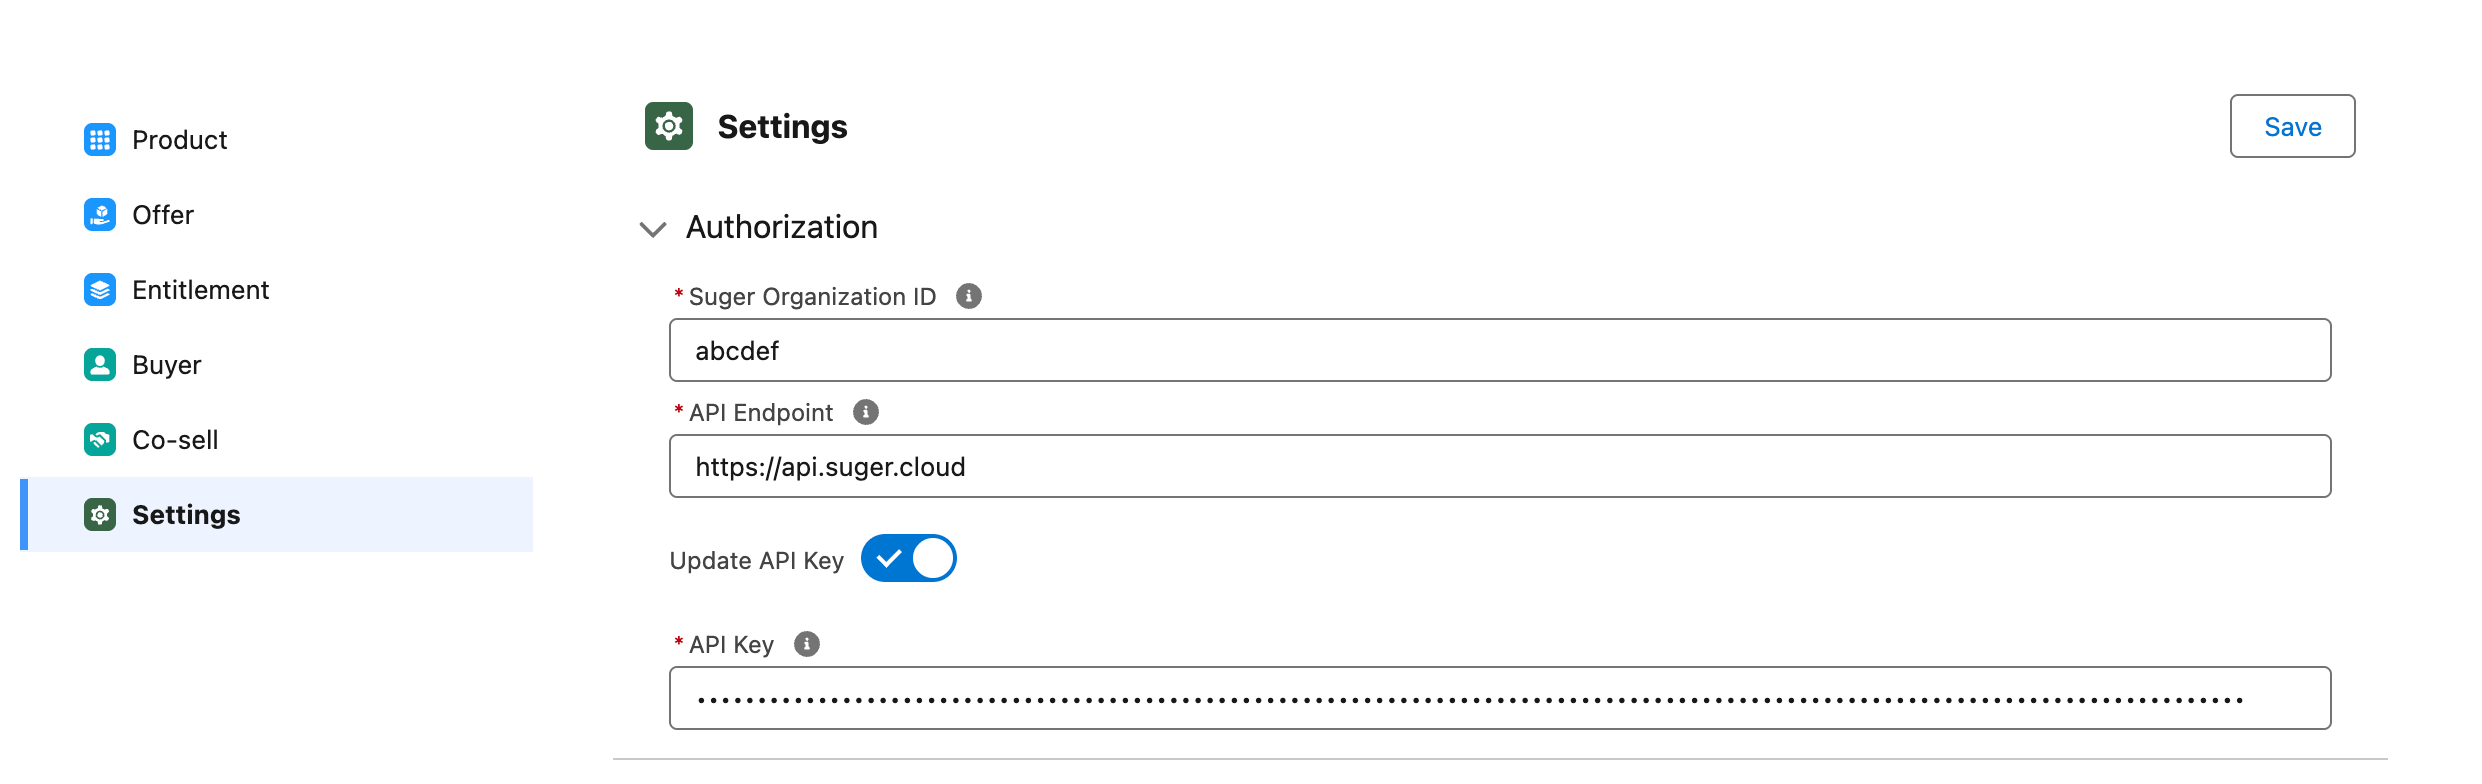
> 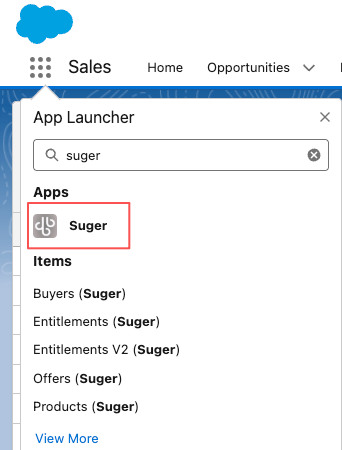 3. Enter settings in Salesforce
- Go to Settings inside the Suger app.
- Fill in:
- **Organization ID**
- **API Endpoint**: `https://api.suger.cloud`
- **API Key** (check no trailing spaces)
- Click Save.
>
3. Enter settings in Salesforce
- Go to Settings inside the Suger app.
- Fill in:
- **Organization ID**
- **API Endpoint**: `https://api.suger.cloud`
- **API Key** (check no trailing spaces)
- Click Save.
>  ### Configure Suger to Access Salesforce
This step configures Suger Console to connect to Salesforce using the Integration User.
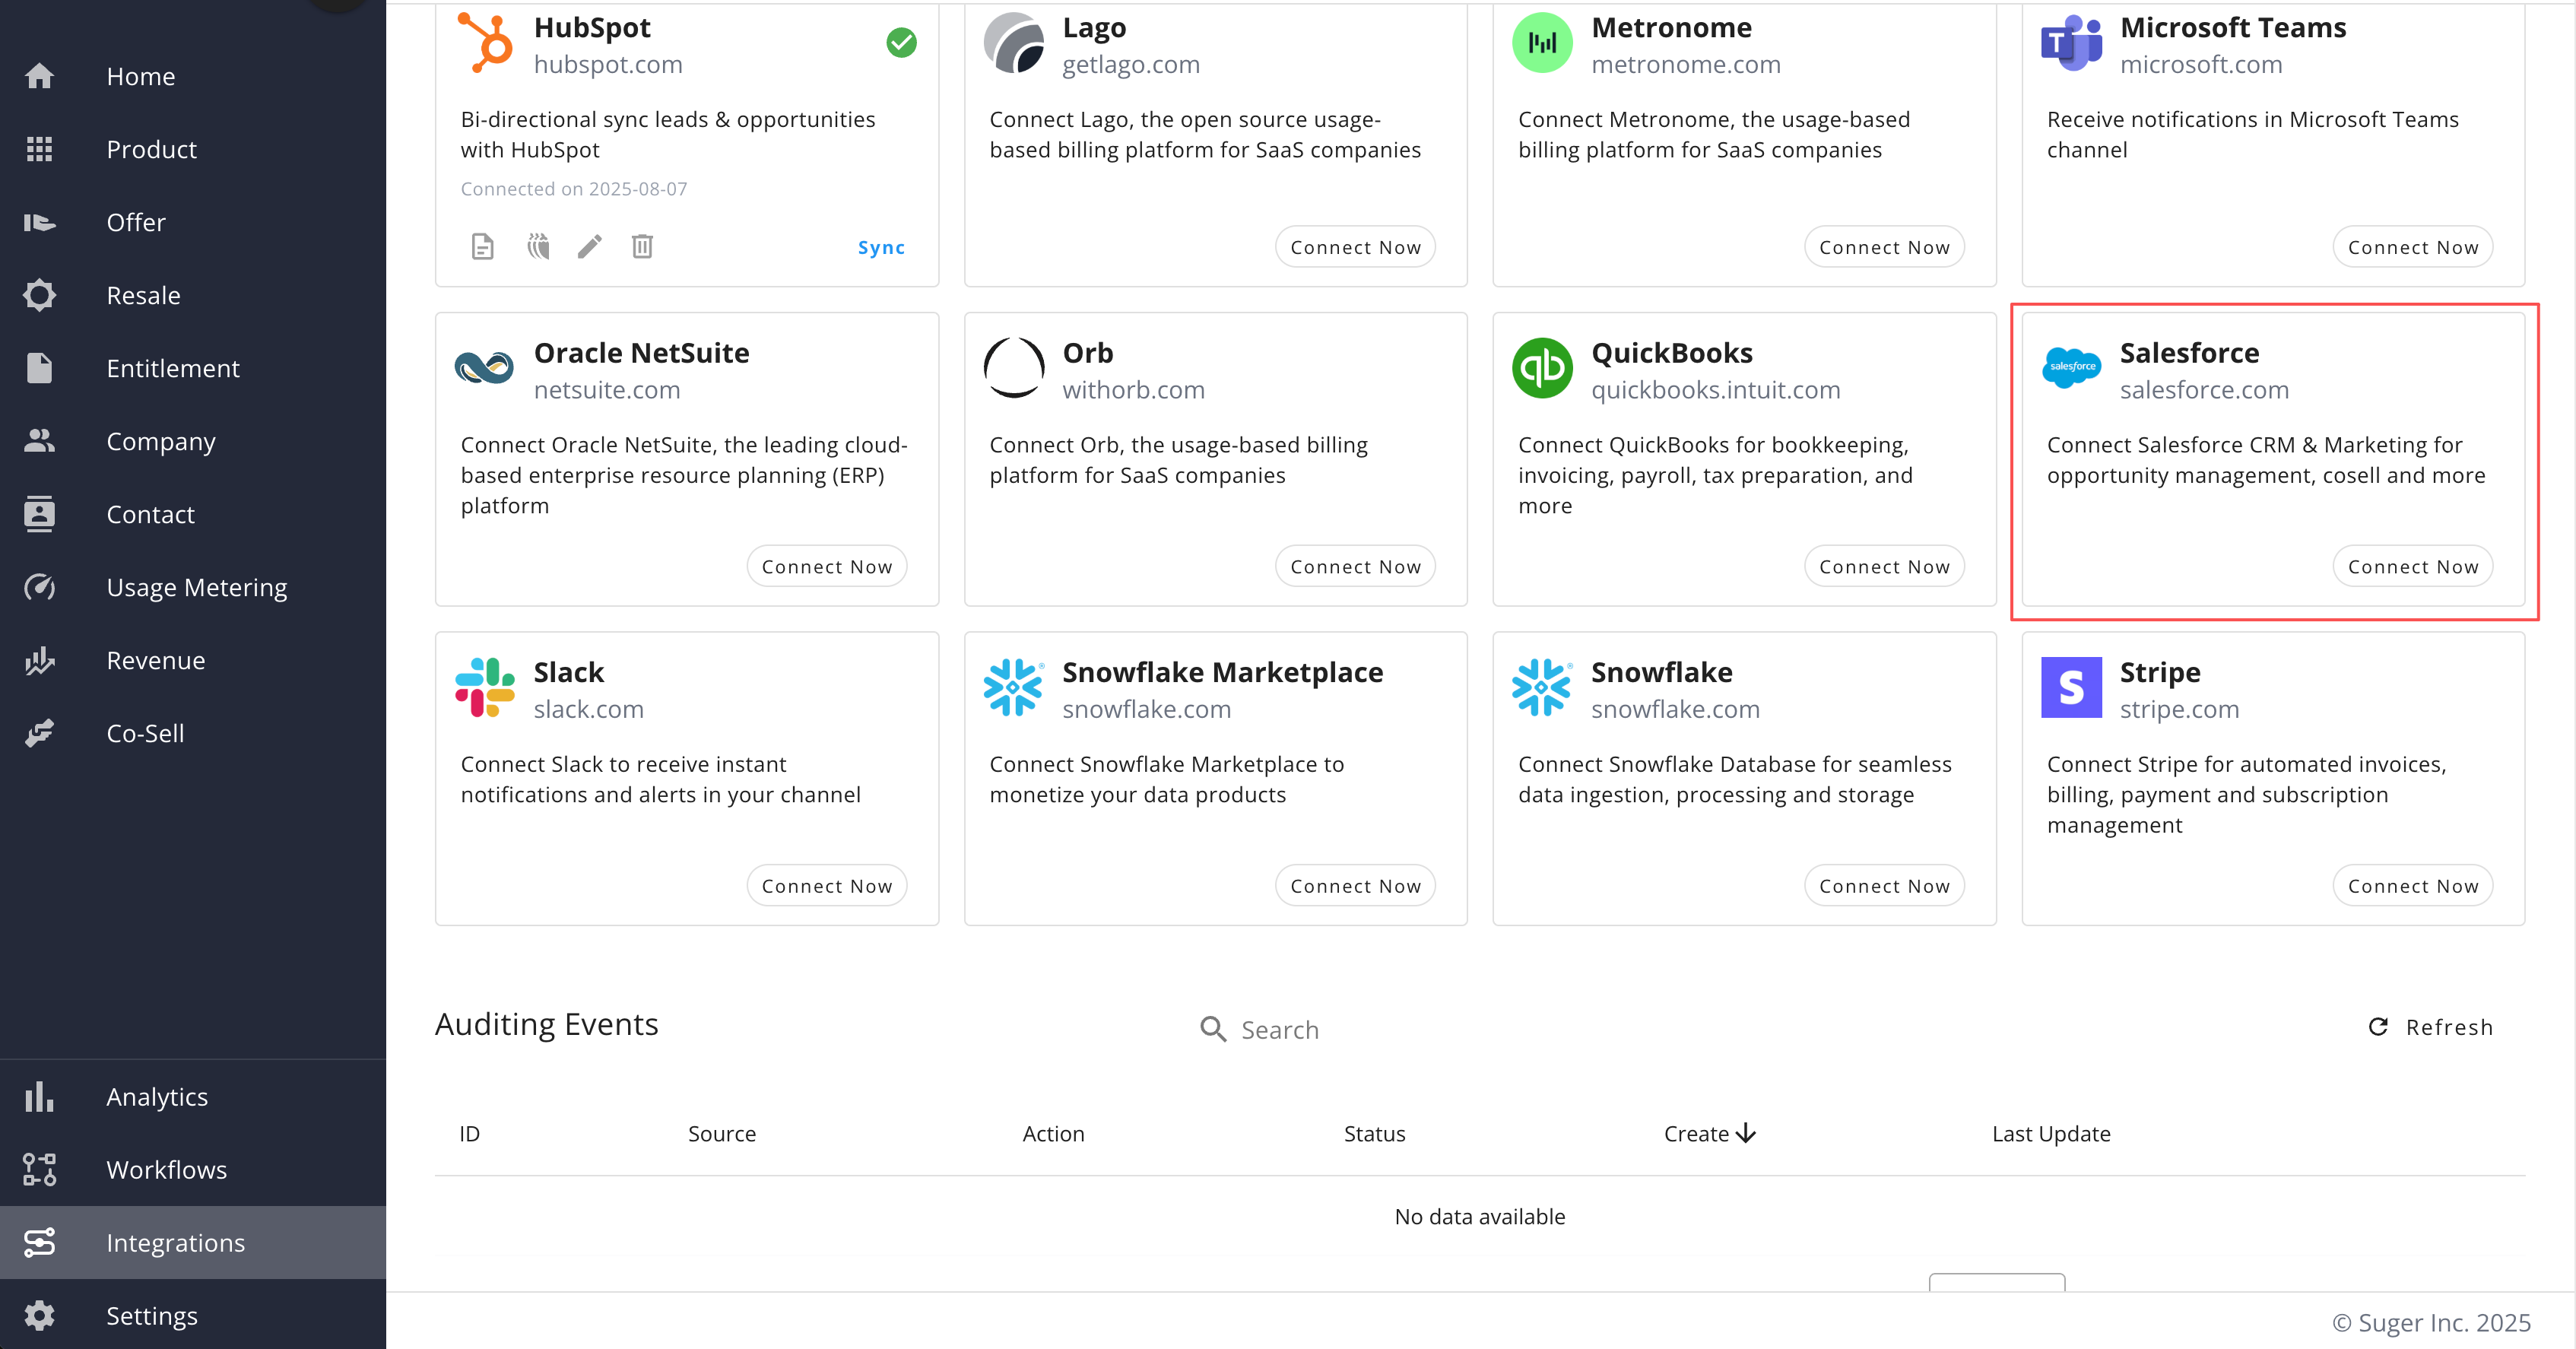
1. Go to [Integrations](https://console.suger.io/settings?tab=integrations) in Suger Console
- Navigate to Settings → Integrations → Salesforce.
- Click Connect Now.
>
### Configure Suger to Access Salesforce
This step configures Suger Console to connect to Salesforce using the Integration User.
1. Go to [Integrations](https://console.suger.io/settings?tab=integrations) in Suger Console
- Navigate to Settings → Integrations → Salesforce.
- Click Connect Now.
>  2. Select Environment
- Enter your **Salesforce Subdomain** (e.g., acme.my.salesforce.com).
- Check Sandbox if you are connecting to a sandbox org.
>
2. Select Environment
- Enter your **Salesforce Subdomain** (e.g., acme.my.salesforce.com).
- Check Sandbox if you are connecting to a sandbox org.
> 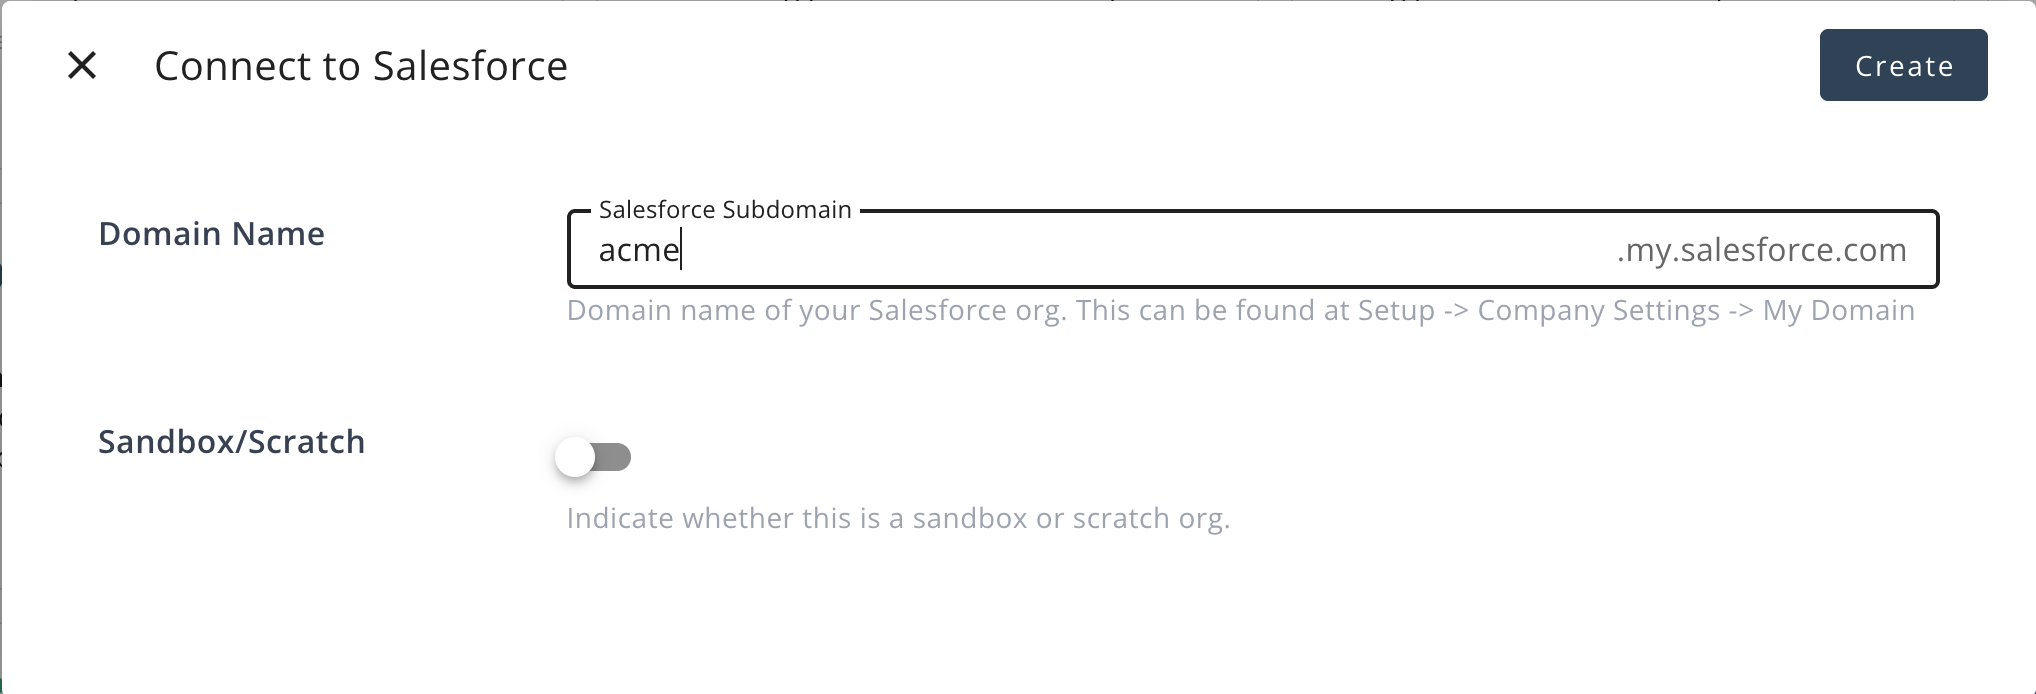 - Click Create
Find your **Salesforce Subdomain** in Salesforce Setup → Company Settings → My Domain.
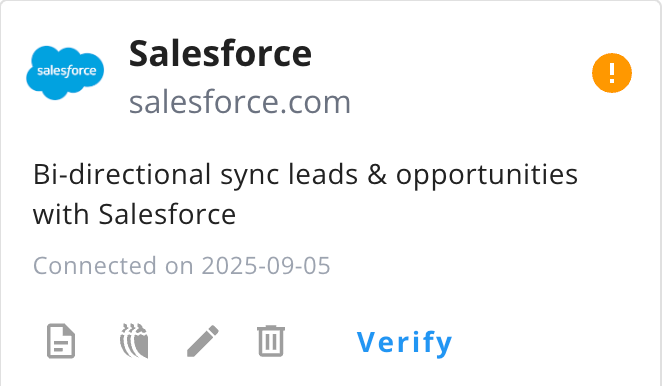
3. Verify the connection
- Click Verify.
>
- Click Create
Find your **Salesforce Subdomain** in Salesforce Setup → Company Settings → My Domain.
3. Verify the connection
- Click Verify.
>  #### Use Your Own External Client App
By default, Suger connects using its own managed OAuth app — you only need to enter your subdomain and click **Create**. If you prefer to connect with **your own** Salesforce External Client App (ECA) instead, toggle **Custom External Client App** on the connect form and enter its **Consumer Key** and **Consumer Secret**.
First, create the External Client App in Salesforce (**Setup → External Client App Manager → New External Client App**) and configure its OAuth settings:
- **Callback URL**: `https://api.suger.cloud/public/integration/salesforce/oauthCallback`
- **OAuth scopes**:
- **Manage user data via APIs** (`api`)
- **Perform requests at any time** (`refresh_token`, `offline_access`) — **required**. Without it Salesforce returns no refresh token and Suger rejects the connection (otherwise it would stop working once the first access token expires).
- **Access the identity URL service** (`id`) — optional; only needed if you enable **Change Data Capture (real-time sync)**, which uses your Salesforce org ID. Core sync, offers, and co-sell work without it.
- Under **Flow Enablement**, enable **Authorization Code and Credentials Flow** (the flow Suger uses).
- Under **Security**, enable **Require Proof Key for Code Exchange (PKCE)**.
- Leave **Enforce Refresh Token IP Allowlist** disabled, unless you add Suger's egress IPs to the allowlist (otherwise token refresh will fail).
> External Client Apps have no "valid until revoked" setting (that's a classic Connected App option). There is no fixed refresh-token expiry to configure; the only expiry is the optional **Limit Idle Refresh Token TTL to 30 Days**, which never triggers for an active integration that refreshes regularly.
Then enter the **Consumer Key** (as Client ID) and **Consumer Secret** on the Suger connect form and click **Create**.
:::note
The Consumer Secret is stored encrypted and is never exposed back to the browser. If you later rotate the secret in Salesforce, delete and recreate the integration to update it — editing it in place isn't supported.
:::
## User Interface Setup
### Enable Suger Widget on Opportunity Pages
Add the **Suger Opportunity Quick Panel** component to enable Suger features directly on opportunity records. For more details, see [Add Suger widgets and buttons to Salesforce pages](/salesforce-app/salesforce-app-page-components/).
1. Open Salesforce Setup → Object Manager → Opportunity → Lightning Record Pages.
2. Edit the **Opportunity Record Page**.
3. In the Components panel, search for Suger.
>
#### Use Your Own External Client App
By default, Suger connects using its own managed OAuth app — you only need to enter your subdomain and click **Create**. If you prefer to connect with **your own** Salesforce External Client App (ECA) instead, toggle **Custom External Client App** on the connect form and enter its **Consumer Key** and **Consumer Secret**.
First, create the External Client App in Salesforce (**Setup → External Client App Manager → New External Client App**) and configure its OAuth settings:
- **Callback URL**: `https://api.suger.cloud/public/integration/salesforce/oauthCallback`
- **OAuth scopes**:
- **Manage user data via APIs** (`api`)
- **Perform requests at any time** (`refresh_token`, `offline_access`) — **required**. Without it Salesforce returns no refresh token and Suger rejects the connection (otherwise it would stop working once the first access token expires).
- **Access the identity URL service** (`id`) — optional; only needed if you enable **Change Data Capture (real-time sync)**, which uses your Salesforce org ID. Core sync, offers, and co-sell work without it.
- Under **Flow Enablement**, enable **Authorization Code and Credentials Flow** (the flow Suger uses).
- Under **Security**, enable **Require Proof Key for Code Exchange (PKCE)**.
- Leave **Enforce Refresh Token IP Allowlist** disabled, unless you add Suger's egress IPs to the allowlist (otherwise token refresh will fail).
> External Client Apps have no "valid until revoked" setting (that's a classic Connected App option). There is no fixed refresh-token expiry to configure; the only expiry is the optional **Limit Idle Refresh Token TTL to 30 Days**, which never triggers for an active integration that refreshes regularly.
Then enter the **Consumer Key** (as Client ID) and **Consumer Secret** on the Suger connect form and click **Create**.
:::note
The Consumer Secret is stored encrypted and is never exposed back to the browser. If you later rotate the secret in Salesforce, delete and recreate the integration to update it — editing it in place isn't supported.
:::
## User Interface Setup
### Enable Suger Widget on Opportunity Pages
Add the **Suger Opportunity Quick Panel** component to enable Suger features directly on opportunity records. For more details, see [Add Suger widgets and buttons to Salesforce pages](/salesforce-app/salesforce-app-page-components/).
1. Open Salesforce Setup → Object Manager → Opportunity → Lightning Record Pages.
2. Edit the **Opportunity Record Page**.
3. In the Components panel, search for Suger.
> 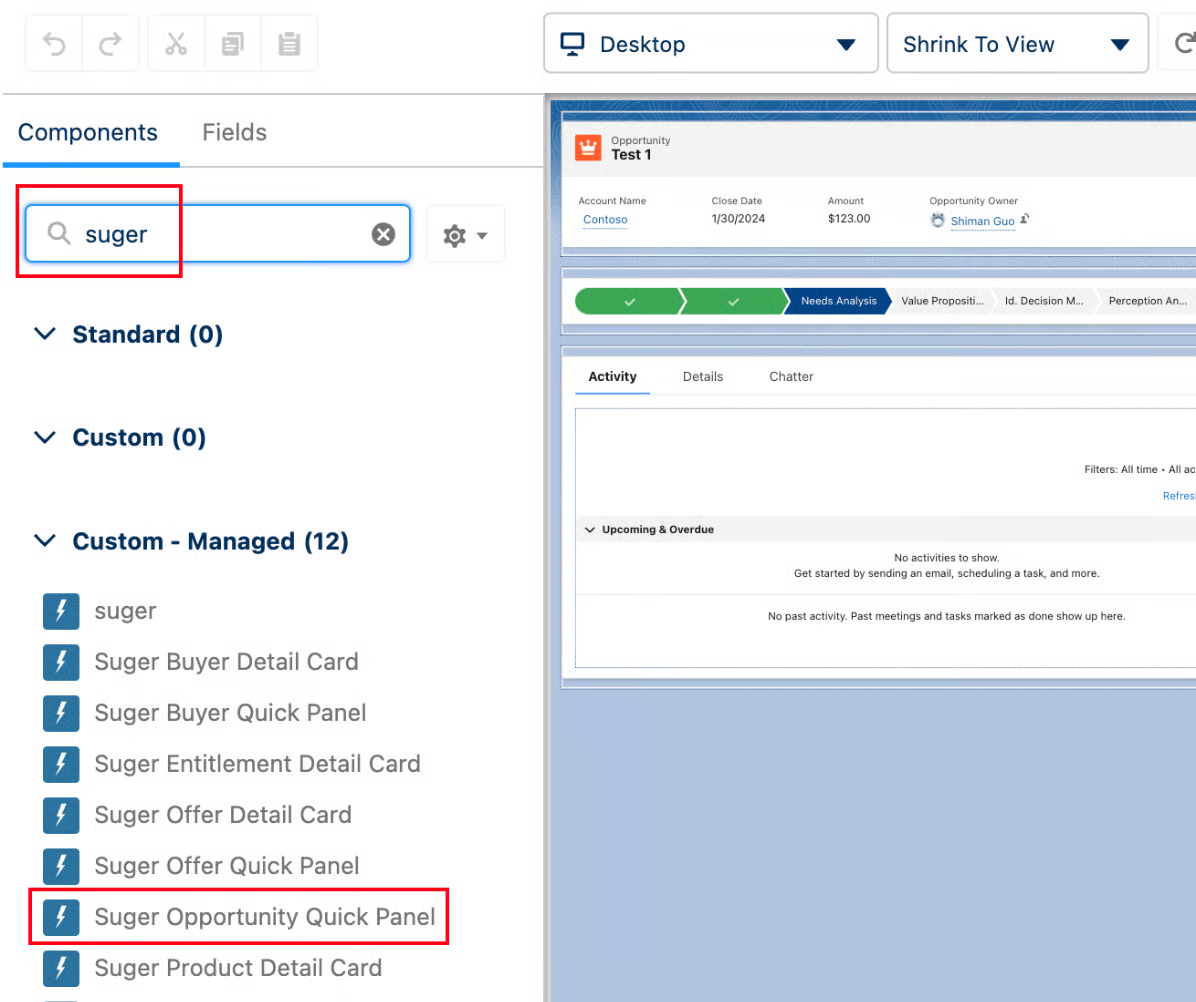 4. Drag and drop **Suger Opportunity Quick Panel** onto the page layout.
>
4. Drag and drop **Suger Opportunity Quick Panel** onto the page layout.
> 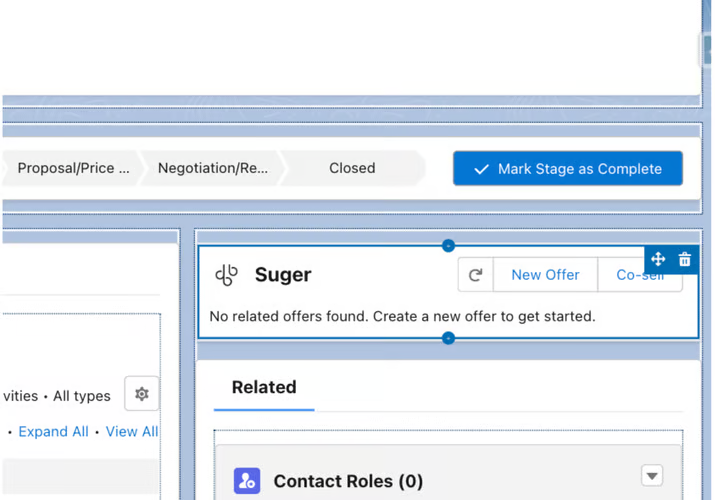 5. Save and activate the page.
When configured, users will see New Offer and Co-sell buttons on Opportunity records.
### Assign User Permissions
Your team will only see the correct Suger buttons if they are assigned the right Permission Set.
Suger provides three permission sets:
| Permission Set | Visible Features | Typical Use Case |
| ---------------------------- | ---------------------------------------------- | ------------------------------------------ |
| **Suger User – Marketplace** | Marketplace buttons only (e.g., **New Offer**) | Sales team managing offers |
| **Suger User – Cosell** | Co-sell button only | Business development team |
| **Suger User** | All functionalities | Power users, admins, or full-feature users |
Example: If a user is assigned Suger User – Cosell, they will only see the Co-sell button in the Suger Widget.
>
5. Save and activate the page.
When configured, users will see New Offer and Co-sell buttons on Opportunity records.
### Assign User Permissions
Your team will only see the correct Suger buttons if they are assigned the right Permission Set.
Suger provides three permission sets:
| Permission Set | Visible Features | Typical Use Case |
| ---------------------------- | ---------------------------------------------- | ------------------------------------------ |
| **Suger User – Marketplace** | Marketplace buttons only (e.g., **New Offer**) | Sales team managing offers |
| **Suger User – Cosell** | Co-sell button only | Business development team |
| **Suger User** | All functionalities | Power users, admins, or full-feature users |
Example: If a user is assigned Suger User – Cosell, they will only see the Co-sell button in the Suger Widget.
>  #### Custom Permissions
Under the hood, button visibility is controlled by the following Custom Permissions (under the Suger namespace). For more details, see [Suger custom permissions in Salesforce](/salesforce-app/salesforce-app-custom-permissions/).
- `Create Offer`
- `Create Referral`
### Co-sell Field Mapping
Link Salesforce fields (such as Amount or Close Date) to partner fields (such as Expected Revenue or Target Close Date) so co-sell referrals carry the right values. For more details, see [Configure Co-Sell Settings for Salesforce](/cosell/cosell-configuration/).
## Authentication & Security
Suger connects to your Salesforce org via the **OAuth 2.0 Authorization Code flow with PKCE**, with Refresh Token Rotation, 30-day idle TTL, and IP allowlist enforced at the External Client App level.
See [**Salesforce App → Authentication & Security**](/salesforce-app/salesforce-app-authentication-security) for the full reference — OAuth flow, token storage, required admin policy settings, revocation, and transport security.
## CRM Enrichment
Automatically populate Salesforce records with intelligence signals from Suger (engagement scores and marketplace metrics across AWS, Azure, GCP).
See [**Salesforce App → CRM Enrichment**](/salesforce-app/salesforce-app-crm-enrichment) for the full configuration guide — custom field setup, SOQL targeting, refresh-cycle controls, and sync progress tracking.
## Package Fields and Sync Behavior
The fields below ship with the **Suger managed package**. If your Salesforce org is on an older package version they do not exist in your schema yet — and because Suger [skips fields that are missing rather than failing the record](#when-something-fails), the rest of your sync keeps working while these values silently never appear.
**Upgrading the Suger managed package is therefore a prerequisite for the data in this section.** See [Install the Salesforce App](/salesforce-app/salesforce-app-install/) for the upgrade path.
### Recently added fields
All field names below carry the `Suger__` namespace in your org (for example `Suger__Entitlement__c.Suger__AWS_License_ARN__c`).
| Object | Field | What it carries |
| --- | --- | --- |
| `Entitlement__c` | `AWS_License_ARN__c` | The AWS license ARN for the entitlement. Written **only** for AWS entitlements that actually have a license ARN — it stays empty for Azure and GCP entitlements, and for AWS entitlements with no ARN. An empty value is normal, not a sync failure. |
| `Referral__c` | `PRM_Partner_ID__c` | The Suger PRM partner associated with the referral, so partner-sourced referrals can be reported on in Salesforce. |
| `Offer__c` | `Partner_ID__c` | The Suger partner associated with the offer. |
| `Entitlement__c` | `Partner_ID__c` | The Suger partner associated with the entitlement. |
| `Contact__c` | `Contact_ID_CS__c` | A second external ID on the contact — see [How Suger matches contacts](#how-suger-matches-contacts) below before you build anything on it. |
### Sync behavior notes
**Entitlement name and dates now follow the latest term.** `Entitlement__c`'s **Name**, **Start Date** and **Creation Date** reflect the **latest** entitlement term and its linked offer, rather than the original one the entitlement was created from. This fixes renewed entitlements showing stale values.
:::caution
This changes existing records. After a renewal, an entitlement's Name, Start Date and Creation Date **will change** to the renewal's values on the next backfill. If you have reports, list views, or automation that assume Start Date is the *original* subscription start, revisit them — that date now moves when the customer renews.
:::
**Products not yet listed on a marketplace are skipped, not fatal.** A product with no external ID (because it has not been listed on a marketplace yet) is now skipped during backfill. Previously it aborted the whole backfill with a required-field error, so a single unlisted product could block every other object from syncing.
**Partner-to-partner co-sell referrals are included in the periodic backfill.** Suger partner-to-partner co-sell referrals now sync on the regular 4-hourly backfill, not only when a single record is synced on demand. If you were re-syncing these by hand, you no longer need to.
### How Suger matches contacts
Suger identifies partner contacts in Salesforce by `Suger__Contact_ID__c`. A second external ID, `Suger__Contact_ID_CS__c` ("Contact ID (Case-Sensitive)"), is also populated with the same value on every sync, but it is **not** used for matching — it is being staged for a future migration. Orgs on an older Suger package that lacks `Suger__Contact_ID_CS__c` sync normally; the field is optional and its absence does not block contact sync.
:::note
Because `Suger__Contact_ID_CS__c` is not the matching key, do not build deduplication rules, matching rules, or integrations on it yet. `Suger__Contact_ID__c` remains the field that identifies a contact.
:::
## Suger AI Tools
Suger AI uses a **middleware** strategy — wrapping the Salesforce REST API directly.
> **Org-level only**: Salesforce tools use the org-level integration credentials.
| Tool | Description |
|------|-------------|
| `salesforce_query` | Execute a SOQL query against Salesforce |
| `salesforce_search` | Execute a SOSL search across Salesforce objects |
| `salesforce_list_objects` | List all available sObject types |
| `salesforce_describe_object` | Describe an sObject type (fields, metadata, picklist values) |
| `salesforce_get_record` | Get a single record by sObject type and ID |
| `salesforce_create_record` | Create a new record |
| `salesforce_update_record` | Update fields on an existing record |
| `salesforce_delete_record` | Delete a record by sObject type and ID |
## Troubleshooting
| Issue | Possible Cause | Resolution |
| --- | --- | --- |
| "New Offer" button is missing | Permission set or page layout issue | Verify the correct Suger permission set is assigned and force-refresh the browser (Ctrl+Shift+R, or Cmd+R on Mac) |
| User sees the wrong button after being assigned a permission set | Salesforce may have auto-enabled extra custom permissions during package install | Check the user's profile for unnecessary custom permissions under the Suger namespace and uncheck them |
| Suger can't read or sync certain records | Missing Read/View All access on Account, Contact, Opportunity, or mapped fields | Confirm Field-Level Security and object permissions on the Integration User's permission set |
| Integration User can't log in or perform expected actions | Salesforce Integration License is API-only | Business users need a full Salesforce License and the correct permission set, not the Integration License |
| "Copy Offer URL" does nothing | Cloud marketplace latency | AWS or Azure can take 3–5 minutes to generate a URL. Wait and refresh. |
| `STORAGE_LIMIT_EXCEEDED` | Sync logs are filling a Sandbox | Delete sync logs via the Suger Console, or set a shorter log retention period in Settings |
| Products not visible in the Salesforce Suger app | Sync hasn't been triggered yet | Go to the Products tab in the Salesforce Suger App and click Refresh |
## Frequently Asked Questions
**How long does the integration take?**
A standard setup typically takes 10–15 minutes.
**What authentication method does Suger use to connect with Salesforce?**
OAuth 2.0 Authorization Code flow with PKCE, through a dedicated Integration User. Suger never requires or stores a username and password.
**Can we create Agreement-Based Offers (ABO) from Salesforce?**
Yes, directly within the Salesforce widget.
**Will ACE referrals show up in Salesforce?**
Yes. Referrals submitted from the Salesforce widget link automatically to the Opportunity. Referrals submitted from the Suger Console can be linked manually by adding the connected Opportunity ID. Referrals submitted directly from ACE can also be found and linked manually in Salesforce.
**Does Suger edit our native objects, like Opportunities or Accounts?**
No. The Suger managed package only creates custom objects it manages (Offers, Referrals, Entitlements, Contacts, etc.). Suger only edits native objects if explicitly given write access for a specific purpose, such as writing engagement scores to an Account or offer details back to an Opportunity.
**How do I map standard, custom, or CPQ fields to Suger private offer fields?**
Configure field mappings in the Suger Console under your Salesforce Integration settings. Suger supports one-to-one mappings, picklist value mappings, and an Expression Mode (SOQL) for conditional logic. If your mapping involves CPQ quotes (`SBQQ__Quote__c`), the Integration User needs both a standard Salesforce License and a CPQ license.
**Why can't Suger see or sync certain opportunities?**
Suger's visibility is entirely determined by the Integration User's sharing rules and permissions. Confirm the Integration User's permission set grants Read and View All access to Account, Contact, and Opportunity, plus any mapped custom fields.
**How do I set up separate Sandbox and Production environments?**
Create separate integrations for each. In Suger Console, create a dedicated testing organization, then check the Sandbox box and enter your Sandbox subdomain when configuring that integration.
**Can I build reports combining Salesforce Opportunities with Suger offer and referral data?**
Yes. Suger syncs marketplace data into custom objects like `Offer__c`, `Referral__c`, and `Entitlement__c`. Create Custom Report Types (for example, "Opportunities with Suger Offers") to report on this data. Due to standard Salesforce reporting limits, Referrals and Entitlements can't be joined in a single report — use two separate reports.
**How do I protect standard fields, like Stage Name, from being overwritten during sync?**
Use Salesforce validation rules to restrict edits on the field, or map the incoming data to a read-only custom field instead.
## Removing the Integration
To completely remove the Salesforce integration:
### From Suger Console
1. Navigate to **Suger Console** → **Settings** → **Integrations** → **Salesforce**
2. Click the 🗑️ **Delete** button
3. This removes stored credentials from Suger
### From Salesforce
1. Go to **Setup** → **Connected Apps OAuth Usage**
2. Locate the **Suger Connected App**
3. Click the **User Count** link
4. Click **Revoke** (specific user) or **Revoke All** (all users)
:::note
If the User Count shows 0, the integration has already been fully revoked.
:::
#### Custom Permissions
Under the hood, button visibility is controlled by the following Custom Permissions (under the Suger namespace). For more details, see [Suger custom permissions in Salesforce](/salesforce-app/salesforce-app-custom-permissions/).
- `Create Offer`
- `Create Referral`
### Co-sell Field Mapping
Link Salesforce fields (such as Amount or Close Date) to partner fields (such as Expected Revenue or Target Close Date) so co-sell referrals carry the right values. For more details, see [Configure Co-Sell Settings for Salesforce](/cosell/cosell-configuration/).
## Authentication & Security
Suger connects to your Salesforce org via the **OAuth 2.0 Authorization Code flow with PKCE**, with Refresh Token Rotation, 30-day idle TTL, and IP allowlist enforced at the External Client App level.
See [**Salesforce App → Authentication & Security**](/salesforce-app/salesforce-app-authentication-security) for the full reference — OAuth flow, token storage, required admin policy settings, revocation, and transport security.
## CRM Enrichment
Automatically populate Salesforce records with intelligence signals from Suger (engagement scores and marketplace metrics across AWS, Azure, GCP).
See [**Salesforce App → CRM Enrichment**](/salesforce-app/salesforce-app-crm-enrichment) for the full configuration guide — custom field setup, SOQL targeting, refresh-cycle controls, and sync progress tracking.
## Package Fields and Sync Behavior
The fields below ship with the **Suger managed package**. If your Salesforce org is on an older package version they do not exist in your schema yet — and because Suger [skips fields that are missing rather than failing the record](#when-something-fails), the rest of your sync keeps working while these values silently never appear.
**Upgrading the Suger managed package is therefore a prerequisite for the data in this section.** See [Install the Salesforce App](/salesforce-app/salesforce-app-install/) for the upgrade path.
### Recently added fields
All field names below carry the `Suger__` namespace in your org (for example `Suger__Entitlement__c.Suger__AWS_License_ARN__c`).
| Object | Field | What it carries |
| --- | --- | --- |
| `Entitlement__c` | `AWS_License_ARN__c` | The AWS license ARN for the entitlement. Written **only** for AWS entitlements that actually have a license ARN — it stays empty for Azure and GCP entitlements, and for AWS entitlements with no ARN. An empty value is normal, not a sync failure. |
| `Referral__c` | `PRM_Partner_ID__c` | The Suger PRM partner associated with the referral, so partner-sourced referrals can be reported on in Salesforce. |
| `Offer__c` | `Partner_ID__c` | The Suger partner associated with the offer. |
| `Entitlement__c` | `Partner_ID__c` | The Suger partner associated with the entitlement. |
| `Contact__c` | `Contact_ID_CS__c` | A second external ID on the contact — see [How Suger matches contacts](#how-suger-matches-contacts) below before you build anything on it. |
### Sync behavior notes
**Entitlement name and dates now follow the latest term.** `Entitlement__c`'s **Name**, **Start Date** and **Creation Date** reflect the **latest** entitlement term and its linked offer, rather than the original one the entitlement was created from. This fixes renewed entitlements showing stale values.
:::caution
This changes existing records. After a renewal, an entitlement's Name, Start Date and Creation Date **will change** to the renewal's values on the next backfill. If you have reports, list views, or automation that assume Start Date is the *original* subscription start, revisit them — that date now moves when the customer renews.
:::
**Products not yet listed on a marketplace are skipped, not fatal.** A product with no external ID (because it has not been listed on a marketplace yet) is now skipped during backfill. Previously it aborted the whole backfill with a required-field error, so a single unlisted product could block every other object from syncing.
**Partner-to-partner co-sell referrals are included in the periodic backfill.** Suger partner-to-partner co-sell referrals now sync on the regular 4-hourly backfill, not only when a single record is synced on demand. If you were re-syncing these by hand, you no longer need to.
### How Suger matches contacts
Suger identifies partner contacts in Salesforce by `Suger__Contact_ID__c`. A second external ID, `Suger__Contact_ID_CS__c` ("Contact ID (Case-Sensitive)"), is also populated with the same value on every sync, but it is **not** used for matching — it is being staged for a future migration. Orgs on an older Suger package that lacks `Suger__Contact_ID_CS__c` sync normally; the field is optional and its absence does not block contact sync.
:::note
Because `Suger__Contact_ID_CS__c` is not the matching key, do not build deduplication rules, matching rules, or integrations on it yet. `Suger__Contact_ID__c` remains the field that identifies a contact.
:::
## Suger AI Tools
Suger AI uses a **middleware** strategy — wrapping the Salesforce REST API directly.
> **Org-level only**: Salesforce tools use the org-level integration credentials.
| Tool | Description |
|------|-------------|
| `salesforce_query` | Execute a SOQL query against Salesforce |
| `salesforce_search` | Execute a SOSL search across Salesforce objects |
| `salesforce_list_objects` | List all available sObject types |
| `salesforce_describe_object` | Describe an sObject type (fields, metadata, picklist values) |
| `salesforce_get_record` | Get a single record by sObject type and ID |
| `salesforce_create_record` | Create a new record |
| `salesforce_update_record` | Update fields on an existing record |
| `salesforce_delete_record` | Delete a record by sObject type and ID |
## Troubleshooting
| Issue | Possible Cause | Resolution |
| --- | --- | --- |
| "New Offer" button is missing | Permission set or page layout issue | Verify the correct Suger permission set is assigned and force-refresh the browser (Ctrl+Shift+R, or Cmd+R on Mac) |
| User sees the wrong button after being assigned a permission set | Salesforce may have auto-enabled extra custom permissions during package install | Check the user's profile for unnecessary custom permissions under the Suger namespace and uncheck them |
| Suger can't read or sync certain records | Missing Read/View All access on Account, Contact, Opportunity, or mapped fields | Confirm Field-Level Security and object permissions on the Integration User's permission set |
| Integration User can't log in or perform expected actions | Salesforce Integration License is API-only | Business users need a full Salesforce License and the correct permission set, not the Integration License |
| "Copy Offer URL" does nothing | Cloud marketplace latency | AWS or Azure can take 3–5 minutes to generate a URL. Wait and refresh. |
| `STORAGE_LIMIT_EXCEEDED` | Sync logs are filling a Sandbox | Delete sync logs via the Suger Console, or set a shorter log retention period in Settings |
| Products not visible in the Salesforce Suger app | Sync hasn't been triggered yet | Go to the Products tab in the Salesforce Suger App and click Refresh |
## Frequently Asked Questions
**How long does the integration take?**
A standard setup typically takes 10–15 minutes.
**What authentication method does Suger use to connect with Salesforce?**
OAuth 2.0 Authorization Code flow with PKCE, through a dedicated Integration User. Suger never requires or stores a username and password.
**Can we create Agreement-Based Offers (ABO) from Salesforce?**
Yes, directly within the Salesforce widget.
**Will ACE referrals show up in Salesforce?**
Yes. Referrals submitted from the Salesforce widget link automatically to the Opportunity. Referrals submitted from the Suger Console can be linked manually by adding the connected Opportunity ID. Referrals submitted directly from ACE can also be found and linked manually in Salesforce.
**Does Suger edit our native objects, like Opportunities or Accounts?**
No. The Suger managed package only creates custom objects it manages (Offers, Referrals, Entitlements, Contacts, etc.). Suger only edits native objects if explicitly given write access for a specific purpose, such as writing engagement scores to an Account or offer details back to an Opportunity.
**How do I map standard, custom, or CPQ fields to Suger private offer fields?**
Configure field mappings in the Suger Console under your Salesforce Integration settings. Suger supports one-to-one mappings, picklist value mappings, and an Expression Mode (SOQL) for conditional logic. If your mapping involves CPQ quotes (`SBQQ__Quote__c`), the Integration User needs both a standard Salesforce License and a CPQ license.
**Why can't Suger see or sync certain opportunities?**
Suger's visibility is entirely determined by the Integration User's sharing rules and permissions. Confirm the Integration User's permission set grants Read and View All access to Account, Contact, and Opportunity, plus any mapped custom fields.
**How do I set up separate Sandbox and Production environments?**
Create separate integrations for each. In Suger Console, create a dedicated testing organization, then check the Sandbox box and enter your Sandbox subdomain when configuring that integration.
**Can I build reports combining Salesforce Opportunities with Suger offer and referral data?**
Yes. Suger syncs marketplace data into custom objects like `Offer__c`, `Referral__c`, and `Entitlement__c`. Create Custom Report Types (for example, "Opportunities with Suger Offers") to report on this data. Due to standard Salesforce reporting limits, Referrals and Entitlements can't be joined in a single report — use two separate reports.
**How do I protect standard fields, like Stage Name, from being overwritten during sync?**
Use Salesforce validation rules to restrict edits on the field, or map the incoming data to a read-only custom field instead.
## Removing the Integration
To completely remove the Salesforce integration:
### From Suger Console
1. Navigate to **Suger Console** → **Settings** → **Integrations** → **Salesforce**
2. Click the 🗑️ **Delete** button
3. This removes stored credentials from Suger
### From Salesforce
1. Go to **Setup** → **Connected Apps OAuth Usage**
2. Locate the **Suger Connected App**
3. Click the **User Count** link
4. Click **Revoke** (specific user) or **Revoke All** (all users)
:::note
If the User Count shows 0, the integration has already been fully revoked.
:::